This post may contain affiliate links. Please see our full Disclosure Policy for details.
We’ve all done it: tossed an empty tin can into the recycling bin without a second thought to reuse. But what if those humble cans held the key to unlocking your next brilliant DIY project? Instead of seeing them as trash, let’s start seeing them as treasure-in-waiting!
With a little creativity, those empty tin cans can be transformed into stunning decor pieces, practical organizers, charming planters, and even unique gift items. This article is packed with over 30 creative, practical, and downright brilliant ways to give empty tin cans a new lease on life.

Tin Can Repurpose Ideas
What Can You Create with Empty Tin Cans?
The possibilities are endless! With just a touch of imagination, you can transform empty tin cans into beautiful and functional items for both your home and garden. Whether you’re looking to decorate for the holidays, organize your kitchen, or entertain the kids, there’s something here for everyone.
1. Tin Can Planter Ideas
Mini Indoor Planters
Paint your cans in bright colors or wrap them with twine or fabric to make beautiful indoor planters. Perfect for herbs or succulents!
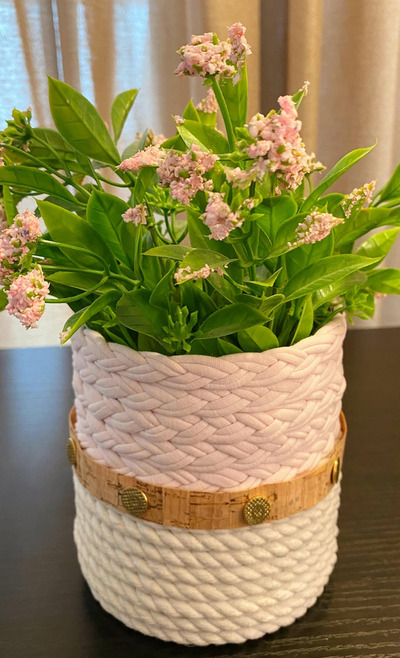
- Rope Planter – Add a modern minimalist touch. Hot glue rope and braided ribbons to match your decor.
- Hand-Painted Floral Planters – Add a vintage feel with intricate floral designs.

- Decoupage planter – Add wooden beads as feet to your planter for aesthetics.

Outdoor Garden Planters
Make your garden pop with quirky, colorful planters using old cans.
- DIY Garden Insect Decor – Create ladybugs, bees, and butterflies to charm your flower beds.


- Tin Can Train Planter – Line up several cans to form a painted train for trailing plants.

- French Vintage Can Pots – Use printed labels and distressing techniques for a rustic European look.
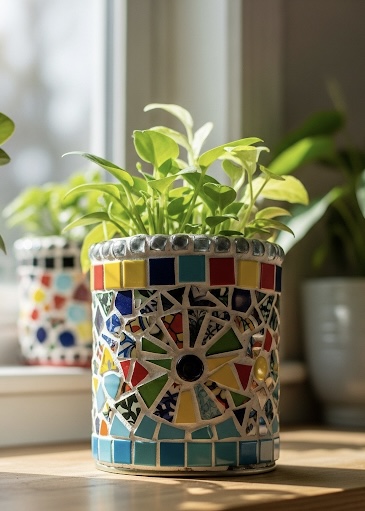
- Mosaic Pots – Turn ordinary tin cans into piece of art with glass tiles and grout.
- Herb Planters – Chic and modern

2. Tin Can Garden Ideas and Bird Feeders
Help local wildlife with these eco-friendly upcycles
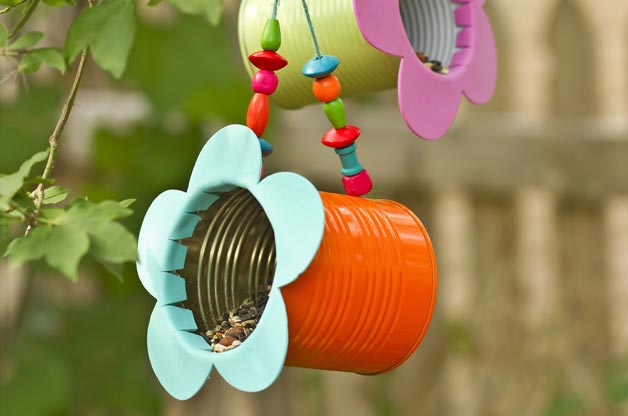
- Hanging Bird Feeder – Attach twine and fill with seeds; hang from a branch or hook.
- Perch and Feed – Add a stick perch and lid shelter for an adorable garden feature.
- Painted Birdhouses – Create cozy homes for small birds with colorful designs.
- Butterfly Feeder Nectar Cups – Fill decorated cans with sponge and sugar water to attract pollinators.
- Garden Markers – Turn tin cans into plant markers with decorative touch.

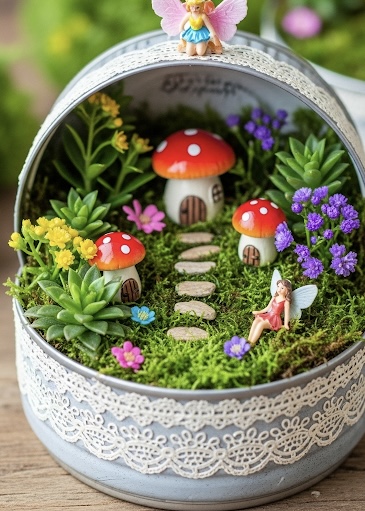
- Fairy Garden – Turn tin cans into miniature gardens and enhance your piece with mini clay art.

- Bug hotel – Create an insect hotel and learn what goes in basic DIY bug hotels.

Outdoor-safe paint and weatherproof sealer are recommended. Line the can rims with foam or air dry clay to protect the birds.
3. Holiday and Seasonal Tin Can Crafts
Christmas Tin Can Decorations
- Tree Ornaments – Hang painted mini cans as vintage-style tree decorations.
- Reindeer Candle Holders – Add charm with hand-painted reindeer faces or fabric wraps.
- Christmas Tree Planters – Use white-themed cans for mini tabletop tree displays.
Fall and Halloween Decorations
- Rustic Pinecone Centerpieces – Combine tin cans, pinecones, and candles for cozy decor

- Fall Leaf Luminaries – Punch leaf shapes into cans and add candles to cast autumnal glow.

- Tin Can Fall Luminary – Instead of focusing on neatly punching patterns on tin can, cutout a large portion of tin can and cover with decorative pattern cutout paper. This is perfect for battery-operated candles.

Creative little hands
- Spooky Tin Can Monsters – Paint cans like pumpkins, ghosts, or creepy faces for your porch or mantel.

- Spooky Halloween Lanterns – Add string lights

- Lanterns and Luminaries – Drill patterns into cans for eerie candlelight effects.

- Spring Centerpiece – A charming flower display on a tray in tin cans.

- Easter Bunny Cans – Paint cans in pastel shades with bunny faces or egg motifs.
Creative Gift Packaging: Wrap small gifts in decorated tin cans for a handmade touch.
- Birthday Gift Cans – Fill with candy, jewelry, or gift cards and wrap with colorful paper or fabric.
- Graduation Gift Canisters – Add motivational quotes and tuck in money or sweets.
4. Tin Can Candle Holders and Luminaries
Create cozy lighting for indoor or outdoor use
- Pattern-Punched Luminaries – Drill or punch decorative holes and place tealights inside.

- Hanging Garden Lanterns – Hang multiple cans along a patio with string lights inside.
- Scented Candle Containers – Pour wax into decorated tin cans to make your own candles.

- Rustic Holiday Candle Holders – Perfect for fall or winter tablescapes with pinecones or leaves.
Seal the inside with heat-resistant spray before pouring wax.
5. Stylish Tin Can Storage Solutions
Organize your home and craft room with repurposed tin cans.
- Decoupage Storage Cans – Cover with napkins or scrapbook paper for pretty storage.

- Straw and Utensil Holders – Decorate for parties or kitchen counters.

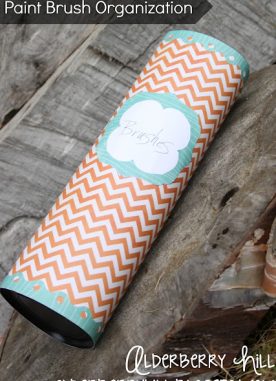
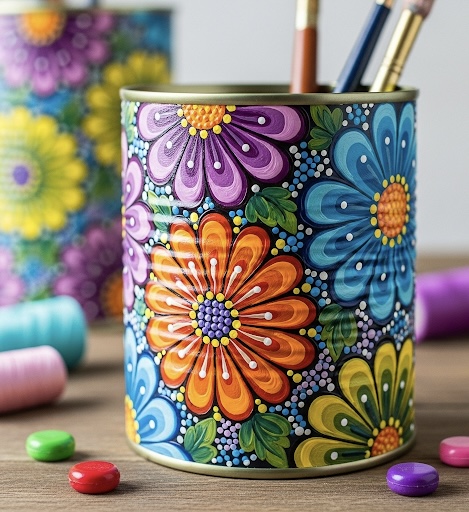
- Brush and Pencil Holders – Ideal for makeup or school supplies.
- Egg Storage Basket – Attach handles for a rustic, functional egg container.
- Foil/Wrap Organizer – Store and cut kitchen wraps with ease.
- Dog Treat Container – Label and store pet snacks in style.
- Craft Supply Organizer – Sort beads, buttons, and threads efficiently.

- Yarn Dispensers – Drill a hole to feed yarn through and keep skeins tidy.

Tin Can Yarn Dispenser
- Spice Jars – Replace expensive jars with painted and labeled cans.
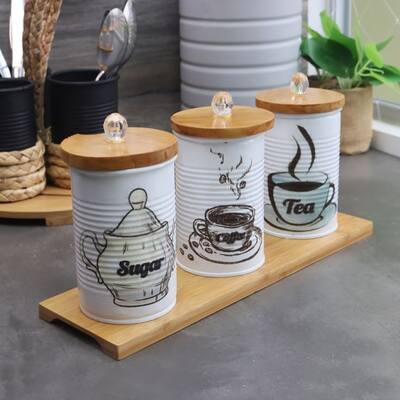
- Coffee, Tea and Sugar Canisters – Coordinate your kitchen storage with custom-painted sets.
Related: Recycling Tin Cans: Organizers and Creative Reuses
6. Wall and Hanging Tin Can Decor
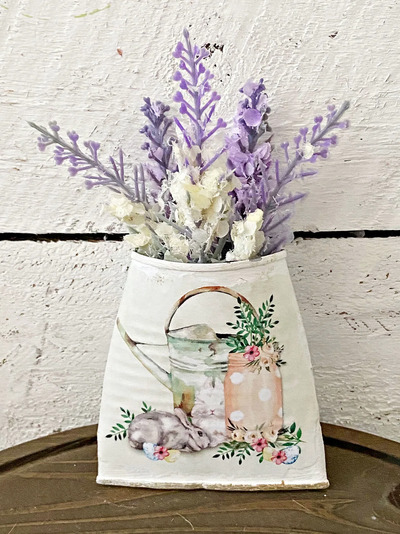
- Rustic Wall Vases – Mount decorated cans for hanging floral displays.

- Butterfly Cut-Outs – Flatten and cut cans into butterfly shapes for whimsical wall art.

Picture Box Blue
- Vintage Wall Decor – Mount cans on distressed wood for farmhouse-style art.
- Tin Can Wall Pocket – Create a waterfall effect with staggered painted cans.
- Crushed Tin Planters – Use dented cans creatively to make textured planters.
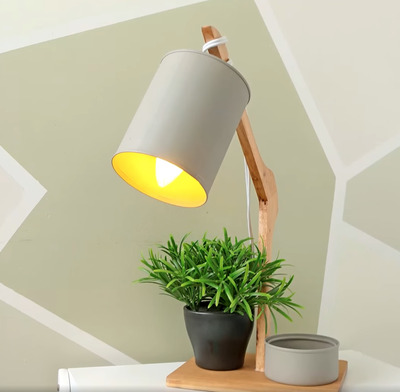
- DIY Table Lamp – Punch intricate patterns into a tin can and place a light source inside for beautiful mood lighting. Use wooden hanger as lamp stand.
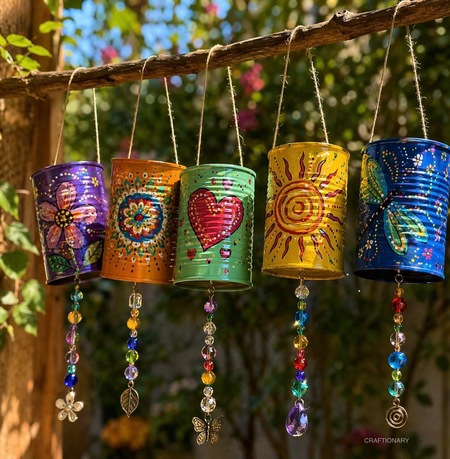
7. Tin Can Wind Chimes:
To make these vibrant upcycled wind chimes:
- Start by cleaning five empty metal food cans and ensuring no sharp edges remain. Let them dry completely. Sand the sharp edges if required.
- Apply a base coat of colorful acrylic paint to each can, then use paint pens or small brushes to add intricate designs like a purple flower, an orange mandala, a red heart, a yellow sun, and a blue dragonfly, allowing them to dry completely.
- Spray 2-3 coats of polyurethane or any other sealer for protection and prevention from rust.
- Drill or punch a hole in the bottom center of each can and two near the top and bottom rim for hanging. Optionally you can make a central hanging for hanging with one hole punch too.
- Create the decorative clappers by stringing multi-colored crystal beads onto a length of wire or jewelry cord, anchoring the top to a metal ring inside the bottom hole and finishing the bottom with a unique charm, such as a metal leaf, flower, or butterfly.
- Finally, loop lengths of natural twine through the top holes, adjust for varied lengths, and tie them securely to a sturdy, weathered branch to display.
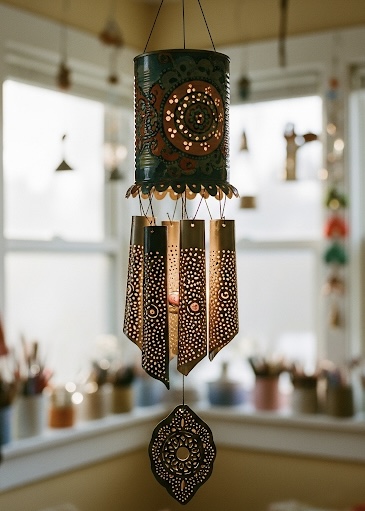
- Hanging Lanterns – Punch patterns into cans to make glowing porch lights.
- Wind Chimes – Attach beads, shells, or bells for soothing sounds.

8. Tin Can Crafts for Kids
Fun, safe, and educational ways to reuse tin cans with kids. Turn crafting time into learning time with these simple projects:
- Tin Can Telephones – A classic science experiment using two cans and string to teach sound waves.
- Mini Robot Models – Paint and decorate cans using bolts, googly eyes, and magnets.
- Pencil Holder Monsters – Use felt and pipe cleaners to create fun desk buddies.
- DIY Marble Maze or Drop Game – Glue paper inside and outside cans to create rolling games.
- Mini Drums – Decorate and add felt, fabric or rope to create child-friendly percussion fun.

DIYnCrafts
- Stacking Games or Pencil Toss – Use empty cans for interactive, screen-free play.
Tip: Always supervise children when using tin cans, and make sure sharp edges are covered or sanded.
9. Tin Can Instruments and STEAM Projects
- Hands-on learning fun with sound and rhythm
- Rainmakers or Shakers – Fill with rice or beans and seal with paper and tape.
- Xylophone Lineup – Arrange cans by size and pitch, then tap with sticks for music fun.
- STEAM Explorations – Teach physics, sound, and recycling all in one craft!
A great addition to classrooms or homeschool curriculums.
10. Wedding and Party Decor with Tin Cans
Rustic elegance on a budget
- Tin Can Flower Vases – Wrap cans in burlap, twigs, or ribbons to use as centerpieces.

- Hanging Ceremony Aisle Decor – Fill cans with flowers and suspend from hooks or trees.
- Table Number Holders – Add chalkboard paint and write table numbers or guest names.
- Favor Holders – Use mini tin cans to hold party favors, snacks, or thank-you notes.
Matches perfectly with vintage, boho, or garden-themed weddings.
11. Hanging Storage and Magnetic Tin Can Hacks
Practical uses for vertical and small-space organization
- Magnetic Board or Fridge Organizers – Glue magnets to cans and store pens, kitchen tools, or scissors.
- Wall-Mounted Tin Can Storage – Mount painted cans on wood boards for storing tools, brushes, or craft supplies.
- Pegboard Can Holders – Attach to a pegboard for workshop organization.
- Kitchen Hanging Rack – Hang cans from an under-cabinet rail for spice jars or utensil holders.
Ideal for garages, craft rooms, and tiny homes!
Where to Find the Perfect Empty Tin Cans for Crafting
Before you dive into your next DIY project, you’ll need a solid stash of empty tin cans. While your kitchen is a great starting point, here are easy and practical ways to find the best cans for your creative needs.
1) Start in Your Own Kitchen and Pantry!
You probably have the best crafting supplies hiding in your pantry right now! Here are the most useful types:
- Soup Cans – Sturdy and come in multiple sizes (10 oz, 14.5 oz, 19 oz). Perfect for pencil holders, planters, and desk organizers.
- Vegetable Cans – Similar in size to soup cans and just as versatile.
- Coffee Cans (Ground Coffee) – Wide and tall with bonus plastic lids—ideal for storage containers, mini trash bins, or tool holders.
- Tomato Cans (Diced, Crushed, Paste) – Ranging from small (great for tiny succulents) to large (ideal for utensil holders).
- Pet Food Cans – Compact and sturdy. Great for small crafts or candle holders.
- Odd-Shaped Cans – Keep unique sizes like tall evaporated milk cans or extra-wide fruit cans—they’re perfect for standout projects!
2) Where Else to Source Tin Cans
Build your collection faster with help from your community:
- Friends, Family and Neighbors: Let people know you’re collecting cans—they’ll be happy to save them for you.
- Cafes and Restaurants: Ask about large food service cans (#10 cans). Be polite, and offer to pick them up regularly!
- Schools and Community Centers: Art departments often save recyclables—ask if they have extras for your projects.
- Buy in Bulk for Uniform Projects: Need 10 matching cans? Stock up during a sale and donate the food to a local shelter or food bank.
Best Types of Cans for Crafting
Not all cans are created equal! Here’s what to look for:
1) Steel vs. Aluminum
- Steel: Stronger and more stable—best for planters, storage, and beginner crafts.
- Aluminum: Softer, easier to cut—great for flattening and detailed designs like butterfly ornaments.
2) Seamless Cans: Choose cans without a visible seam if you want a smooth finish (especially for decoupage).
3) Cans with Lids: Save coffee or formula can lids—they’re super handy for making covered containers!
How to make Tin Can safe to use?
Before crafting, ensure your tin cans are clean, safe, and durable:
1. Smooth Sharp Edges
- Use a smooth-edge can opener.
- Sand sharp rims with metal file or fine-grit sandpaper.
- Cover with hot glue, duct tape, or fabric if needed.
2. Prevent Rust
- Dry completely before use.
- Spray with acrylic sealer or rust-resistant primer, especially for outdoor crafts.
3. Customize for Functionality
- Drill drainage holes for planters.
- Add hooks or punch designs with a drill or hammer and nail.
- Label, cap, or line according to the use.
How to cut tin cans for crafting with ease?
To cut tin cans cleanly and safely:
- Use tin snips or heavy-duty metal scissors for simple cuts.
- For intricate designs, use a Dremel rotary tool with a metal-cutting blade.
- Always wear gloves and smooth edges after cutting.
How to Clean Tin Cans before Using?
1. General Cleaning
- Rinse well with warm, soapy water.
- Use a bottle brush to reach the bottom in taller cans.
- Let dry completely before decorating.
2. Remove Labels and Sticky Residue
- Soak Method: Submerge cans in hot, soapy water for 30+ minutes (or overnight). Labels will peel off easily.
- Oil Trick: Rub sticky spots with cooking oil on a paper towel. Let sit, then scrub off.
- Rubbing Alcohol or Nail Polish Remover: Great for stubborn adhesive—test a small spot first.
- Hair Dryer Heat: Warm the label for 15–30 seconds to loosen glue, then peel.
3. Remove Strong Odors (Pet Food, Tuna, etc.)
- Baking Soda Paste: Apply inside the can and leave for a few hours or overnight. Rinse thoroughly.
- Vinegar Soak: Fill the can with equal parts white vinegar and water. Let sit, then rinse.
- Sunlight: After washing, let cans sit in direct sunlight for 1–2 days to naturally eliminate lingering smells.
Don’t Toss It—Transform It!
With just a bit of time, imagination, and a few supplies, an empty tin can becomes so much more—a light, a planter, a toy, or a storage solution. These ideas are just the beginning.
So next time you empty a can of soup, beans, or coffee, don’t throw it away—get inspired and turn your trash into treasure. It’s eco-friendly, budget-conscious, and oh-so-satisfying.
Drafted by: Alveena Nazir
Written by: Hani Shabbir
You will also like:
Recycling Tin Cans: Organizers and Creative Reuses
35 Efficient uses for old chairs
40 Efficient Uses for Old Windows Ideas
Please note some images are AI generated to help you visualize the idea.