This post may contain affiliate links. Please see our full Disclosure Policy for details.
I took a class to learn how to mosaic with a professional artist Maryam of over 20 years of experience from Toronto. Today I am sharing my learning experience, tips, and instructions on how to make mosaic coasters?
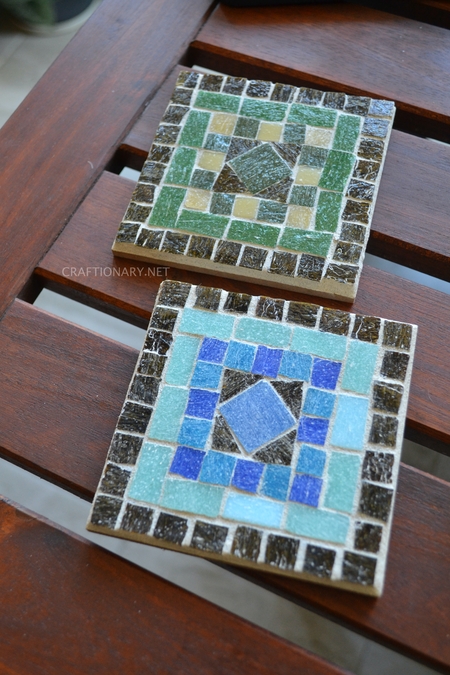
Mosaic Coasters Project
This was my first DIY mosaic project. Let’s go over the material and instructions.

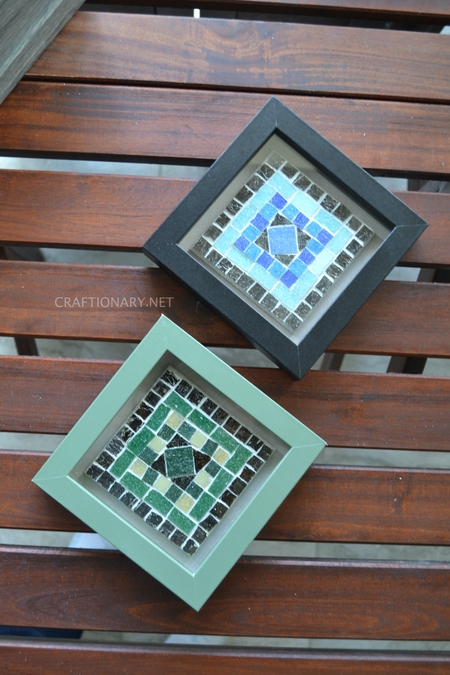
You can also frame it in a shadow box to make wall art:
You will also like: Stunning Landscape DIY Mosaic Art using Glass Tiles
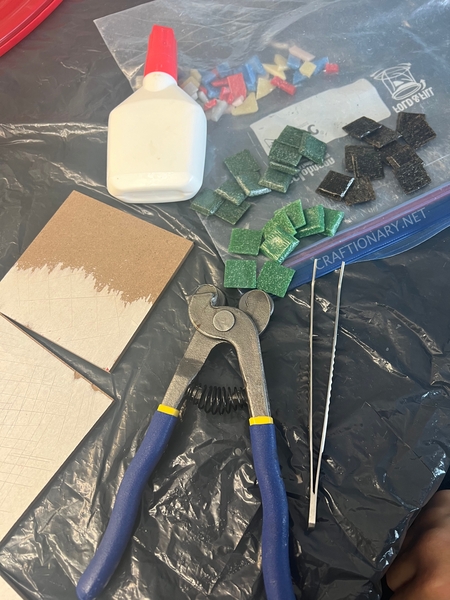
Material and Supplies:
You will need:
For Gluing:
- Wood squares (these are MDF board cut into 4 inches by 4 inches squares for coasters box-shape at home depot. However, you can get similar pre-cut MDF wood blanks)
- Glue (Weld Bond dries fast and non-slippery. A type of glue that you use to stick glass tiles for mosaic)
- Squeeze bottle with a tip for easy application (if you buy glue in bulk).
- Glass tiles
- Glass cuter (I recommend buying mosaic tools set. This handy set has all the tools you need including heavy duty mosaic tile cut nipper, tweezers, double-ended hook, sponge, spatula, and scraper).
- Retractable Blade (for scratching the surface)
- Wide painters tape
For Grouting:
- Grout – (Using Polyblend Plus in Snow White color)
- School glue
- Chopsticks (or wooden skewers)
- Disposable gloves and tablecloth
- Rag (pieces of old tshirts or other soft materials)
- Spray bottle
You will also like: DIY Glass Tile and Stone Indoor Garden Art
Instructions:
Plan Your Mosaic Design and Pattern
Scratch the surface of your wooden square with a blade. This helps the tiles adhere well to the rough surface compared to a smoother one.
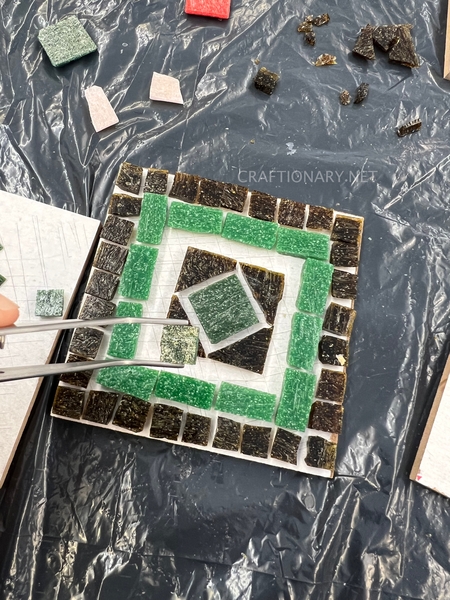
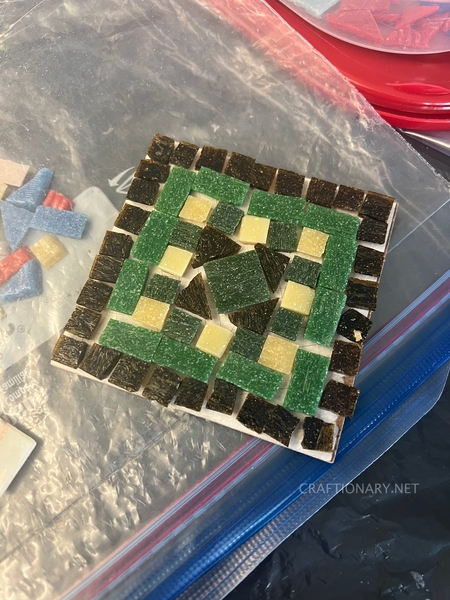
Choose your tiles. For this project I am using glass tiles that are used in backsplash. You can use any tiles you like, just make sure they are all the same width so you can grout and have a plain surface to use as coaster.
Brainstorm and draw a design on a paper that you would like to mosaic.
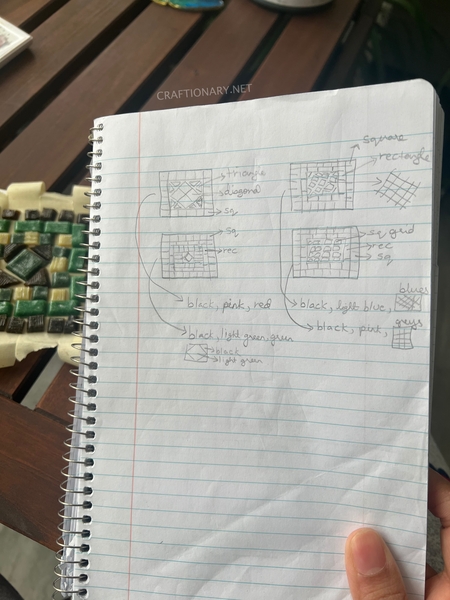
You can play with various color combinations, contrasts, and geometric designs on your tile. Floral and scenic designs are also fun. Search on pinterest for unlimited mosaic coaster ideas and inspirations or try your own patterns.

Mosaic Design Tips:
To check how many tiles you will need for your mosaic project, measure the square foot surface area or lie down the tiles on the area you wish to cover with a certain tile to get an idea!
If you have a picture in mind, you can make a grid on it and play with different shapes on photo editor and print it to the coaster size. Use it to cut tiles and work on it.
Try different patterns and shapes – triangles, squares, rectangles and turn them around for other shapes. Think about the pattern and layering methods. For example you can put squares in alignment as squares or diagonally as diamonds!
How to cut glass tile with cut nipper?
Mark where you want to cut the tile and fix that spot between the two rings of the glass tile nipper applying firm pressure, now carefully use the other hand to cover the tile and the nipper such that the tile once cut falls in your palm. Now apply pressure at the handle of the nipper to cut the tile. For beginners it is ideal to use a large seal bag and try cutting your initial tiles inside the bag such that the tiles stay inside once cut. This is also important as small remnants of glass may fall around your working space and can prick your feet and hurt if not cleaned properly.
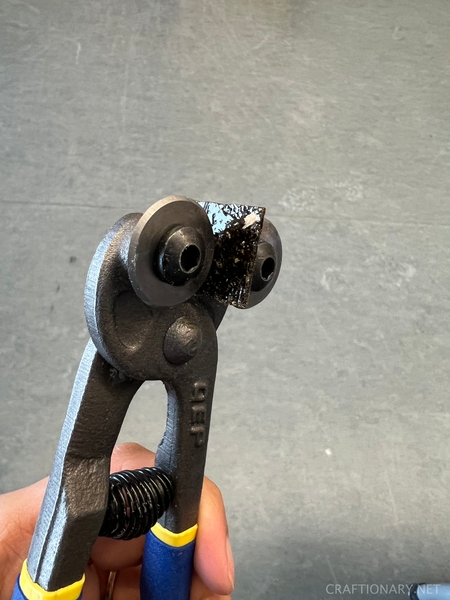
To cut a custom size tile, use a painter’s tape and pencil to take print of the area and stick it on the tile and cut with nipper.
Make sure to leave 1/4 of an inch space on the sides and between the tiles for an even distribution and to fill grout later on. The easiest way to maintain consistency is by poking a toothpick between the tiles. Use a tweezer for small design pieces.
Also try to keep the smooth side on the outside of the blank coaster. Smooth side is the side you do not cut.
It is important to pay attention to the top side of the tile if the tile has one when making pattern. Some tiles can be used both ways. If a tile has rough side that is the bottom.
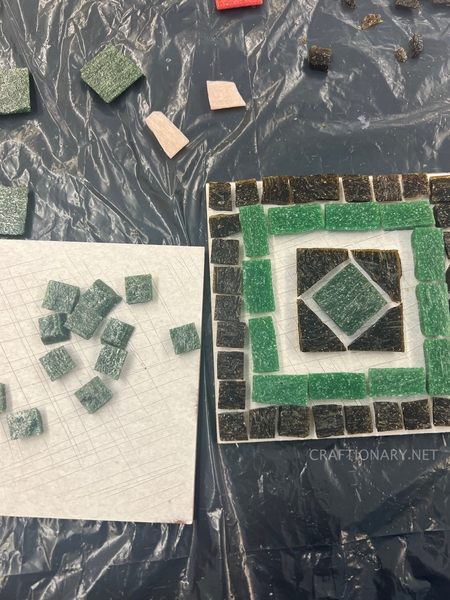
Glue Glass Tiles
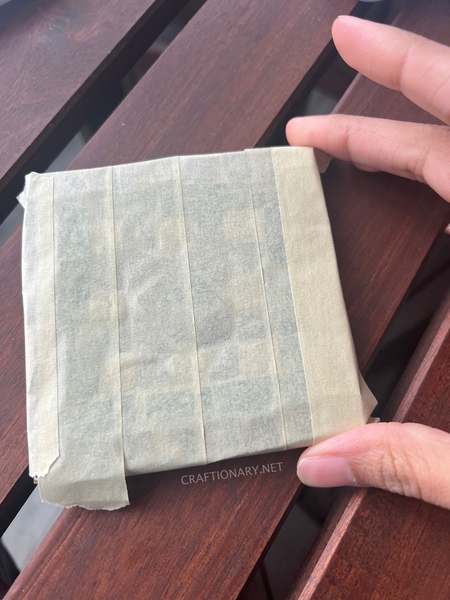
Once you are happy with your design, it is time to transfer it and start gluing. To do this, we use painter’s tape and tape the design.
Now we pick all the tiles from the wooden square that are sticking to the tape and keep them aside. This way our design stays intact.
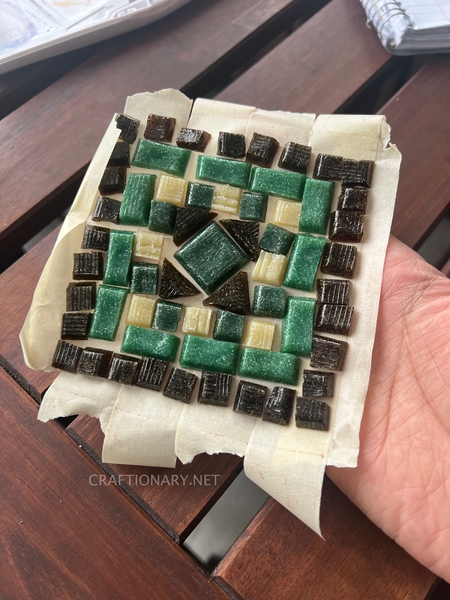
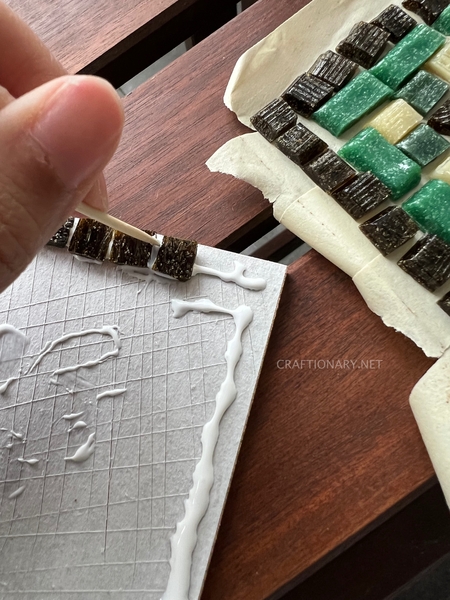
Squeeze glue on the wood in 1/4 portion and start picking the pieces from the tape and putting them in place. Make sure to turn them back to the front side and glue the bottom on the wood blank.
I like to do with my hands but you can also use a tweezer.
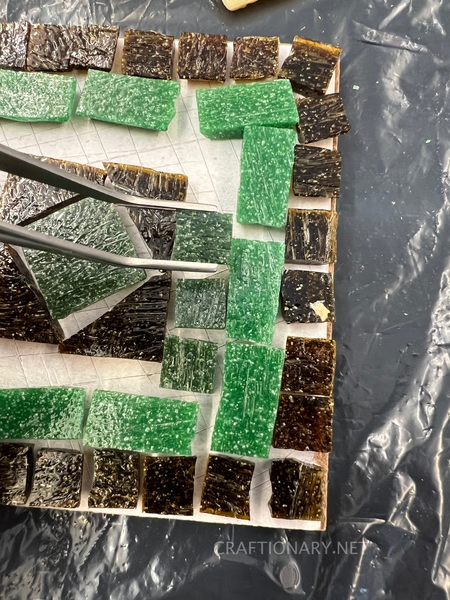
Again maintain a toothpick wide distance between the tiles and the sides of the square as you go.
Remove any excess of glue from the sides using the tip of your toothpick. This is important to maintain space for filling grout later. Excess glue once dries will take up space and there will be no or little space for filling grout.
Continue to glue till all the tiles are in place. Let it dry overnight.
Troubleshoot:
If you glued a tile wrong and it has dried you can remove it using a hammer and scraping metal tool. Special precaution is needed for this step like googles to safeguard eyes and gloves on hands. Tilt the scraper underneath the tile making sure it doesn’t touch the side tiles and push it underneath with a hammer to remove it. Here’s a video of the process – how to remove wrong mosaic tile?
If your tiles have sharp edges use a sanding block to smooth the sides.
Grouting Mosaic Projects
Not all mosaic projects are grouted but projects that you want to use like a tray and coasters for instance are grouted for a plain surface.
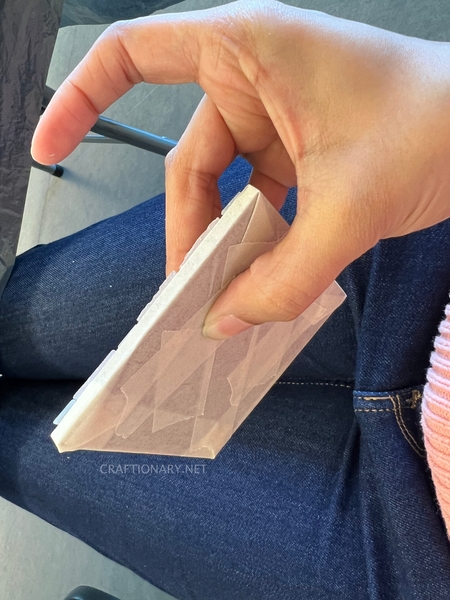
Use painters tape to tape all the sides and bottom of your coaster for neat results. Score the tape with the tip of your nails for proper sticking.
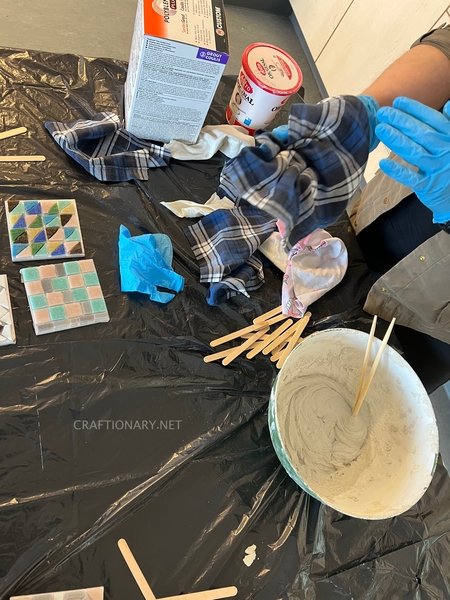
Wear your gloves and cover the surface. Mix grout, glue, and water in a plastic container with chopsticks. Glue helps with binding grout in place. The final mix should have the consistency of a cake batter. Such that when you pick it up on chopsticks it drips down like cream but not runny.
Recipe for grout mixture:
You will need to eyeball the amount of water to make the mixture but you can estimate about 2 parts grout, 1 part glue and 1 part water.
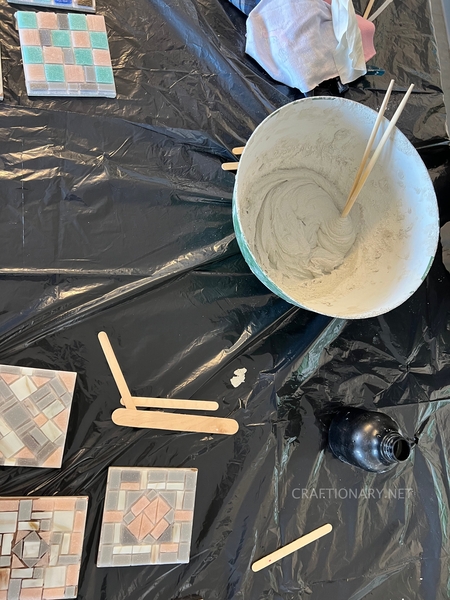
Only make enough for your project otherwise the leftover will go to waste. For example, you need only a tablespoon of mixture per coaster.
Let it slake for 2-3 minutes. Now use chopsticks to drop it on your coaster. Use popsicle stick for grouting and your fingers to move it around, slide into the edges and spaces between the tiles. Make sure to fill in all spots and flatten it by scoring with your fingers. Let it sit for 2 minutes.
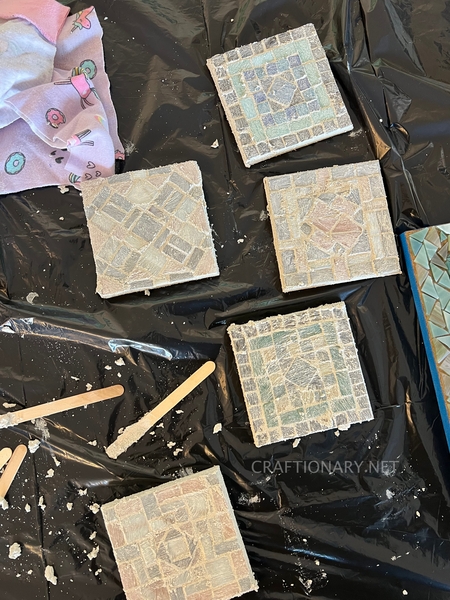
Now use a damp tshirt piece or rag to smoothly remove the excess of grout to reveal shiny surface of your glass tiles. Use a spray bottle to dampen your cloth and rub in circular motion patiently with a light pressure to remove the excess. Spray to wet your rag frequently but not often.
This way you don’t clog your drainage and the excess grout goes into trash. This method is better for your plumbing and easy to clean as well. Compare this with using a sponge and bowl filled with water to clean grout (a common practice).
Once you are done removing the excess of grout remove the tape and your coasters are ready.
Grouting Tips:
Use vinegar and q tip to remove stubborn grout from the tiles for neatness.
For colored grout you can either mix acrylic paint (but take into consideration the liquid portion of it to ensure your final grout is not runny). About 1 part paint, 1 part glue and 1 part water to 3 parts of grout. Or you can get black grout or any other color if available.
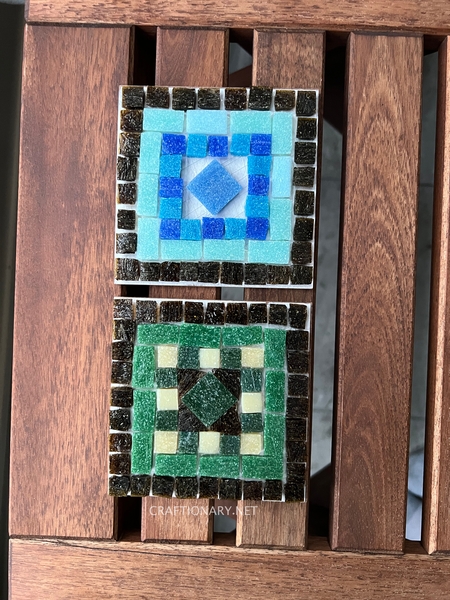
Here’s the finished DIY mosaic coasters.
I hope you enjoyed this project. I will see you next week with my second Mosaic project from this class.
Till next time! Happy Crafting.
You will also like:
40 Impressive DIY Mosaic Projects to love
How to Make DIY Resin Coasters WITHOUT molds?


Love this and will be following your steps for a little at home craft party! Wondering — what does the side of the coaster look like? Is the wood exposed? Did you stain it? Paint it?
Hello Avery, these are standard 4×4 inches wooden coasters. The sides are covered with grout and the base is glued with cork coasters for avoiding scratches to the furniture. These are mosaic tiles, colored glass tiles which are glued and grouted. Which is tough and stain is not required on mosaic. If you like you can paint on glass and spray it with a UV-resistant clear polyurethane spray but that is optional.