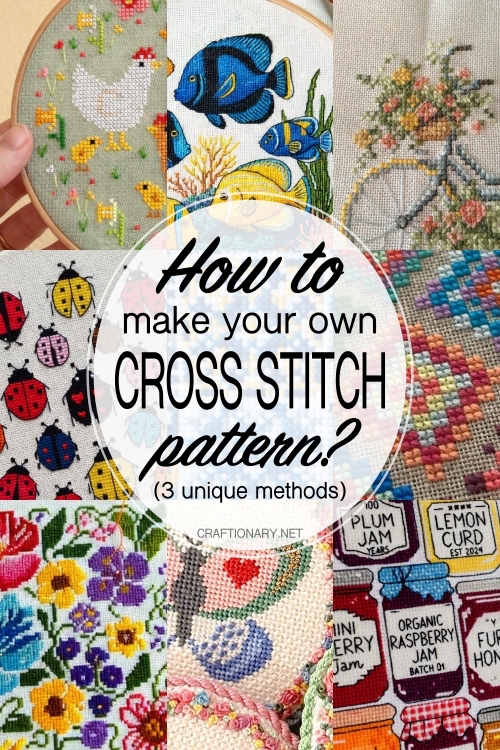
This post may contain affiliate links. Please see our full Disclosure Policy for details.
Have you ever scrolled through Pinterest or Instagram and thought, I wish I could stitch that exact image
Whether it’s a portrait of your pet, a favorite quote in a specific font, or a piece of original digital art, learning how to make your own cross-stitch patterns is the ultimate way to level up your hobby.
We will walk through the manual and digital methods of pattern design, ensuring your final product is professional, readable, and—most importantly—fun to stitch.
Why Design Your Own Patterns?
Most off-the-shelf kits are beautiful, but they aren’t personal. Designing your own allows you to:
- Commemorate Milestones: Turn wedding photos or baby announcements into heirlooms.
- Perfect Sizing: Create designs that fit specific hoops or frames perfectly.
- Save Money: Avoid the cost of expensive kits by using your existing floss stash.
Method 1: The Old School Manual Way
Before the digital age, designers used pencils and paper. This is still the best method for small, simple designs or typography.
What You’ll Need:
- Graph Paper: Use 14-count graph paper if possible, or standard grid paper where 1 square = 1 stitch.
- Tracing Paper: Useful for sketching over an existing image.
- Colored Pencils: To map out your floss colors.
The Process:
- Sketch the Outline: Place your tracing paper over a reference image and draw the basic shapes.
- Translate to the Grid: Place the tracing paper over your graph paper. Every time a line passes through a square, decide if that square will be a stitch.
- Refine Confetti: Avoid placing single, isolated stitches of one color (called confetti). In manual design, you can smooth these out to make the stitching process easier.
Method 2: The Old School Hybrid Method
If digital tools are feeling too rigid, you can print your image onto graph paper using a very light transparency setting. Then, use colored markers to manually fill in the squares that most closely represent the colors of the image. This allows for an artistic touch that algorithms often miss—especially around eyes or fine details.
Method 3: Using Professional Software
If you want to turn a photo into a pattern or create complex art, software is non-negotiable. Here are the top-rated tools this year:
| TOOL | BEST FOR | PRICE |
| WinStitch/ MacStitch or PCStitch
|
Professional designers
|
One-time payment
|
| Stitch Fiddle or pic2pat
|
Web-based/ beginners
|
Free (Premium option)
|
| FlossCross
|
PDF export
|
100% Free
|
| Stitchly
|
iPad or Apple pencil users
|
One-time or subscription
|
Pro Tip: If you are converting a photo, use the Clean Input rule. Before uploading, increase the contrast and reduce the noise in a photo editor. This prevents the software from assigning 50 shades of gray to a simple shadow.
Converting a photo or illustration into a cross-stitch pattern is essentially a process of pixelation and color indexing. The goal is to reduce a high-resolution image into a grid of tiny squares, where each square represents a specific thread color.
Here are the best ways to turn any image into a stitchable pattern, ranging from one-click solutions to manual professional methods.
1. Use Dedicated Online Converters (Fastest)
These are browser-based tools specifically designed for stitchers. They do the heavy lifting by automatically mapping pixels to DMC thread colors.
- FlossCross: Currently one of the most user-friendly and modern tools. It allows you to upload an image, choose your grid size (e.g., 100×100 stitches), and limit the number of thread colors to keep the project manageable.
- Pic2Pat: A classic, no-frills site. You upload an image, and it generates several PDF options with varying levels of detail and thread counts.
- Stitch Fiddle: Excellent for those who want a bit more control. It handles cross-stitch, crochet, and knitting patterns.
The Software Method (Highest Quality)
If you want professional-grade patterns with high-quality symbols and backstitching options, dedicated software is the way to go.
- WinStitch / MacStitch: These are the industry standard for pattern designers. They have advanced algorithms for dithering (blending colors) so your finished piece doesn’t look blotchy.
- PCStitch: Another long-standing favorite for Windows users that allows for easy photo-to-pattern conversion.
3. The Graphic Design Approach (Manual Control)
If you are already comfortable with photo editing software like Photoshop or GIMP, you can manually create a pixel map.
- Crop and Clean: Remove the background and increase the contrast of your image.
- Downsample: Go to Image Size and change the dimensions from inches/pixels to Stitches. For example, if you want a 5×7 inch piece on 14-count Aida cloth, set your width to 70 pixels and height to 98 pixels.
- Posterize: Use the Posterize or Indexed Color tool to limit the number of colors (e.g., set it to 15 or 20 colors). This prevents you from having to buy 100 different skeins of thread for one small project.
- Grid Overlay: Turn on the pixel grid to see exactly where each cross should go.
Technical Checklist for Better Patterns
| FEATURE | RECOMMENDATION | WHY? |
| Image type
|
High contrast/ simple background
|
Busy background turn into confetti (random single stitches) which are hard to stitch
|
| Grid Size
|
14, 16, or 18 count
|
This refers to stitches per inch. 14 is standard, 18 allows for more detail in a smaller physical size.
|
| Color limit
|
15-30 colors
|
Too many colors make the project expensive and slow; too few make it look like a cartoon.
|
| The confetti check
|
Remove isolated pixels
|
If you see a single pixel of one color surrounded by another, delete it. it’s rarely worth the effort to thread a needle for one stitch.
|
How to Turn a Photo into a Pattern: Step-by-Step
Converting photos is the most common reason people want to make their own charts. Follow these steps to avoid a muddy result:
- Crop Tightly: The more background you have, the less detail your main subject will have.
- Limit the Palette: A standard photo has millions of colors. Most cross-stitch patterns should stay between 30–45 colors. Any more, and you’ll spend more time changing needles than stitching.
- Choose Your Fabric Count: This dictates the size.
- 14-count Aida: Larger, easier to see.
- 18-count Aida: Smaller, allows for much more detail in a smaller physical space.
- The Squint Test: Zoom out on your digital preview and squint. If the image is still recognizable, your color placement is solid.
Key Terms Every Designer Should Know
- DMC/Anchor: The industry-standard thread brands. Most software defaults to DMC.
- Backstitching: Thin lines used for outlines or detail. You add these after the X stitches are mapped.
- Fractal/Half Stitches: Used to create smoother curves.
- Legend/Key: The list of symbols that tells the stitcher which color corresponds to which symbol.
Frequently Asked Questions
1. Can you sell patterns you make from photos?
Only if you own the copyright to the photo or it is in the public domain. Never turn a random artist’s work from the internet into a pattern to sell without permission!
2. What is the best software for beginners?
Stitch Fiddle is incredibly intuitive and runs in your browser, making it the perfect starting point for hobbyists.
3. How do you know if your pattern is too difficult?
Look at the confetti count. If you have dozens of colors that only appear once or twice in random spots, the pattern will be frustrating to stitch. Try to group colors into blocks.
Final Checklist for a Stitch-Ready Pattern
Before you print or export your PDF, ensure it includes:
- The Grid: Clearly marked every 10 stitches with bolder lines.
- Center Marks: Arrows indicating the horizontal and vertical center.
- Floss Legend: Brand name, color number, and the symbol used.
- Stitched Size: Dimensions in inches/cm for common fabric counts (14, 16, 18).
I hope this helps create the best cross stitch pattern from a photo.
You will also like:
How to Make Needlepoint Playing Cards
30 Practical Craft Uses for Cross Stitch Artwork
Beginner Crochet Plant Free Pattern for First-time Crocheters