This post may contain affiliate links. Please see our full Disclosure Policy for details.
Make epoxy resin crafts for home, gift or your handmade store with these cool ideas for beginners. I have been experimenting with epoxy resin for months to understand how it works. Today I want to share tips and tricks that helped me get successful results with easy and simple starter DIY crafts.
Epoxy Resin is an old crafting technique that has revived and is here to stay because we all love pouring and making magically beautiful patterns and textures in molds and hollow surfaces like trays, tables, wood and so on.
There are many different brands offering resin and with a wide variety of tools, types of epoxy, molds, and fillers one can easily get overwhelmed and confused about where to begin. Worry no more, as I am going to share in the simplest language what resin is, what you can do with it as a first timer, what basic things you require to test whether this is something you want to do and finally share resin crafts.
Crafting with Resin
If you are totally new to resin and never used resin before, you will benefit from the FAQs about resin products below and things you can do with it. The beginners guide to resin crafts will cover the most common concerns and answer the basic issues that crafters face with resin. You can skip these questions and see DIY resin crafts if you are here for epoxy resin project ideas.
What is epoxy resin?
Epoxy resin is a casting resin that comes in two parts. One bottle contains the resin and the other is filled with hardener. It normally has a shelf life of about 1-2 years and can stay in liquid form intact. However, when you mix the two together, typically in a 1:1 ratio, it solidifies into a clear form. The resulting product is waterproof, food safe, and strong.
Is resin art easy?
Even though resin crafts look hard but if you work with appropriate safety gears and follow all the instructions carefully, it is as simple as mixing and pouring. The stunning resin projects makes one feel there is more to it but resin art is easy. As a beginner, I suggest you make a small project first to get yourself acquainted to the process.
What crafts can you make with resin?
There is a variety of crafts you can make with resin. Most popular ideas include:
- trays
- coasters
- wall art
- jewelry
- keychains
- wood art
- paperweights
- resin decor
- lamps
- tabletops
- cutting boards
- jar lids
- and more
What can I use as mold for resin?
Molds that allow you to remove resin once cured:
- Any plain surface covered with sellotape or brown tape to make a dam you can fill.
- Silicone molds
- Cupcake molds made out of silicone
- Plastic lids to make coasters
- Hot glue gun molds
- Plastic candy molds (avoid thin plastic)
- Acrylic sheets
- Silly putty
Molds that do not allow resin release once cured:
- Jewelry blanks
- Wood pieces with holes
- Glass
- Wooden trays
- Aluminum foil
- Wooden panels
- Playdoh
- Plaster of paris
- Ceramic
- Cement
- Clay
- Metal items
Related: 8 Fun and Creative Epoxy Resin Techniques To Try
Why is resin dangerous?
Resin is a chemical and therefore it can irritate sensitive people. When resin is mixed and cured, some unnoticeable fumes might escape into the air due to chemical reaction. Therefore, it is recommended that you work in an open space, wear gloves, eye wear and face mask.
What is the best resin for beginners?
Most of the resins in the market today offer similar product that is typically a 1:1 mixing ratio resin. You can opt for any resin depending on your budget and product reviews. The tools, materials, and instructions for all resin products are the same.
What can you put in resin?
The variety of resin fillers is endless. You can put anything your heart desires into the resin making sure it has no water. Some options include:
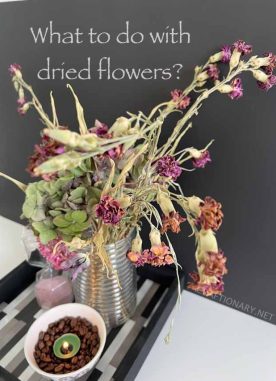
- dried flowers
- mica powder
- alcohol ink
- glitter
- foil flakes
- scrapbook embellishments
- wood pieces
- seashells
- rocks
- sand
- coffee beans
- craft materials
- and more…
Can you put fresh flowers in resin?
Fresh flowers make great resin insertions, however, it is important that they are completely dry before you immerse them into resin otherwise they can rot inside. These are nine ways to dry flowers including pressed flowers in frame.
Why is resin expensive?
From the economics point-of-view setting up a resin facility is costly and therefore their are limited resin manufacturers. The processes involved in carefully packaging resin in bottles also requires proper handling of chemicals and ingredients. Resin is a rather permanent product with long life. The material producing beautiful results and I personally feel it is worth the price.
Does resin break easily?
Resin is strong and it doesn’t break easily. Normally construction tools are used to drill holes and sand the surface of resin crafts. The dense substance once harden has weight and can break a wood or ceramic surface if you slam it hard into it.
How to avoid bubbles in resin?
- Warm the resin solution before mixing and stir the mixture slowly.
- Let the mixture sit for 5 minutes before pouring to allow it to settle.
- Pour the resin solution near the surface of the project and slowly to avoid air entrapment.
- Do not leave it in the sun to cure, it can cause yellowing and shorten the life of product.
- Use torch to pop bubbles from the surface.
- Alternatively, you can also use 99% Isopropyl alcohol spray to reduce surface tension and release bubbles.
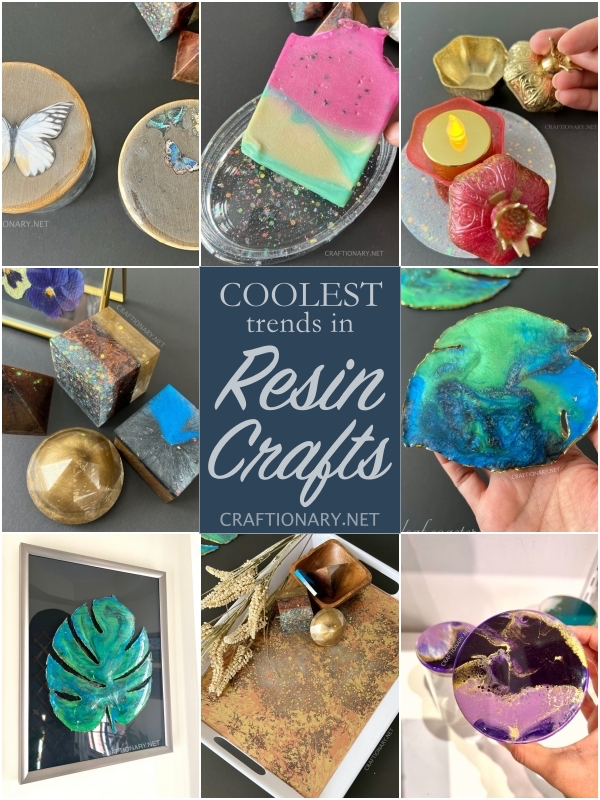
Epoxy Resin Crafts
What is the best thing to make with resin? Find resin crafts with tips and ideas for beginners. Learn to make cool projects with epoxy resin. You can choose the craft that you want to make and buy the simple tools and materials without spending too much as resin can get expensive.
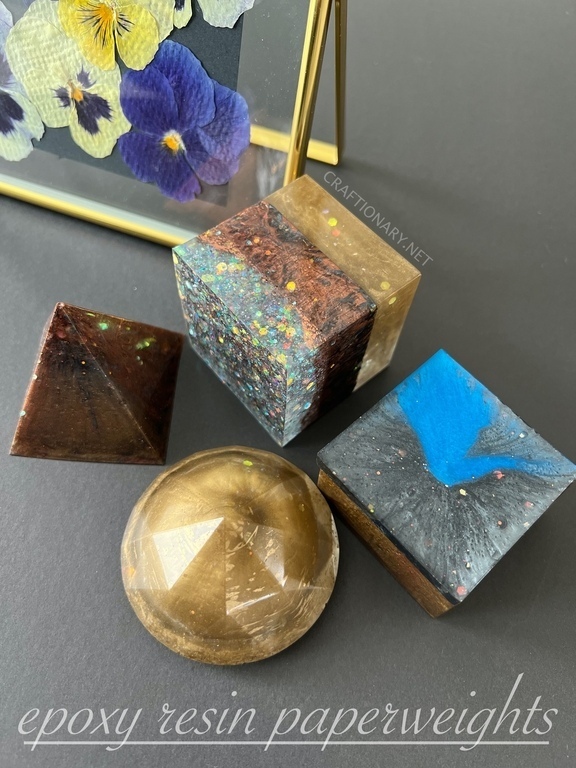
1. Resin Paperweights
Make cool geometric shape paperweights with epoxy resin using split cup acrylic pour technique with resin and make fun patterns and swirls. This tutorial guides you through the entire process with video instructions.
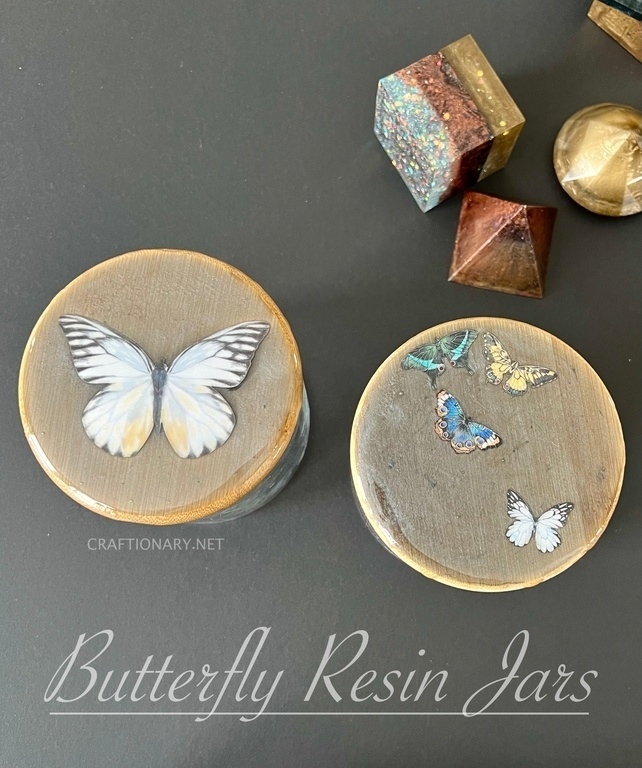
2. DIY Resin Jars
Decorate the lids of your jars with fillers like these cute butterfly resin jars. Find tips to work with open surface without wasting resin in these instructions. What things will you put in the resin?
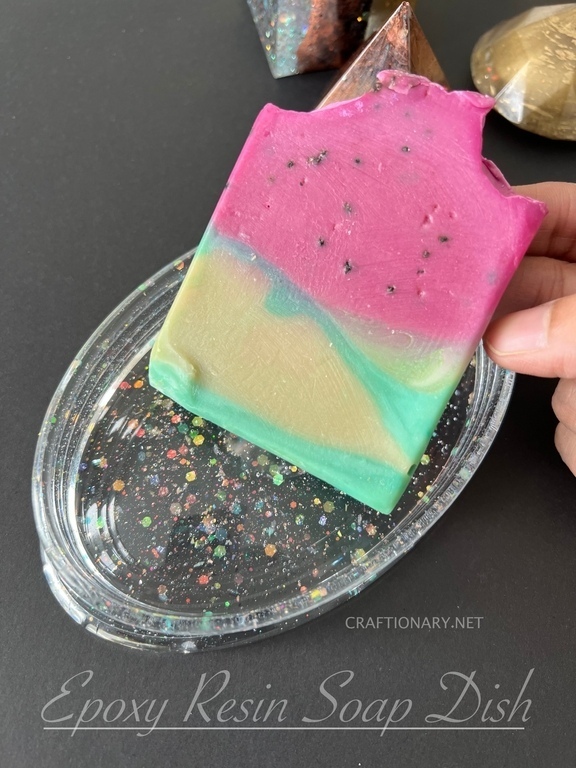
3. Glitter Resin Soap Dish
This interesting project guides you through how to make silicone molds and then uses the silicone mold to make this adorable clear resin soap dish with chunky glitter as confetti.
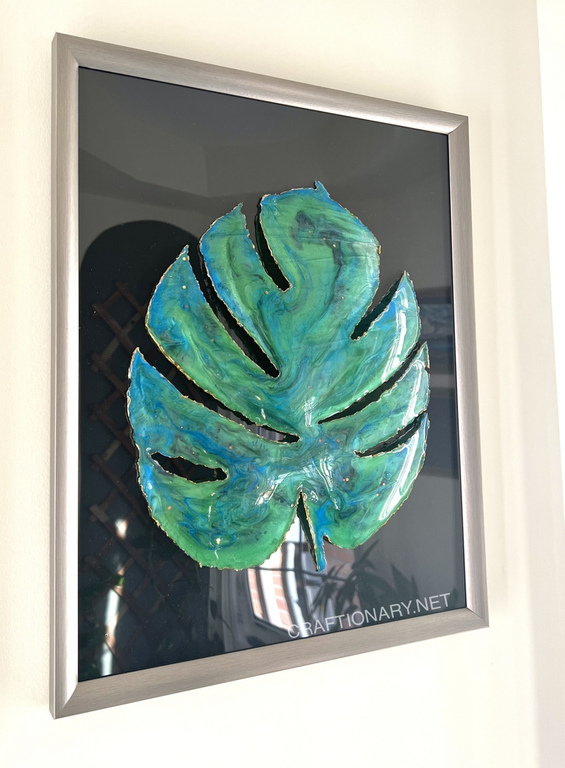
4. DIY Resin Art
Here’s a fun resin craft guiding you through the process to make a large size resin wall art using hot glue gun to make your custom mold. This project opens up the possibilities of making unique items with molds you cannot find elsewhere.
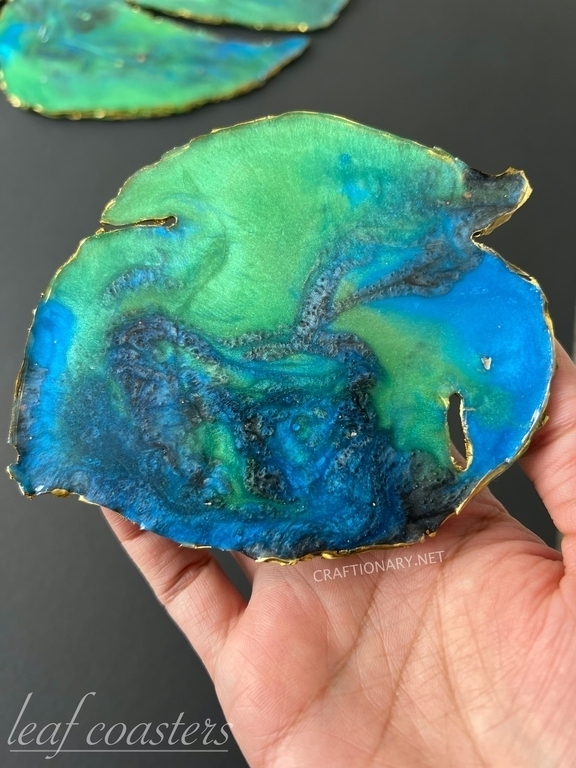
5. Make Resin Leaf Coasters
Tired of seeing common geometric shaped coasters! Try these cool leaf shape DIY resin coasters for your garden or use this simple parchment paper and hot glue technique to make fun patterns and designs. You can make them any size, any thickness and anyway you desire with this simple trick.
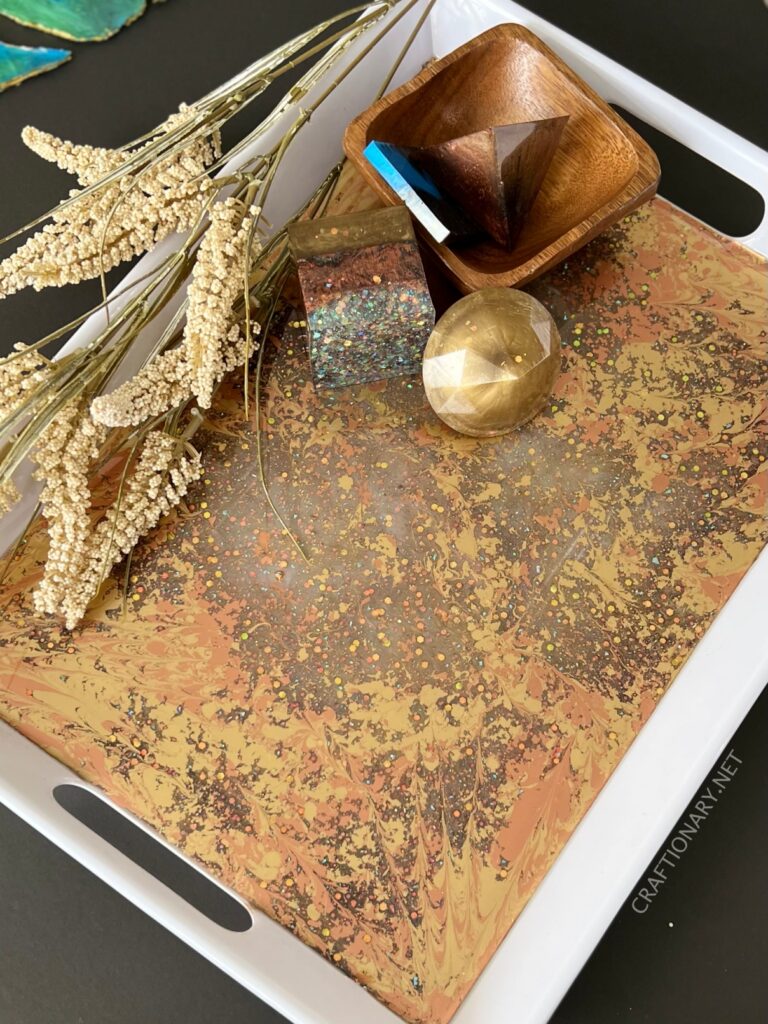
6. DIY Resin Tray
Get these extraordinary patterns formation without any effort with split cups and simply pour and make a stunning DIY resin tray using this tutorial.
7. Pressed flower resin coasters
It won’t be complete without a project that guides you through adding fun things to your resin like pressed flowers. Add resin and dried flowers to cork coasters to make these fun pressed flowers resin coasters. I love the see-through look of these coasters. If you want to make them opaque use for color. These could be made using resin molds as well.
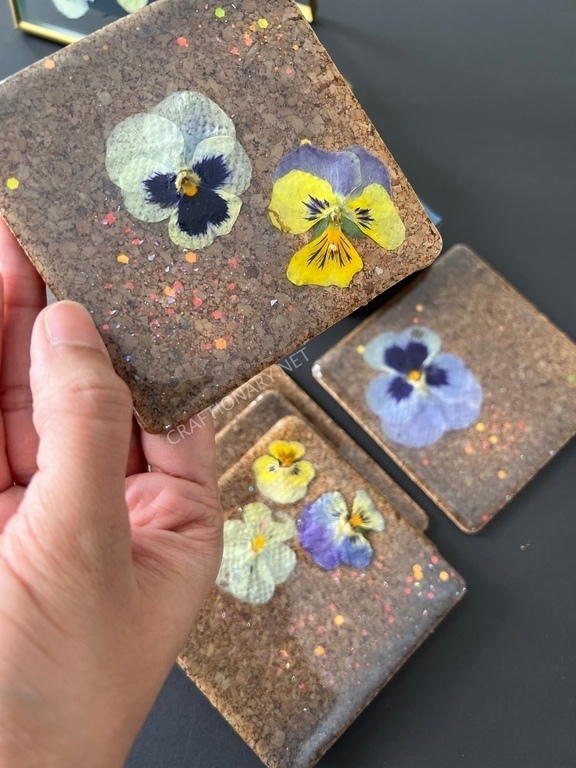
Pressed flower resin coasters
8. Resin candle holder
A fun and easy project that uses metal piece to make custom silicone mold with interesting patterns and designs. Use this mold to make unique pomegranate-shaped resin tealight holders. This idea opens endless possibilities for custom molds using decor pieces to make one-of-a-kind resin projects.

What resin crafts sell the most?
There are a variety of resin crafts that are trending and these include:
9) Agate geode coasters – add alcohol ink, glitter and paint to resin to make different patterns. These are perfect for home decor and gifts.
10) Resin frame – use items from home like Lego blocks to immerse in resin to make a frame.
11) Resin hair barrettes – add colors and foil flakes to make them fancy.
12) Glitter resin dominoes – make these with molds to play with your family.
13) Dried flowers in resin – Add pressed flowers in resin to make coasters, trays, jewelry, and more.
14) Resin cutting board – Use paint and epoxy casting resin to make a perfect gift.
15) DIY resin keychains – Find resin keychain kits to make a variety of styles, these are great to try with kids and make fun birthday gifts.
16) DIY resin bookmark – Bookmarks are not limited to long styles anymore. Make elegant glitter bookmarks with tassels for the book lovers in your life.
17) Ocean resin art – Ocean resin art is fun to try as a beginner with simple technique of blow dryer and colored resin without experience.
18) DIY photo resin coasters – Use a medium like mod podge to transfer photo on to your coasters, tray, jar lids or frame. Let it dry completely and then pour resin on top.
19) Resin Lazy Susan – Turn any wood or plastic lazy susan into a piece of art with resin and graphics of your choice.
20) Resin cabinet drawer pulls – Revamp plain looking cabinet knobs with resin.
21) Gold leaf resin pendant – Use a thin layer of mod podge to draw your design and let it dry a little. Cover it with gold leaf and use a paint brush to remove the excess. Blow away any remnants. Now pour resin to seal your gold pendant.
22) Decorate tumblers with resin – Use resin and monograms, glitter, and stickers to customize your tumblers.
23) Resin jewelry – A variety of options are available to make jewelry with resin.
24) DIY book cover with resin – Personalize a notebook cover with resin for teacher gift idea. This is also a cool craft for teenagers and students going back to school.
25) Decorate wooden spoons – Pour resin with alcohol ink or paint a design on wooden spoons to make a decoration for kitchen or a gift for mom.
26) Make Resin dice – Make creative art dice pieces with these fun dice molds and unlimited use of resin with pigments and fillers.
27) DIY glossy photo wood slice – Add a photo to a wood slice and cover with resin on top.
28) Resin thumbtacks – Use a jewelry mold to make beautiful pin and glue it to thumbtack using E6000 or resin. This is a great project for beginners.
29) Decorative mosaic tray – Use leftover backsplash tiles to stick to the bottom of a tray and pour clear resin on top to create a smooth surface. An easy project that is perfect for starters.
30) Resin bangles – Fill silicone bangle molds with resin and glitter to make cool resin bangles. Get creative with alcohol ink, mica powder and filler to make beautiful designs. Great for making a perfect bangle to compliment your dress for a night out.
31) DIY Resin succulents – Make fun patterns in succulent molds and paint them if you like. Add a magnet to stick them to the fridge, pot them in a planter and use them as decoration for your garden space. These will also make cute keychains. Easy to make for resin beginners and also makes cute party favors or gifts for plant lovers.
32) Resin string lights – Make thin layered resin castings using plastic molds to cover string lights. The thin layer makes resin translucent and you can see light in the color of your resin casting. This project is fun to try for a theme party.
33) Resin lights – Once you are confident with the beginner projects, you can experiment with a variety of fun materials like adding string lights to your resin centerpiece and turn it into a lamp. I have shared some stunning resin projects that people are loving. You can check them out.
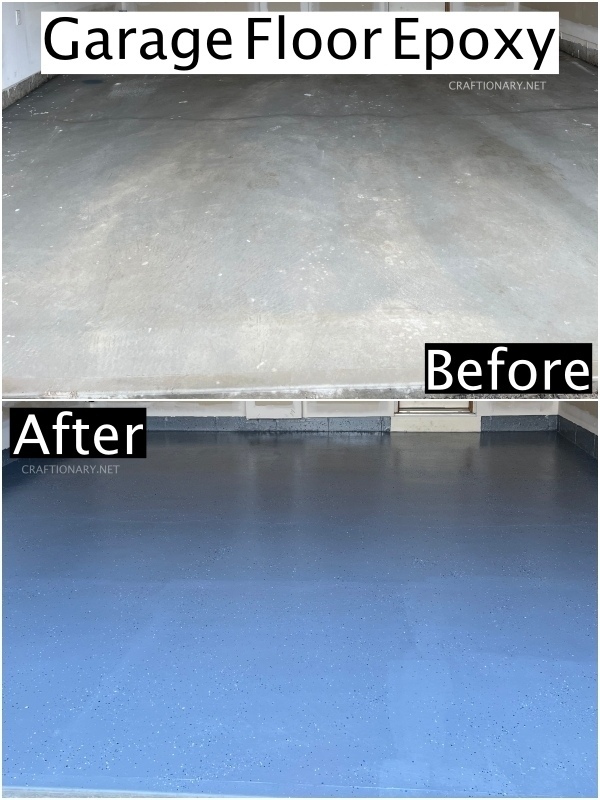
34) Here’s my experience using garage floor epoxy for the first time for home improvement. See the project in action without any edits and my final word on whether to do it yourself or hire someone.
Custom Molds for Resin Crafts
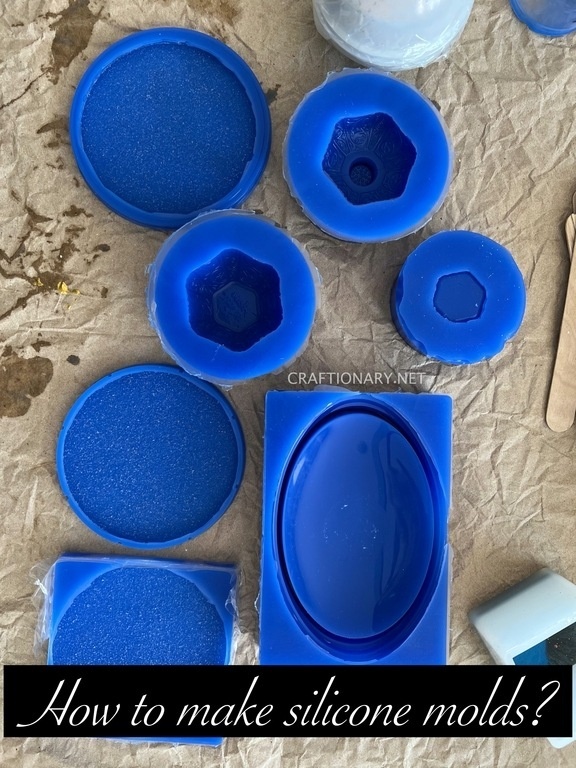
35) You can make your own silicone molds for unique personalized resin products. Here’s a step-by-step guide to making silicone molds. With UV resin making jewelry and miniature projects has become more intricate with designs.
Here are some useful tips from my experience using resin for crafts as a beginner.
Epoxy resin material care recommendations
– Normally you will have to throw plastic cups and wooden sticks after one use.
– Resin does not stick to silicone. Any tools made of silicone are reusable, and cost effective. Silicone spatula and silicone measuring cups are reusable. Just wipe it with a tissue paper OR let it cure. Peel the leftover solution, and wash it with soap and water to clean for using again.
– Use alcohol spray and paper towel to wipe clean your silicone tools like spatula and wooden sticks to reuse.
Tips to avoid sticky and bendy resin
Avoid cold and temperature varying areas:
Do not work in cold temperatures, as it prevents resin from curing properly. Epoxy resin is runny and flows freely in warm temperatures. It is ideal to work in a controlled temperature environment. Avoid open and windy spaces where dust can easily stick to the epoxy as well.
Warm Epoxy before pouring:
Even though the manual recommends to warm both the solutions. I learned from my experience and read on other blogs as well that warming solution A is the key.
As a practice, keep the bottle of solution A in a glass or tub of warm tap water to increase its temperature and make it warm before pouring into the cups for mixing. This allows it to mix easily and when mixed the solution is smooth to run from the mixing cup for a longer period giving you more time to work on your project. If you warm solution B which is the hardener, it speeds up the chemical reaction and it tends to harden faster than normal.
Precise measuring of resin mixture:
When mixing the two solutions be precise with measurement. Measure by weight on a scale for more accuracy. However, even if you eye the bars on the measuring cup to mix equal parts of resin and hardener, make sure to keep your eyes in level with the cup to avoid human error in calculation. Do not pour more than 200ml at a time to avoid flash curing.
Pour 1 part of solution A (resin) in the measuring cup and let it settle in the cup for a minute before pouring the solution B (hardener) in equal proportion. When the two mix you will see swirls and lines appear in the transparent cup. Use a mixing stick like popsicle stick or silicone spatula to thoroughly mix the two solutions for 3 minutes or till the lines disappear completely. Scoop the mixture from the walls and sides of the mixing cup to mix it and stir in one direction only slowly.
Avoid water-based materials from contact with resin:
Do not use water-based colors and dyes in resin. For large projects pour in multiple layers waiting for about 3-5 hours between each pour. Thin layers and small molds may take about 1-2 more days than usual to cure.
I hope my projects helped you get started as a beginner with resin crafts. If you have any questions let me know.
Related: DIY Resin Crafting: Everything You Need To Know To Get Started