This post may contain affiliate links. Please see our full Disclosure Policy for details.
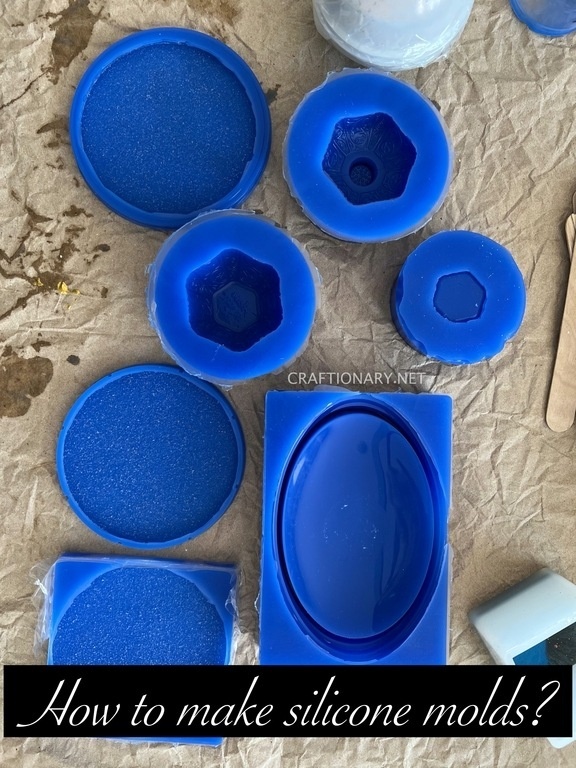
In this post you will find details for material and instructions to make silicone soap dish molds using silicone rubber and housing kit. This is a one stop article to get you started into making silicone mold with plastic and metal for casting epoxy resin mold projects, candle wax, soap, plaster, concrete cement, clay and more.
Here is a quick summary of how to use silicone to make custom molds for your craft projects before we dig deep into the complete procedure:
How to Make Custom Molds?
You can start a resin business at your home by simply learning about custom molds to make resin pieces:
MATERIAL:
- Laser-cut acrylic blank
- Sticky back plastic sheet
- Plastic container or cup
- Liquid silicone
- Hot glue gun
- Nitrile gloves
- Mixing cup and stick
- Small pair of scissors
- Mica powder (optional)
INSTRUCTIONS:
You can easily make a custom mold step by step:
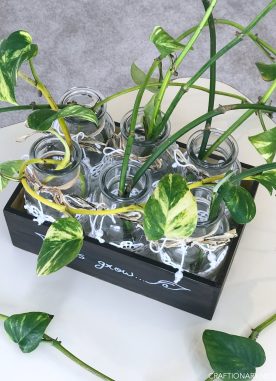
- The first step is you have, to make a ‘blank’ around which the silicon mold needs to have formed. And if you want a shiny mold, your blanks will also be shiny. For example: first, I design the ‘blank’ from 3mm (1/8 inch) Perspex with engraved details 1mm less than 1/16inch deep with digital drawing software, convert it into a PNG file, and send it to the laser cutting company to cut it.
- Then create a ‘wall’ around the blank to contain the liquid silicone. Cut the top half of the cup and place it on a stick-back plastic sheet with the edge facing down for a small design. A large project sandwich box: you can use the top half of a plastic container.
- Take a hot glue gun and run it around the outside edge of the plastic cup and container to seal them to the back of the stuck plastic sheet. So that silicone cannot seep out in step 6.
- Place your blank in the center of your walled-off so that the side with imprint details is facing above.
- Put your nitrile gloves on to mix a batch of liquid silicone: liquid silicone comes in two parts combined in a 1:1 ratio. You submerge your blank with a depth of 1cm above it. Mix slowly; until it is combined. And make sure that you scrape the sides and bottom of your cup and containers thoroughly. This whole process takes 3 minutes.
- Pour the silicon that mix in step 5 over your blank and leave it for a cure. Different brands have different times to cure. But this curing process becomes fast in a warm room. The time for curing is 1 to 4 hours.
- Once the resin has cured, pull apart the plastic walls to release your mold and push the blank outward from the mold.
- Finally, trim the uneven lip around the edges of your mold with small scissors. After this, your mold is ready to use.
Let’s look at the above method to make silicone molds in detail. You will find the following information below:
Table of contents:
- Introduction
- Silicone molds making video
- Make plastic silicone mold
- Material
- Important information
- Silicone molds step-by-step instructions
- Silicone mold tips
- Ways to make silicone molds frame
- Materials to use as master mold for silicone rubber
- Make metal silicone mold
Introduction
Wear gloves, cover the surface, place your non-silicone item you want to make mold of in a tray and seal from the sides. Mix part A and part B of the silicone rubber mold making kit using wooden stick and pour over the item till it’s completely submerged in it. Let it cure as per instructions in the product’s manual. Trim and remove the item and use your mold to make variety of things using epoxy resin and other casting crafts.
Silicone molds making video
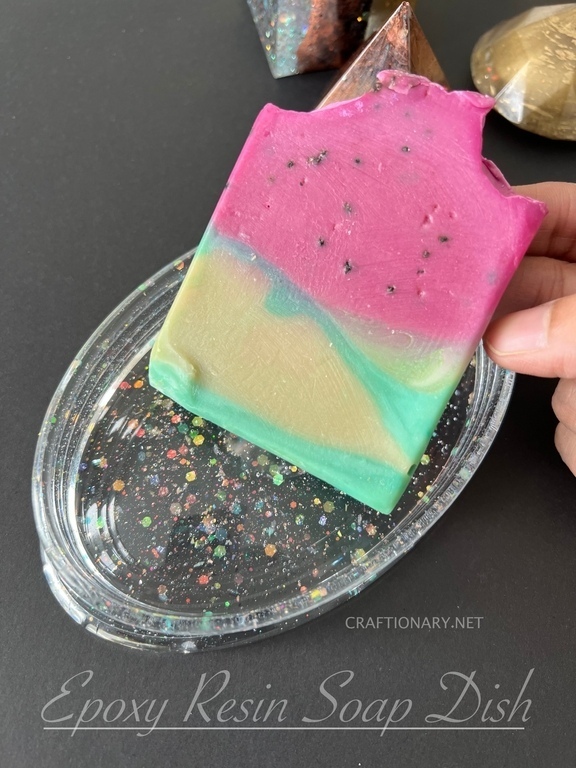
If you are a visual person you will enjoy this video of making silicone molds from mixing till removing the item from the mold to making an epoxy resin soap dish.
Make Plastic Silicone mold
You can make a mold using anything in silicone, for the purpose of this tutorial we are using a dollar store soap dish.
Material
You will need:
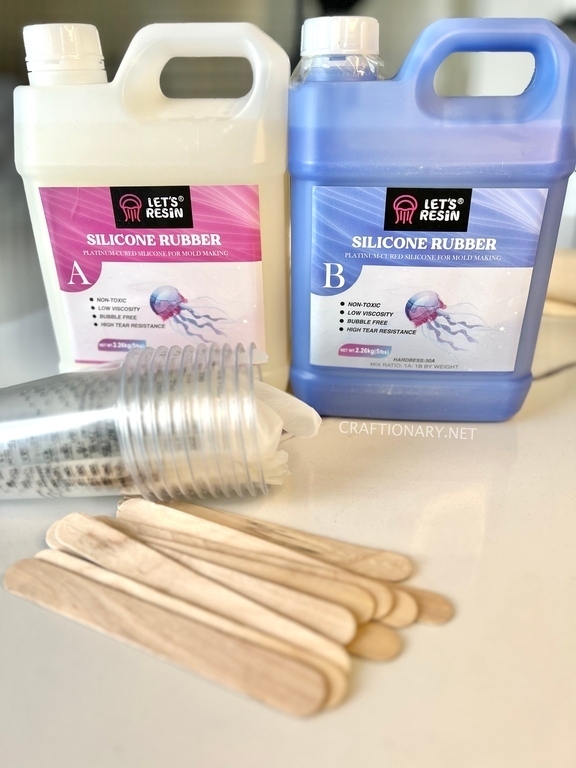
- Lets Resin Silicone Rubber
- Lets Resin Mold Housing for silicone mold making
- Gloves
- Plastic or paper sheet
- Baking tray
- Parchment paper
- Double-sided tape or glue gun
- Wooden sticks
- Plastic cups with measurement scale
- Scissors
Related: DIY Resin Crafting: Everything You Need To Know To Get Started
Important Information
Before starting the process let me share some importance essential features of the Lets Resin silicone rubber product I chose for making silicone mold art and crafts.
Features: This is a 30A hardness, self-degassing and fast curing platinum silicone with high tear strength, resistance and low shrinkage rate. It is non-toxic, odorless and doesn’t easily break making it ideal for DIY resin molds. Note that: A platinum cured silicone uses platinum as a catalyst and converts from liquid to solid using heat from the environment.
Mix Ratio: 1:1 by weight or volume (weight is more accurate)
Mixing Time: 3-5 minutes for smaller quantity or till the two solutions mix completely. One is blue and the other is white making it easy to notice proper mixing.
Working Time: 30 minutes at room temperature i.e. 25 °C/77 °F.
Curing Time: Approx 3-6 hours. Depends on the size and thickness of the project and curing temperature. I waited for 24 hours before remolding and using the silicone molds for making projects.
Bubbles: Low viscosity helps bubbles disappear within 2 hours at room temperature. If you are working in hot temperature, you can seal and put it in the refrigerator for 1 hour while it cures to remove any possible micro bubbles formation. Remove and continue to let it cure at room temperature.
Use: Make small and large silicone rubber molds for wide application. They are ideal for use as resin casting molds, 3D silicone molds, concrete molds, cement molds, soap molds, plaster molds, clay molds and more. It has a long life and are reusable up to 500-1000 times.
Silicone molds step-by-step instructions
1. Wear gloves and cover the working surface with a plastic sheet or any sheet you prefer to avoid mess from spills.
2. Plastic, metal and any non-silicone material can be used for making silicone molds. I used a parchment paper as base for my project and placed it in on a baking tray.
3. Then I placed the item I want to make mold off on the paper i.e. the soap dish. If the item is lightweight make sure to fix it to the base using double-sided tape, otherwise it may float to the surface making the process ineffective.
4. Create a boundary around the soap dish.
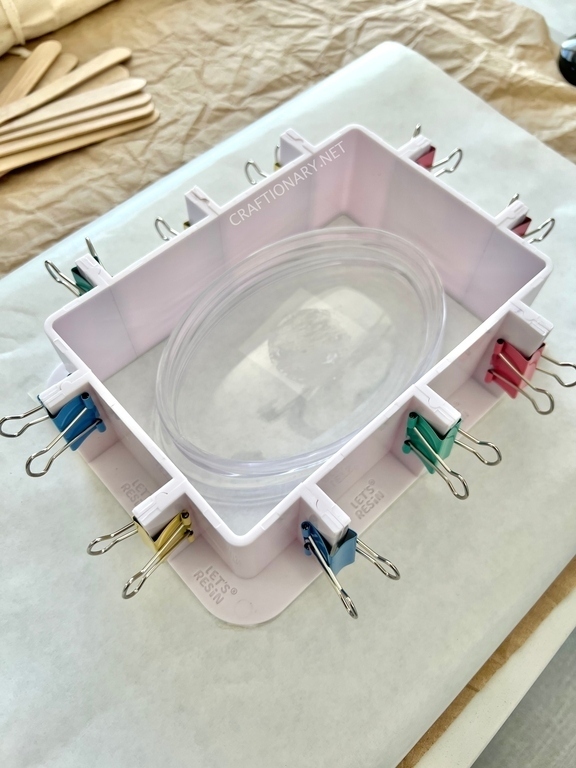
The mold housing is a convenient accessory to make small molds and you can build in a variety of shapes. Use double-sided tape to stick the mold housing to the parchment paper and seal it with glue gun for extra prevention. I skipped the glue gun part but firmly pushed it down, however, some small quantities escaped the sides but didn’t cause much trouble.
5. Once the setup is complete mix the silicone rubber in equal parts.
To avoid accidents be careful with the measurement. Ideally use a scale to measure by weight but since I didn’t have a small scale I aligned my eyes with the measuring cup and poured equal quantities of silicone A (white rubber) and B (blue rubber) one after the other. Use a wooden stick to mix the two entirely for at least 3-5 minutes or till there is no difference between the two colors.

6. Pour the mixture into the housing till 1/4 of the soap dish is covered with silicone. There is a chance of silicone mold ripping if it is too thin at the top.
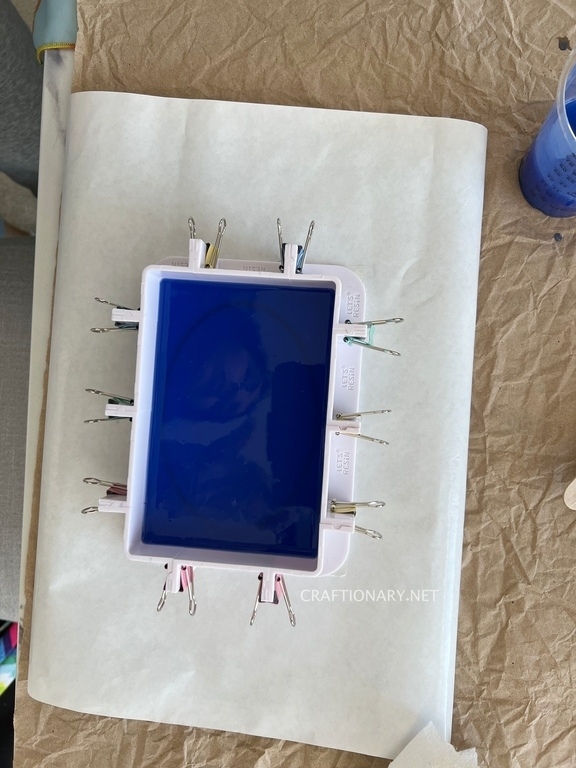
7. Let it cure for 5-6 hours as suggested by the manufacturer. I left it for 24 hours just to be sure.
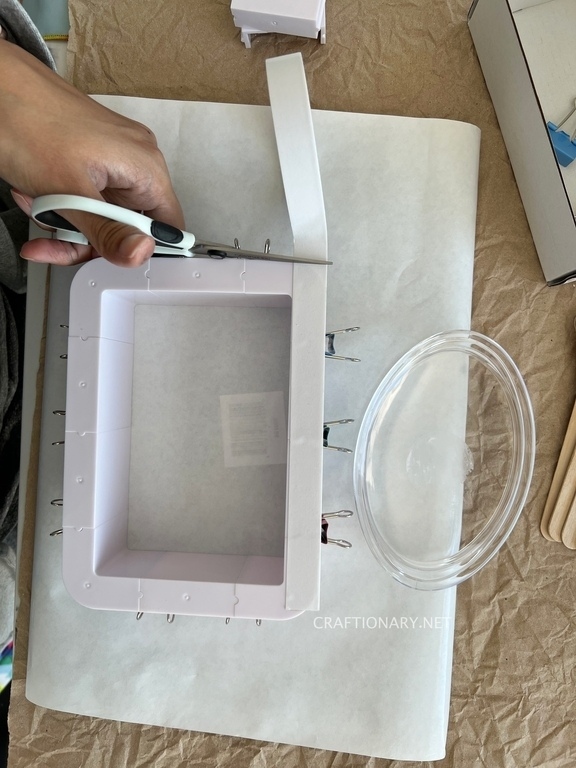
8. After it cures. Remove the mold housing from the sides and remove the parchment paper from the bottom. Now carefully cut the top to remove thin layer using scissors and remove the soap dish.
9. Trim the details to make it neat and ready for casting.
10. Make your projects. Find detailed instructions and video on epoxy resin molds DIY.
Silicone mold tips:
- Always seal the solution bottles after pouring.
- You get more working time with silicone in lower temperature.
- Silicone spills easily wipe off the surface with rubbing alcohol and clean with soapy water.
- Bring the silicone at room temperature before using if it has frozen.
- You can reduce the stickiness of silicone by leaving it to cure for 1-3 days. Can happen with larger projects. I personally didn’t have this issue.
- To avoid cure inhibition make sure to work in a clean environment and avoid contact with resin, clay and tin-cure silicone. (Tin cure silicone uses tin salts as catalyst and moisture from air to transform).
- Avoid water contact while making silicone molds and wipe things with paper towel to dry completely before use.
Ways to make silicone molds frame
There are a variety of things you can use at home to make frame for pouring silicone rubber to make molds other than adjustable size mold housing.
For the boundary: Use lego bricks, cookie cutters, plastic cups, foil trays, cardboard cookie boxes, and plastic chocolate containers.
For the base: PVC sheet, seamless tape, ABS plastic sheet, PLA sheet, and acrylic plate. Make sure to seal the bottom and boundary with hot glue gun from the outside. Do not use silicone mat as base.
Materials to use as master mold for silicone rubber
There are a variety of items you can use to make molds with silicone rubber that are non-silicone. A few of these items are:
- epoxy resin cured pieces
- metal items made of copper, iron, steel, and aluminum alloy.
- plaster
- ceramic
- cement
- glass
- sulfur-free clay (like air dry clay, polymer clay)
- 3D model items made of PLA and ABS material.
Testing Metal to make Silicone Mold
You can use decorative accents to make beautiful molds for your projects. I tested out a cute little pomegranate metal decor piece to make tealight holder.
Make Silicone Metal Mold:
Instead of a housing kit, I used disposable plastic cup as my housing for silicone casting. Since, this is metal it is heavy and doesn’t require sticking to the base. Simply, place the plastic cup on a parchment paper and glue the sides with hot glue gun. Be generous with glue to ensure their is no space for silicone to escape.
Now sit the metal piece in the center and pour the silicone mixture on top. The direction you put the mold determined the cast. If you place it upside down, it will make an empty jar for you to put things in and the other way around will create a opaque mold to make a decor piece filled with resin. Here’s a video showing the process to make resin candle holders in less than a minute.
Make Resin Tealight Holder:
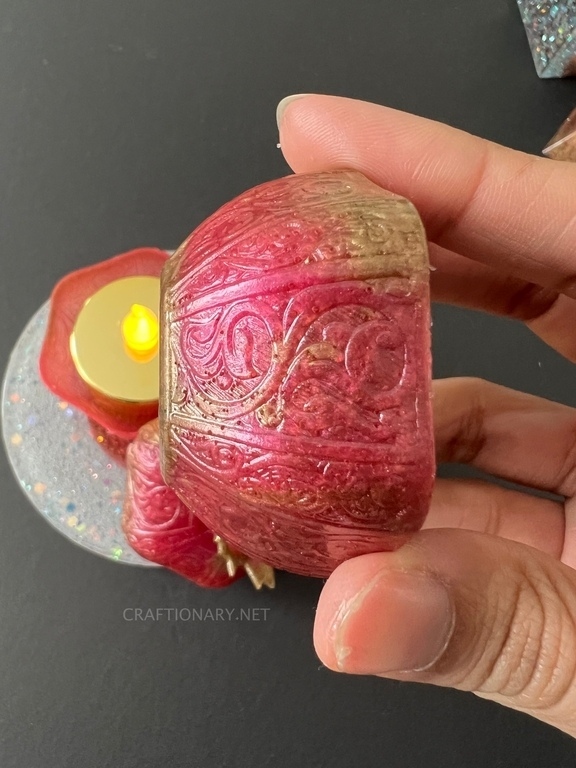
To make the resin candle holder, I used the acrylic pour painting ideas with a red and metallic gold mica powder solution and poured the mixture a little in the center turn by turn till the mold was filled. In the end I gave it one stir with wooden stick and cool swirls were produced.

Note that resin is not heat-resistant to direct flame and may get damaged from tealight flame. I am using remote controlled LED tealight candles.
Silicone molding considerations:
– When making a mold keep in mind that the layer around the piece is not TOO thin, otherwise it will produce a resin piece which is too soft and flimsy. A certain thickness makes it firm and quality-looking.
– I wanted to see how the design on this master mold produces results in resin projects. Here’s a comparison of the design and I think it is perfect.
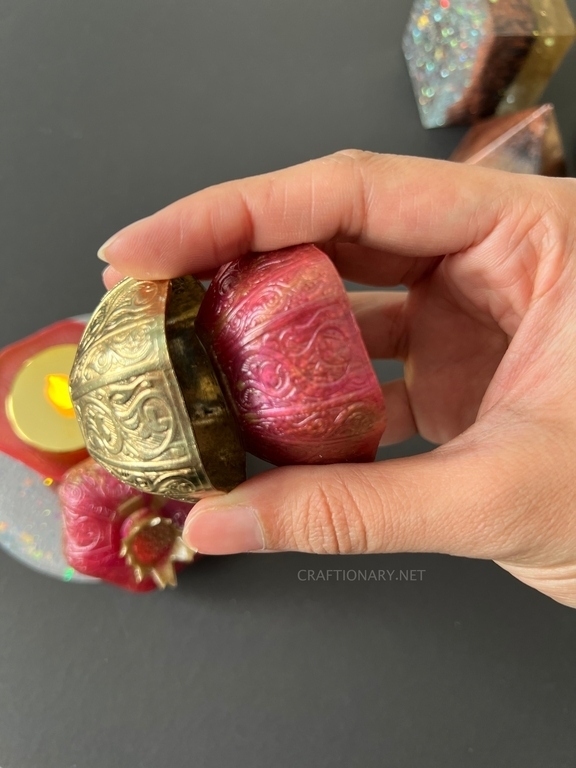
I also want to show you a closeup of the design from the metal on to the resin project through custom mold.
I hope you found this article useful. If you have any questions regarding the projects I have shared please leave them in the comments section below. You will also like:
Unique butterfly resin art on bamboo jars
Beautiful glass paperweights with epoxy resin molds
36 Stunning epoxy resin projects diy that look expensive
Disclaimer: This is a sponsored post by Lets Resin. I received products for review, however, the opinions and projects shared are 100% mine.


I absolutely loved this tutorial on making silicone soap dish molds! The step-by-step instructions were super easy to follow, and the housing kit made the whole process so much simpler. Can’t wait to try this out for my next crafting session! Thanks for sharing!
I absolutely loved this tutorial! The step-by-step instructions made it so easy to create my own silicone soap dish molds. Can’t wait to try different designs with the housing kit. Thanks for sharing such a fun and creative project!