This post may contain affiliate links. Please see our full Disclosure Policy for details.
Garage floor epoxy is a type of coating that you apply to concrete garage floors to improve their durability and appearance. The coating typically consists of a two-part epoxy resin that you mix together and then applied to the floor in multiple layers. Once the epoxy has cured, it forms a tough, durable surface that is resistant to chemicals, oil, and other substances commonly found in a garage.
Additionally, epoxy coatings can come in a variety of colors, allowing for a custom look for the garage. It is important to properly prepare the concrete surface before applying the epoxy and also to follow the manufacturer’s instructions for application. Check out these simple and easy DIY garage wall ideas that anyone can do.
Table of contents:
- DIY Rustoleum garage floor epoxy video
- Advantages of epoxy resin floor
- Disadvantages of epoxy resin floor
- Is epoxy flooring worth it?
- How much cost is garage floor epoxy?
- What is the life of epoxy floors?
- Double car garage epoxy floors
- What color epoxy floor to use?
- How long does it take to epoxy two car garage?
- Material list for garage epoxy floor?
- Epoxy flooring process
- Do you grind garage floor before epoxy?
- Step by step instructions for garage floor epoxy
- How much time it takes to cure epoxy floors?
- Maintenance of epoxy floors
- Should I hire or DIY epoxy floors?
- Is polyurea better than epoxy for garage floors?
Find DIY Rustoleum garage floor epoxy instructions from a non-DIYer with unedited video to decide whether to hire or do it yourself?
Garage floor epoxy
There are different types of resin. The one you use to seal, coat and protect your floor is called polyurethane resin. It is scratch resistant and strong.
DIY Rustoleum garage floor epoxy video
Here’s a video showing application of epoxy on the garage floor with unedited instructions.
Before getting to the instructions on how to coat with Rustoleum garage epoxy floor without using extra tools lets talk about the benefits of epoxy on the floors.
Related: DIY Resin Crafting: Everything You Need To Know To Get Started
Advantages of Epoxy resin floor
There are several advantages to using epoxy resin for garage or commercial flooring:
- Durability: Epoxy resin is a very hard and durable material compared to hardwood floors, cement and other materials. It can withstand heavy traffic, impacts, and spills. It is resistant to chemicals, motor oil, gear oil, gasoline, acid, bleach, and other common garage and commercial flooring hazards and solvents.
- Easy to Clean: Epoxy resin is a non-porous surface, making it easy to clean, and sweep or mop without any difficulty.
- Aesthetics: Epoxy resin comes in a variety of colors and you can combine it with decorative chips or flakes to create a unique and attractive finish. Easily customizable and high performance.
- Chemical Resistance: Epoxy resin is highly resistant to most chemicals, acids, and solvents, making it an ideal choice for commercial, industrial and laboratory floors
- Slip Resistance: Epoxy resin can be formulated to provide a slip-resistant surface that is safer for foot traffic.
- Moisture resistance: Epoxy flooring is an excellent barrier for moisture, making it great for use in damp or humid areas
- Low Maintenance: Epoxy resin requires little maintenance and will last for many years with just occasional cleaning.
- Cost-effective: Epoxy resin flooring is a cost-effective solution as it is relatively inexpensive compared to other types of flooring and it will last for a longer time.
- Easy to repair: You can easily repaire epoxy floors by patching, sanding, and recoating, which means you can maintain the integrity of the surface for years.
- Insulation: Epoxy coating also provides added insulation and helps to keep the space dry and clean. For a heated garage it is energy efficient as it maintains the temperature throughout the year.
Disadvantages of epoxy resin floor
While epoxy resin flooring has many advantages, there are also some potential disadvantages to consider:
- Long curing time: Epoxy resin requires a curing time of at least 24 hours, and in some cases, several days to fully cure. This means that the area where the epoxy is applied will be out of use during this time.
- High VOC emissions: Epoxy resin can have high emissions of volatile organic compounds (VOCs), which can be harmful to air quality. This is something to consider if you’re sensitive to strong odors or if you’re installing the flooring in an area with poor ventilation.
- Difficult to apply: Epoxy resin has an installation process and requires a certain level of skill and experience. It’s important to follow the manufacturer’s instructions carefully and to work in a well-ventilated area.
- Not suitable for all surfaces: Epoxy resin is not suitable for all types of surfaces, and it may not bond well to certain types of concrete or other materials.
- High temperature sensitivity: Epoxy resin may lose its strength and become brittle in high temperatures. It may also become soft in extremely low temperatures.
- Expensive: Epoxy resin flooring can be more expensive than other types of flooring, especially if you hire a professional to install it.
- Not suitable for outside use: Epoxy resin is not suitable for use outdoors, as it may be affected by UV rays, temperature changes and other environmental factors.
- Difficult to remove: Epoxy resin is very difficult to remove once it has been applied, so it’s important to be sure that you want it before applying it.
- Slippery: It may be slippery when wet or oily.
- Replacement: In the long run, it may crack due to normal wear and tears and you will have to replace it.
- Yellowing: It may turn yellow, chip or pickup hot tire in rare cases. In such areas cement floors is a better option.
It is important to weigh the pros and cons before deciding to use epoxy resin flooring, and also to consider the specific requirements of the area where it will be installed.
Is epoxy flooring worth it?
Epoxy resin not only upgrades the functionality but the appearance of your garage floors as well. It also adds to your home value and pay off if you sell your home in future. It increases the value by up to $10 per square foot and is comparatively a fast and inexpensive upgrade.
How much cost is garage floor epoxy?
The expense can typically range from $1,100 to $3,500 for garage floor epoxy.
The cost of garage floor epoxy can vary depending on a number of factors, including the size of the garage, the condition of the concrete, the type of epoxy you use, and whether or not you choose to hire a professional to install it.
On average, a DIY garage floor epoxy kit can cost anywhere from $50 to $150, depending on the brand and the size of the kit. For a two-car garage, the cost can range from $200 to $600. However, these prices are for the material only and don’t include the cost of renting equipment or tools, and the cost of preparing the surface before applying the epoxy.
If you decide to hire a professional to install the epoxy, the cost can be significantly higher. A professional installation can cost anywhere from $3 to $12 per square foot, depending on the size of the garage, the condition of the concrete, and the type of epoxy you use. This cost also includes the cost of preparation, the cost of materials, and the cost of labor.
It’s important to note that the cost can vary widely depending on the specific location, and it’s best to get quotes from several contractors to get an idea of the cost in your area. Also, if you’re on a budget, you can consider alternative options like paint, tile, or roll-out mats that may be more cost-effective.
What is the life of epoxy floors?
With proper care epoxy floors can last for up to 10 years in a residential space like patios and garages.
The life of epoxy flooring can vary depending on a number of factors, such as the quality of the epoxy used, the condition of the concrete surface, the level of foot traffic and vehicle traffic on the floor, and the level of maintenance provided.
Under normal conditions, epoxy flooring can last for many years, typically in the range of 10 to 20 years. With proper maintenance, it can last even longer. Proper maintenance includes regular cleaning, using the right cleaning products and avoiding using abrasive materials.
However, if the surface is exposed to heavy traffic, chemicals, or other harsh conditions, the life of the epoxy flooring may be shorter. In these cases, the epoxy may need to be reapplied or patched sooner than expected.
If you have any concerns about the life of your epoxy flooring, it is best to consult with a professional flooring contractor or epoxy flooring supplier. They can inspect the floor and give you an estimate of how much longer the flooring is likely to last, and provide recommendations for maintaining the floor to extend its life.
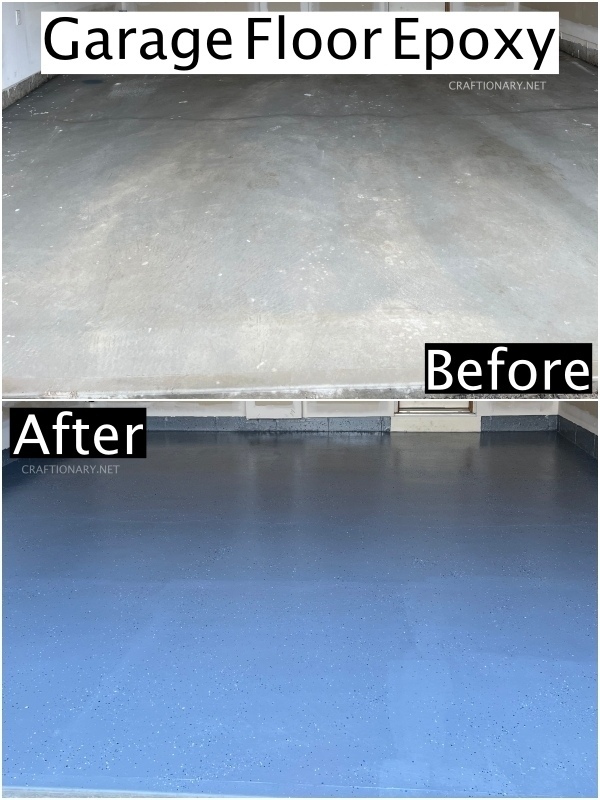
Double car garage epoxy floors
The double car garage kit we bought is a 2 1/2 car garage epoxy coating from Home Depot. It includes concrete etch, epoxy resin, hardener and color flakes. It is only available in gray color choice in our area. However, depending on where you reside you might have garage epoxy colors to choose from!
Coverage: Up to 450-500 ft²
Walk-on ready: 24 hours
Drive-on ready: 3 days
Best for: Basements, residential garages, workshops, laundry rooms and more.
Benefits: No hot tire pick-ups, 1 coat application and waterproofing sealer.
Technology: Rustoleum epoxy uses cross-linking technology that helps to prevent concrete from chipping, cracking and dusting by forming a bond that s stronger than concrete. Its like a network of crisscrossing which supports superior abrasion, resistance to chemical and water as well as maximum hardness and adhesion.
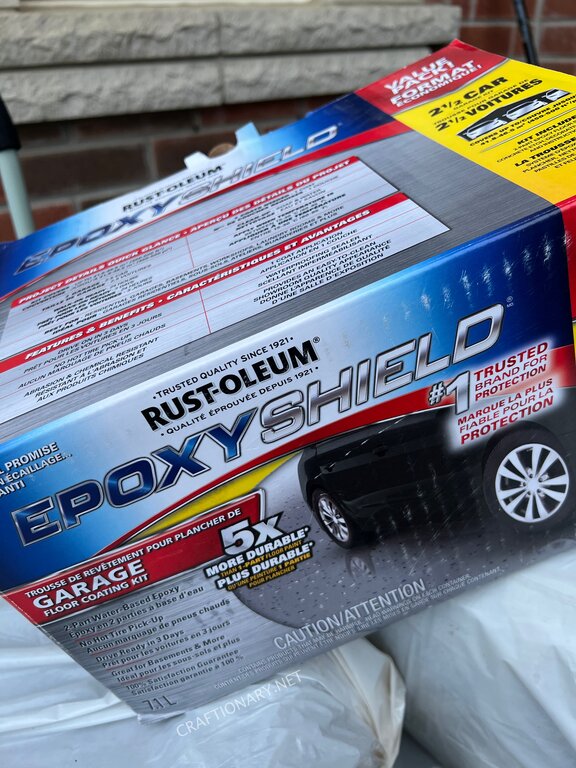
Rustoleum epoxyshield
What color epoxy floor to use?
White epoxy floors yellowing is most commonly observed, followed by lighter greys. Therefore, go with earthy tones as they are more resistant to turning yellow with time.
The color of the epoxy flooring is a personal choice and depends on the desired aesthetic look of the garage or the commercial space. Some popular colors include:
- Clear: Clear epoxy is a popular choice because it allows the natural color of the concrete to show through. This is a great option if you want to keep the natural look of the concrete, but still want the benefits of an epoxy coating. However, it can turn yellow overtime.
- Gray: Gray is a classic and neutral color that goes well with most garage designs. It also hides dirt and stains well.
- Browns: Beige or tan are popular colors for a garage or commercial space that want to have a more modern and elegant look.
- Black: Black epoxy is a great choice for a garage that wants to have a sleek and modern look. It also hides dirt and stains well.
- Color flakes: Some epoxy manufacturers offer color flakes that can be added to the wet epoxy, giving the floor a decorative finish. This option allows you to customize the color of your floor and add a unique touch to the space.
- Custom colors: Some manufacturers can create custom colors to match the existing color scheme of a commercial space or to match a specific brand color.
It’s important to consider the overall aesthetic of the space, the amount of natural light, and the intended use of the space when selecting the color of the epoxy floor. Some colors may be better suited for certain types of spaces, such as black for a mechanic workshop. It’s also a good idea to see a sample of the color in the space or a large color swatch to get an idea of how it will look before making a final decision.
How long does it take to epoxy two car garage?
The project takes 3-4 hours to complete without taking any break for this size of garage. However, if you have a single car garage the time will be half.
Material list for garage floor epoxy
Rust-Oleum is a popular brand of garage floor epoxy that can be applied by DIYers. Inside the two car garage epoxy floor kit, you will find resin, hardener, concrete etch and flakes.
Here is a general list of materials that may be required for a DIY garage floor epoxy project:
- Epoxy coating kit: This will include the epoxy resin and hardener, as well as any pigments or color flakes that are needed.
- Concrete cleaner and degreaser: Used to clean the concrete surface before applying the epoxy.
- Concrete etcher: An acidic solution used to etch the concrete surface to improve the adhesion of the epoxy.
- Concrete patch and repair kit: Used to repair any cracks or damage to the concrete surface.
- Concrete sealer: Used to seal any porous areas of the concrete to prevent the epoxy from being absorbed.
- Paint brush: Used to apply the epoxy to the sides.
- Mixing bucket and stir sticks: Used to mix the epoxy resin and hardener together. You can also reuse large plastic container as bucket. Replace stir sticks with drill and mixing rod for efficiency.
- Epoxy roller: Used to apply the epoxy to the floor with a roller.
- Paint tray: To pour and apply the epoxy with roller.
- Masking tape: Used to mask off any areas that should not be coated with epoxy.
- Drop cloths: Used to protect any areas around the garage from drips and spills.
- Safety equipment: Such as gloves, shoe covers, goggles, and respirator, to protect yourself from the chemicals and fumes during the application process.
- Extension pole: To reach far areas (optional).
- Squeegee: For effective cleaning and speed drying (optional).
Epoxy flooring process
The process for applying Rust-Oleum garage floor epoxy typically involves the following steps:
Prepare the concrete surface: Clean the floor thoroughly and repair any cracks or damage. Scrub if the area is heavily soiled and etch the entire floor with concrete etch. The surface should be dry and free of debris, oil, and other contaminants.
Mix the epoxy: Wear gloves! Rust-Oleum garage floor epoxy comes in a two-part system that you mix together according to the manufacturer’s instructions in a large container. Knead the pouch for a few seconds, roll sides and shake back and forth. Squeeze the corners to mix the content for about 2-3 minutes. Wait for induction for about 1-2 minutes. Then cut corners and pour epoxy resin followed by hardener which will also have the tint of the kit you selected.
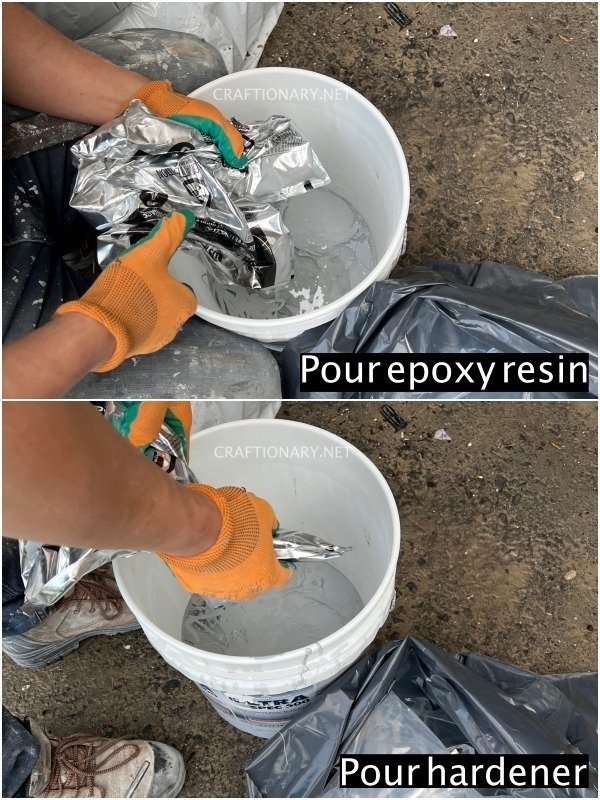
Pouring epoxy resin and hardener in the bucket
Now with the help of a drill and mixing rod mix the two parts together efficiently for 5 minutes at the least.

Mix epoxy solution with a drill rod
Apply the epoxy: Use a paint roller or brush to apply the epoxy to the floor, working in small sections. Be sure to overlap each pass slightly to ensure an even coverage.
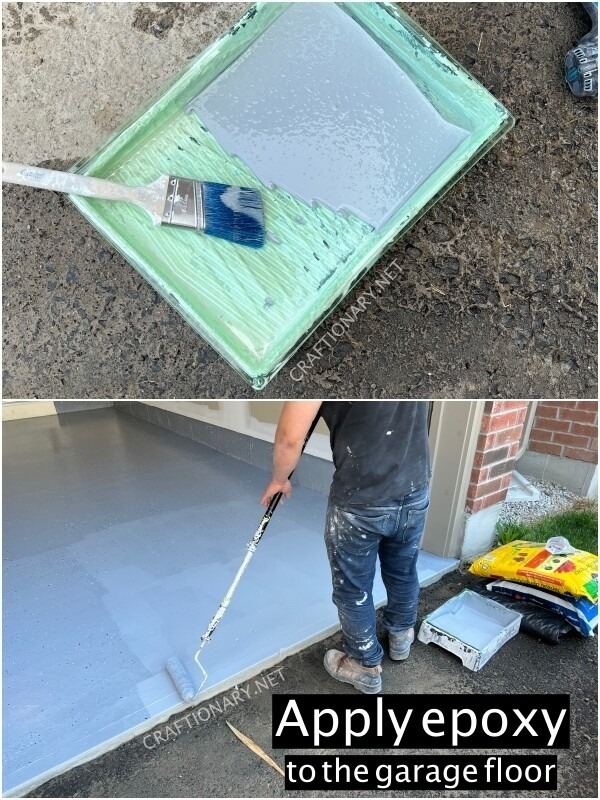
Apply epoxy to the garage floor
Add the color flakes (if desired): Rust-Oleum garage floor epoxy kits come with color flakes that you can add to the wet epoxy to give the floor a decorative finish.
Apply a topcoat: It is recommended to allow the epoxy to dry overnight, then apply a clear topcoat for added durability and shine. However, we applied two coats allowing a few minutes of drying time in between both coats.
Allow the epoxy to cure: Follow the manufacturer’s instructions for curing times.
It is important to note that the process of applying Rust-Oleum garage floor epoxy is a time-consuming, multi-day process that requires proper preparation, and you should read the instructions and safety precautions carefully before starting.
Do you grind garage floor before epoxy?
Grinding a garage floor before applying epoxy is a common preparation step that you can use to improve the adhesion of the epoxy to the concrete surface. Grinding removes the top layer of the concrete, exposing the rough and porous surface, which allows the epoxy to bond better to the concrete.
It is recommended to grind the floors for commercial floors, old concrete or worn out floors. However, for residential acid etching can also improve epoxy installation if the floor is in bad condition. For new floors there is no need for grinding and etching.
Step by step instructions for garage floor epoxy
Epoxyshield Garage Floor Kit:
Rustoleum Epoxyshield concrete floor paint is a complete 2 1/2 car garage floor coating kit. The garage epoxy floor cost was only $200 at home depot.
Prep garage floor before epoxy:
Before you start use a power wash or garden hose to vigorously clean every spot in the floor. You might need to use specific tools or solutions depending on how strong the mud or other residue is sticking to the floor. Our garage was only one winter old and therefore it was easy to clean with a garden hose. Some light brushing with an outdoor floor broom on wet mud did the job. There was some sticky mud and salt residue which easily came off with the rough broom bristles. This step is important because anything that is left on the floor at this point will get a coat over. Hence, it may not give smooth results. Wash the floors a day before painting to ensure it is completely dry.
If you have old floors with cracks, this is a good time to fill those cracks up as well. You may consider grinding or acid etching the floor.
Epoxy installation:
When you are painting the floors you have to ensure you cover the entire surface with a strategy that allows you to coat every spot. Don’t get stuck in the middle or reach a further space with no way to walk back to the missing spot. Since the paint is wet and you might ruin it by walking on top.
Start by using a paint brush to coat the edges of the floor. This is the space where you don’t have to stand. Use a paint roller and start from the top left corner (or your top right corner) to coat the garage floors. Go from top left corner to the top right corner making sure you applied a proper first coat of epoxy. Coat back and forth covering 3-4 feet wide space depending on your roller’s rod length. Now move from top left corner to the top right corner to apply a careful second coat.
The first coat is wet while you apply the second. When you reach back to the spot that you started sprinkle the chips on the wet paint unevenly. It’s like splashing a handful of sand in the air.
Recommended: It is recommended to wait overnight before applying the second coat, but in this case it was done as the first coat was touch dry. This project was recorded in June. It will cure faster in summer.
Now repeat the above process till you reach the end of the garage floor. Now let it settle for at least one day before you start walking on it or drive your cars over. Enjoy the fruits of your labor.
How much time it takes to cure epoxy floors?
It will take 24 hours for epoxy flooring to cure, however, it is recommended that you drive your cars over after 2-3 days.
Maintenance of epoxy floors
Epoxy garage floors are easy to maintain and fall in the low maintenance category. Just a normal cleaning routine with sweep and mop works with epoxy floors. Keep your floors scratch free and reduce wear and tear by removing small particles. You can also wash the floors with garden hose and floor cleaning solvents for perfect clean.
Should I hire or DIY epoxy floors?
You will find tons of Rustoleum garage floor epoxy videos and written instructions. Since this material is available for many years to protect the garage flooring. Many will be professionals sharing their best practices and tips. They want to ensure this simple garage floor coating is achievable with minimum effort to help DIYer. Since, hiring a person for the job can get expensive why not do it yourself.
At this point, the main question is whether it is as easy as the professional floor coating contractor makes it seem in the video or will it be worth the investment if you ask for services. This is where an amateur homeowner like myself comes into play. I am writing this down with the hopes that it helps someone. The only projects before Rustoleum garage floor epoxy that I have tried is painting the walls and making a planter box. Therefore, you can be confident in using this solution to simply paint (aka coat) your garage floors with a roller if I can!
Is polyurea better than epoxy for garage floors?
Both polyurea and epoxy are popular options for garage floor coatings, but they have some distinct differences.
Epoxy is a two-part system that consists of a resin and a hardener. It is known for its durability, chemical resistance, and ability to bond well to concrete surfaces. Epoxy is also relatively inexpensive and widely available in DIY kits.
Polyurea, on the other hand, is a one-part system that is typically sprayed on. It is known for its fast curing time, high flexibility, and excellent chemical resistance. Polyurea is also more resistant to UV light and extreme temperatures compared to epoxy.
In terms of durability, both polyurea and epoxy are very durable and can last for many years with proper maintenance. However, polyurea is generally considered to be more durable and resistant to impacts, scratches and abrasions, and UV exposure.
In terms of cost, polyurea is typically more expensive than epoxy. It also requires special equipment and expertise to apply, so it’s typically only applied by professionals.
In summary, if you’re looking for a fast-curing, flexible, and UV-resistant coating with excellent chemical resistance, polyurea may be a better option than epoxy. However, if you’re looking for a more cost-effective solution that is widely available in DIY kits, epoxy may be a better choice. It is important to weigh the pros and cons of each option and consider your specific needs and budget before making a decision.
Update:
Epoxy works as garage floor primer and comes with small sprinklers to give some decorative touch to the floor. Rustoleum epoxyshield reviews are very few but in my opinion after 8 months, it is going strong.
We had some accidental blue stains from leakage of salt bag on the floor and I was worried the stain would be permanent, but it washed off with just a spray using garden hose. I will keep updating this post with every passing year.
November 2023: It is still intact since my last update in Jan 2023. Be careful not to use outdoor hard bristles brush to remove mud and salt stains. A soft brush would be great for rubbing off winter dirt, mud and sticky salts. We made this mistake of brushing too hard with a hard bristle outdoor brush and it rubbed off some of the resin flooring layer.
Are you new to doing things yourself? Want inspiration to start on home projects and believe in not collecting a whole lot of tools and materials! Do you believe less is more and to get the right things only to get the job done. You don’t really need all those tools for one time project.
You will also like: