This post may contain affiliate links. Please see our full Disclosure Policy for details.
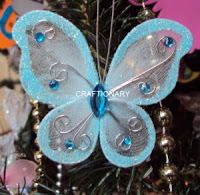
Make butterflies with nylon also called stocking net. Making beautiful flowers with nylon is fun. I thought how about we make a butterfly! They will surely look cute! Let’s take a look at nylon butterflies frame finished product that we will be making today with step-by-step instructions and proper material guide:

Related: 40 DIY tulle fabric projects to make and sell from home
Make Nylon Butterflies
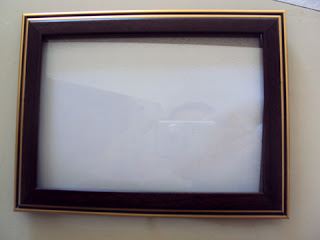
I had this old frame that I spray painted white. You may use paintbrush or foam brush for a distressed textured look as well.
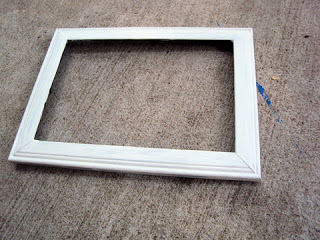
With the other frame I made this dry erase list board.
Nylon butterflies material
You will need the following material to make stocking net butterfly:
- nylon (stocking net)
- #24 gauge wire
- rings size (1) and (2) (you can also use anything round with diameters 1 or 2 inches)
- nylon thread
- plier
- beads
- scissors
Make Nylon butterflies
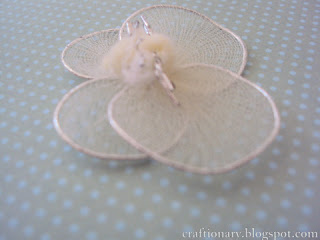
- Wind the wire around the rings. Twist at the end and cut the excess with the plier.
- You will need 2 wings size (1). And 2 wings size (2) for each butterfly.

- Next wrap the wire in the stocking net. Gather at an end and thread it. Cut the excess of net.

- If you are new to nylon crafts. You can find complete details about material over HERE. A complete basic tutorial over HERE.
- To make the butterfly. Thread the two similar pairs together. Then slip the smaller pair of wings inside the bigger ones. And thread them together tightly.

- Open the wings and shape it to complete your butterfly.

- Now flatten the wires on the back and cut out the excess.
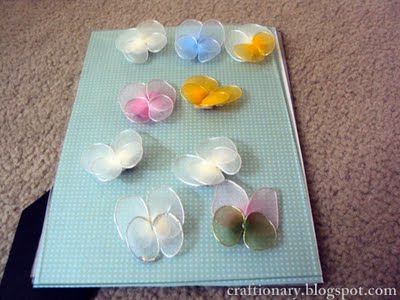
- In the same way make 8 more colorful butterflies.

- Now arrange them on the frame.
- To make the body of the butterflies, I used stamens.
- You can also use beads and pipe cleaners.

- Hot glue the stamens on the butterflies.
- Then hot glue the butterflies on a piece of paper.
- I used a green polka dots paper. I like it as the background of my frame.

I think it was fun.

Here’s my first try at making butterflies.
This tutorial is a little different from this one. Check it out:
Stocking net butterflies tutorial.

I also like this Christmas tree decoration. I found this one at Butterflies Museum.
Loved the idea of using wire, beads and glitter to decorate.
Stocking flowers or Nylon flowers.
For more beautiful flowers made using Stocking. Check out the link below:


How delicate and beautiful! I will definitely try to make it some time!
I love butterflies and these make me think of spring…it looks like you could also apply this same technique for dragonflies too!
These are adorable! I quickly sent this on to my daughter who has plans to decorate her little girl's room with butterflies. Thanks for the great idea and tutorial. 🙂
wow, those are really pretty! How did you ever think to make them? I am not good with crafts and even if I was the RA makes my hands hurt so I take things in spurts these days. Thanks for stopping by my blog, I really appreciteated it.
How creative! And this is something I may be able to do without messing it up. LOL Following you from LinkedIn!
These are so pretty! Thanks for sharing.
That's a great craft.. thank you for sharing it.
Hi, I've awarded you with the Versatile Blogger Award, You can pick it up here on my blog :Purple Froggie Clay Stuff
I hope that you have a great day, and Congrats on the award!
Cindy
wow…awesome creative butterflies…looks lovely..
first time here..love your space..
happy to follow u..:)
do stop by mine sometime…
Tasty Appetite
beautiful hani, u did grt job.i know i made like them .keep it up
Lovely tutorial! I would love to make some butterfly clips for my daughter!
brilliant my dear! thanks so much for partying with whipperberry!!
kisses
Those butterflies are so colorful, lovely and cute! Enjoyed the pictorial. Keep them coming!
These are beautiful Hani! I would have no idea where to start on a project like this. Thanks for sharing the tutorial. Also, thanks for stopping by my blog and commenting. It really means a lot!
xoxo
These are so cute! They'd be perfect for a little girl's room! Thanks for sharing the tutorial!
Loving these!!
love these…you make me think that even as a craft IDIOT I could do these..so pretty.