This post may contain affiliate links. Please see our full Disclosure Policy for details.
Are you looking for a stylish and budget-friendly way to organize your home office? A DIY IKEA file organizer decorated with IKEA magazine pages or paper and Mod Podge is a perfect solution! This easy and creative project lets you upcycle old magazines into a stunning, custom-designed file holder that reflects your personal style.
In this tutorial, you will find the step-by-step process of transforming a basic IKEA file organizer into a chic and functional piece using Mod Podge and IKEA magazine clippings. You can use this idea to decorate a plain file organizer with magazine cutouts to use your favorite patterns, designs and other collections to decorate things at home.
Why Decorate an IKEA File Organizer?
IKEA file organizers are practical, affordable, and easy to customize. By using IKEA magazine pages, you can add a unique Scandinavian design touch to your workspace. Plus, Mod Podge acts as both an adhesive and a sealant, ensuring durability and a professional-looking finish.
Materials You’ll Need:
- IKEA file organizer
- IKEA magazine pages (or any decorative paper of your choice)
- Mod Podge (Matte or Glossy finish)
- Foam brush or paintbrush
- Scissors or craft knife
- Ruler and pencil
- Sandpaper (optional, for smoothing edges)
- Clear acrylic sealer (optional, for extra protection)
DIY Desktop File Organizer Decoration Tutorial

IKEA File Organizer
Choose Your Design
Flip through IKEA magazines and select pages with bold patterns, modern interiors, or Scandinavian-inspired graphics. You can go for a minimalist monochrome theme, colorful collage, or even nature-inspired patterns.

IKEA Magazine Scrapbook
Cut the Magazine Pages
Measure your file organizer and cut the magazine pages to fit the front, sides, and back. If you prefer a patchwork look, cut different shapes and sizes to layer them. Do not worry about sizing them for collage style.
I am using a set of Plywood File Organizers from IKEA. They are called unfinished wooden organizers for magazines and files.

IKEA Plywood Organizers
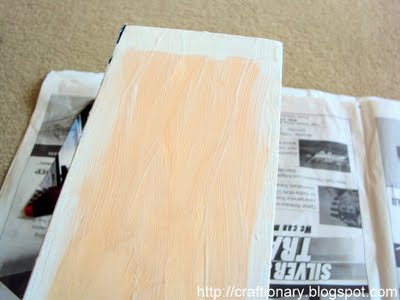
Paint The File Organizer
Paint with white acrylic paint for extra protection and neat results. (optional)

Paint the edges

Paint the insides
Arrange the Paper Cutouts
Arrange the magazine papers on the organizers to see how they look. Once you are satisfied with the arrangement it is time to glue it.

Arrange the Papers
Apply Mod Podge as an Adhesive
Use a foam brush to apply a thin layer of Mod Podge onto the surface of the file organizer. Carefully place the magazine page onto the glued area and smooth out any wrinkles or air bubbles with your fingers or a plastic card such as old credit card or roller.
Apply Mod Podge to the Surface
Use your fingers to press and set as you go.

Arrange Magazine Papers
This method is very easy and gives accurate results with no bubbles and creases below the surface.

Press paper to stick with fingers
Alternatively, you can apply the glue on the paper and adhere it on the surface.

Glue with Mod Podge
This part is very important. My alternative to roller, a glue bottle (or anything you can roll).
Roll over the paper to remove any air bubbles, and flatten the paper. This step will help avoid any creases and irregularities in the surface.

Roll to remove air bubbles
This is how it looks so far. What do you think?

Seal with Mod Podge
Once the magazine pages are in place, apply another thin layer of Mod Podge over the top to seal and protect the design. Let it dry for about 15-20 minutes, then apply a second coat for extra durability.

Decoupage with Mod Podge

Seal with mod podge
Trim Excess Paper and Smooth Edges
After the Mod Podge dries completely, use scissors or a craft knife to trim any overhanging edges. If needed, lightly sand the edges for a smooth, professional finish.

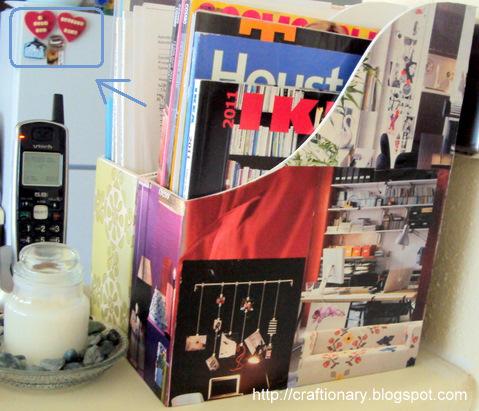
Decorated IKEA File Organizer
You can decoupage pattern paper on file organizer in the same way.

Decoupage File Organizer

Scrapbook Paper File Organizer
Apply a Protective Seal (Optional)
For added durability, especially if the file organizer will be handled frequently, spray a clear acrylic sealer over the decorated areas. This prevents yellowing and makes it water-resistant.
Do you remember these Magnet hearts for valentines day?
Styling and Usage Ideas
1. Home Office:
2. Bookshelf Display:
3. Kids’ Study Area:
4. Gift Idea:
A personalized file organizer makes a thoughtful and stylish DIY gift for friends or family.
Decorating an IKEA file organizer with IKEA magazine pages and Mod Podge is an easy and affordable way to add personality to your workspace. This eco-friendly DIY project not only upcycles old magazines but also lets you create a unique and stylish storage solution.
Get creative, experiment with different designs, and enjoy your new personalized file organizer! It was so much fun decoupaging these file organizers for my work space. Moreover, I love the Ikea magazine photos for inspiration.
You will also like:
Looking for more great DIY ideas to organize?
Check out tutorials in the category ORGANIZE.
Are you on pinterest?
You will also enjoy the Home Tips and Everything Kitchen Boards.
These are updated regularly whenever I find unique ideas.


great idea. the file organisers look lovely. happy crafting
I am really impressed and got some unique ideas from your work now its my turn i will try to make something else with your method.
Thanks..:)I would love to see what you come up with!LoveHani
Very clever idea! You should link up to the Delightfully Decoupaged Link party
NICE! I absolutely love this file organizer! I think I am going to make one for myself soon! Congratulations on your blog!
wao,,its such a nice idea..I love decoupage..hmmm
great idea – i love using modge podge. I found you on Top mommy blogs (just joined) – I inviite you to visit my blog – its a crafty type too – with a focus on handmade cards.
These are super fun! I love the catalog pages. Great idea!
Hi hani…. what a co incident it is My latest post is also about Decoupage… Your file organizer look fab… I may go for one.
I am a mod podge girl! Sparkle is my favorite! Good idea!
xo,
Sena
So creative!!! The pictures make it seem so fun!! Like there's something really exciting inside! Thanks for sharing this on Fancy This Fridays!!!
Ikea, Mod Podge, collage-y type stuff… this post has a little of a lot of things I love 🙂 Great idea!
Oh, so much cuter!!
I am the worst about organization- I have lots of pile called piles I need to go through! Come and link this to. It would be a nice addition to the party!
I love that you used a catalog instead of just scrapbook paper. It makes them so much more interesting:)
Great project I love it! I hope you will link up to Scrappy Saturdays linky party
I love this project. I did mine with cereal boxes. I did a layer of mod podge on the inside and outside of the box before I added the decorations. It made it more sturdy! Great post!