This post may contain affiliate links. Please see our full Disclosure Policy for details.
We have finally started to see the beautiful sun shining in the sky as the cloudy cold days are about to end. The sun rays and some newly grown greenery has sparked an urged in me to make origami tulip flower craft. As the arrival of spring brings colorful tulips in my mind, I thought why not decorate the home with some beautiful flowers while it’s still cold outside.
These stunning tulips are so easy to make and look adorable in a bunch in various colors. If you love to craft, the supplies for this project will already be available to you. Make these origami tulips with your kids on the weekend and enjoy some spring time till the tulip bulbs bloom.

How to make origami tulip flower craft
All you need is colorful construction paper, glue stick and scissors. Some other supplies are needed to complete the look which are optional.
In this post you will find simple how-to instructions for making origami tulips below and a full video tutorial at the bottom of the post.

This post contains affiliate links to product mentioned. Read our disclosure policy for more information.

Supplies needed for making tulip flower
- – Construction paper
- – Glue stick (with disappearing purple color)
- – Scissors
- – Glue gun
- – Paper straws
- – Floral tape
- – Stationery
Instructions to make origami tulip flower craft
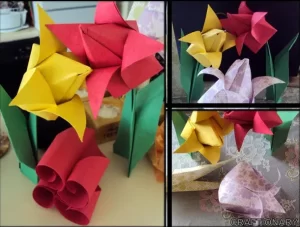
You will need one large and one small flower with origami bud to complete each tulip flower. The colors I used are red, yellow, orange, pink and blue. You can use any colors. My approach was to use a family of colors and add a pop with an alien color. Now let’s get started:
STEP 1: Start by using a pencil and a ruler to mark 8×8 cm squares on the construction paper for the outer petals. Do the same on another color paper only this time marking 7×7 cm squares for the inner petals. The bud for each flower is an 8×8 cm square as well.
STEP 2: Use alternative colors that go together to make them look bright and colorful. Cut out the squares and get ready to fold the paper.
Related: Make yarn rosettes

How to fold the origami tulip flower
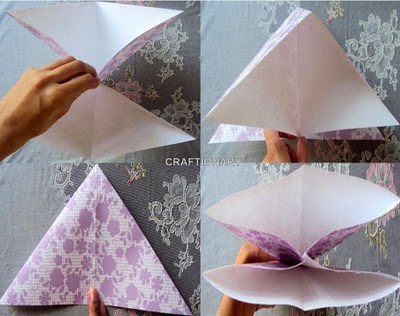
STEP 3: Fold the square in half vertically and unfold. Now fold it horizontally and open. Then fold and open it diagonally on both sides. This will mark the lines on the paper.
STEP 4: With the help of the scissors cut the paper halfway on the horizontal and vertical lines only. The diagonal lines help shape the flower.
Related: Nylon flower tulips

STEP 5: Use glue stick to glue the folds starting at one cut and ending at the diagonal mark. Picking at each cut to go in circle till the round is complete. That’s it, let it dry. Repeat to make more.
How to fold the origami tulip bud
STEP 6: Form the horizontal, vertical and diagonal lines as for the flower above. Now pull the diagonal sides together to form a triangle and fold it flat on surface.
STEP 7: Now take side of the triangle and fold it up making sure the tip of one end touches the tip on the top end of the triangle. Repeat on the other side. Now flip the side and repeat.
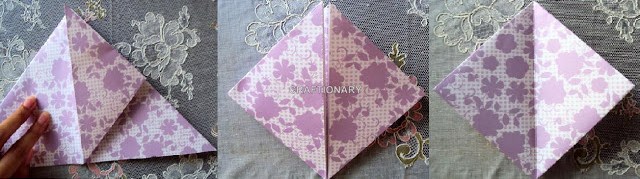
STEP 8: You will end up with a diamond shape. Take the left and right corners of the diamond and fold them to the middle. This will result in a round bud ready to make your tulip center.
Related: 20 unique flower tutorials
The bud of this flower was inspired by origami tulip. Since, the construction paper was used to make strong tulips for decoration purposes the folding was challenging to complete the flower. To make origami tulips in whole follow the paper tulips instructions with pictures.
How to make origami tulip stem
STEM 8: Take the paper straw and wrap it with floral tape.
TIP: To make it perfectly secure use glue stick at the beginning and end of the floral tape as you wrap.
Related: Bendable burlap flowers

How to assemble the origami tulip flower craft
STEP 9: It’s time to plugin the glue gun. If you are making these flowers with kids please supervise this process. Once the glue melts use it to join the large and small petals such that the petals of both shapes are adjacent to each other.
STEP 10: Repeat the process for bud and stem. Let it sit till it dries.
Video tutorial: How to make origami tulip flower craft
Watch the video tutorial for a step by step guide on how to make origami tulip flowers. Find more easy and simple ideas by browsing our categories at the top menu bar on our website.

Complete the look: How to decorate with origami tulips
While spring is not in full bloom as yet you can make decorative planters with these stunning tulips. Find step by step instructions and video tutorial with supplies needed to make the two projects at Spring flower decoration.
Want more DIY flower crafts inspiration? Check out various materials we used in the past to make flowers in our resource handmade flowers.


Thank you for sharing this on Traffic Jam Weekend! It has been chosen as a fave feature for this week’s party that goes live on Thursday at 5:00 pm CST.
I can’t wait to try making these with my daughter. Thanks for sharing at Celebrate Your Story! You’ve been featured this week 🙂