This post may contain affiliate links. Please see our full Disclosure Policy for details.
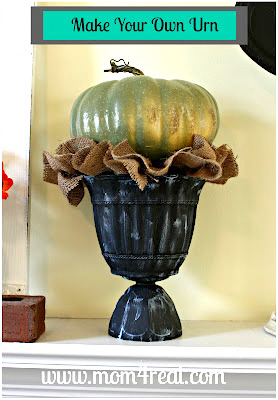
Looking to add a touch of timeless elegance to your garden, patio, entryway, or mantel in living rooms without spending a fortune? You’ve likely admired those beautiful, grand urns at garden centers, only to be stopped by the price tag and the sheer weight of them. The good news is, you can achieve that same classic, high-end look using simple, inexpensive plastic pots and bowls.
Learn the process of making your own stunning faux stone or cast iron urns, covering the different techniques and answering all the common questions to ensure your DIY project is a success.
Why DIY Your Urns from Plastic?
- Affordability: This is the biggest advantage. You can create a large, impressive planter for a fraction of the cost of a store-bought one.
- Lightweight: Unlike their concrete or cast iron counterparts, these plastic creations are easy to move, rearrange, and store for the winter.
- Weather-Resistant: Plastic is durable and won’t crack or chip in cold weather, making it a great choice for year-round outdoor decor. With the right paint and sealer, they can withstand indoor and outdoor use.
- Customizable: You have full creative control over the shape, size, and finish, allowing you to perfectly match your home’s aesthetic.
Related: 25 DIY Apothecary Jar Ideas and What to Fill Them With
How to Make DIY Urns?
Materials:
Before you can add that stunning finish, you need to build the structure. This is where those plastic pots and bowls come in. You can find most of these at the dollar store, thrift store, or garden center:
- Plastic flower pots
- Acrylic bowls (to act as the urn’s “neck” or decorative middle section)
- E-6000 or strong adhesive like Gorilla Glue
- Spray paint or Chalkboard spray paint (matte black, stone gray, or metallics for a high-end look)
- Acrylic paint and paintbrush
- Sandpaper
Optional finishing materials
- Rub ’n Buff for a metallic antique finish
- Textured spray paint for a stone effect
- Clear sealer (for outdoor durability)
Related: Best Sealer: How to Waterproof Paint on any surface?
1. Gather Your Supplies
- Plastic Pots and Bowls: You’ll need at least one large pot for the top and one small bowl for the pedestal to create the layered urn shape. Look for different sizes and shapes to create interesting silhouettes.
- Strong Adhesive: A heavy-duty, weather-resistant glue is a must. Options like E6000 or a construction adhesive are good choices. A hot glue gun can work for temporary hold while the stronger glue sets.
- Filler: To add weight and stability to the base, you can use sand or small rocks inside the bottom pot.
2. Assemble the Urn
- Clean Your Plastic: Thoroughly wash and dry all the pieces to ensure the adhesive and paint will stick. A quick wipe with rubbing alcohol can help.
- Assemble the Base: Turn your largest pot upside down. Glue the the smaller pot upside down to form the base with E-6000. Let it dry overnight.
- (Optional) Build Up the Layers: Continue to glue additional bowls or containers, stacking them from largest to smallest, to create the classic urn shape. The key is to create a tiered, substantial silhouette.

3. Prime and Paint
Plastic requires a primer made for plastics (like Krylon Fusion) or use all-in-one spray paints. After priming:
- Spray with matte black for a wrought-iron look.
- Use textured stone spray paint for a cement look.
- Add metallic touches (gold, bronze, copper) with Rub ’n Buff.
- Use acrylic paint dry-brushing technique and gently sand it with sandpaper for distressed look in white and aqua colors for the look in picture.

4. Seal and Protect
If the urn will be outdoors, apply a clear UV-resistant sealer to prevent fading and peeling.
Related: Best Sealer: How to Waterproof Paint on any surface?
5. Style Your Urn
Use for plants, artificial topiary balls, or seasonal decor (pumpkins in fall, ornaments at Christmas).
Place in pairs at entryways for a grand, symmetrical look.
How to Make a Plastic Urn Look Expensive?
Texture is key: Use stone-textured paint or a stippling brush to create depth.
Matte finishes: Avoid glossy finishes, which make plastic look cheap.
Antiquing techniques: Lightly brush metallic or white paint over raised details for an aged effect.
Weighting the base: Fill the bottom pot with sand or rocks so the urn feels sturdy like a real cement one.
Achieving the High-End Look: Finishing Techniques
Once your urn is assembled and the glue is completely dry, it’s time for the magic. Here are some of the most popular and effective finishes.
Method 1: The “Concrete” or “Stone” Finish
This is the most common technique and gives your plastic urn a heavy, aged look.
Materials:
- Matte black or gray spray paint (as a base coat)
- Dry mix grout, joint compound, or premixed texture paint
- Exterior latex or chalk paint in a light gray or off-white color
- Sponge or stiff bristle brush
Instructions:
1. Prime with Paint: Give the entire urn a coat of matte black or gray spray paint. This will help the subsequent layers adhere better.
2. Apply the Texture: Mix your dry grout or joint compound with a little water until it has a thick, frosting-like consistency. Wearing gloves, apply this mixture all over the urn. The key is to be imperfect; a thick, textured, and slightly messy coat is what gives it that aged look. You can stipple it on with a sponge or use your hands to press it into place.
3. Create Dimension: Once the texture layer is dry, use a stiff brush to “dry brush” a lighter gray or off-white paint over the raised areas. This will highlight the texture and give it the look of real stone or concrete. You can also mix in a tiny bit of black paint to create different shades and add depth.
4. Seal It: While most paints are durable, a final clear matte sealer can provide extra protection against the elements.
Method 2: The “Cast Iron” Finish
For a more dramatic, traditional look, you can make your urn look like heavy, antique cast iron.
Materials:
- Matte black spray paint (specifically for plastic)
- Metallic spray paint (silver, bronze, or copper)
- Vinegar or rust-colored paint/wax
Instructions:
1. Base Coat: Apply a few coats of matte black spray paint, specifically designed for plastic, to the entire urn.
2. Add Patina: Lightly and unevenly spray a metallic paint (like a silver or a dark bronze) over the black. The goal is to let some of the black show through.
3. Create “Rust”: For a weathered look, you can either:
4. The Vinegar Method: Spray the urn with a mixture of vinegar and water, then place some steel wool on top. The vinegar will start to rust the steel wool, which will drip down and create realistic rust streaks.
5. The Paint Method: Use a rust-colored craft paint or wax and a small, dry brush to dab on splotches of color, mimicking rust.
FAQs and Troubleshooting
Will the paint stick to plastic?
Yes! The key is to use a paint specifically formulated to adhere to plastic or to use a strong primer designed for multi-surfaces. Sanding the surface lightly before painting can also help the paint grip.
What kind of glue should you use?
A strong, waterproof adhesive is crucial. Hot glue is great for a quick hold but is not strong enough on its own for a durable, long-term bond, especially outdoors. Opt for a construction adhesive or a strong epoxy.
Can you put real plants in these?
Absolutely. Since the urn is made of plastic, it’s waterproof. You can drill drainage holes in the bottom with a simple drill and bit, just as you would with any other plastic planter.
Can you use hot glue to assemble the urn?
Hot glue works temporarily, but for outdoor urns, use a strong adhesive like E6000 or Gorilla Glue.
How do you make the urn heavy enough so it doesn’t tip over?
Fill the bottom pot with rocks, bricks, or sand before gluing it together.
Can you leave a plastic urn outside year-round?
Yes, but always seal it with a clear outdoor sealer to protect from rain, UV rays, and temperature changes.
What size pots work best for a DIY urn?
A large urn usually looks best with a 14–16 inch pot on top, a 10–12 inch bowl in the middle, and an 8–10 inch pot as the base.
Can you paint the urn to look like concrete?
Absolutely. Use gray stone spray paint or layer gray and white chalk paint with a sponge for a faux-concrete effect.
How do you make it look more realistic?
- Imperfection is Key: Real stone and concrete aren’t perfect. Embrace the bumps, streaks, and unevenness.
- Layering: The most realistic finishes are achieved through layers. Don’t just apply one coat of paint; build up the color and texture.
- Dry Brushing: This technique is a game-changer. It highlights texture and creates a multi-dimensional, aged look.
By combining common dollar store items with a bit of creativity, you can create a beautiful and expensive-looking urn that will be a stunning focal point in your outdoor space for years to come.
Styling Ideas for DIY Plastic Urns
- Entryway Elegance: Place a pair of urns with faux boxwood balls for a timeless look.
- Seasonal Swaps: Fill with pumpkins in fall, poinsettias in winter, or flowers in spring.
- Indoor Decor: Use smaller versions as table centerpieces or mantle accents.
- Event Decor: Perfect for weddings, parties, or photo backdrops when you need budget-friendly statement pieces.
Creating a DIY urn from plastic pots and bowls is a simple, budget-friendly way to elevate your home decor. With the right assembly, painting, and finishing touches, you can achieve a luxury look at a fraction of the price. Whether you’re decorating your front porch, garden, or living room, these urns will impress guests—and no one will guess they came from the dollar store.
You will also like:
50 Never Tried Fall Simmer Pots


So creative, Jessica! Love these!
Shush -!! That is it? How easy… and AWESOME!! Thanks Jess you super creative lady you!!
Thats great!
Jessica,they are really good,Now you have me on the hunt for pots to make some. I'm coming over for a visit now.:)