This post may contain affiliate links. Please see our full Disclosure Policy for details.
Laser engrave canvas with your custom handmade drawings is not only fun but different. This idea opens a whole new level of opportunities of xTool projects for artists.
Do you enjoy drawing beautiful art on the paper and wonder what I can produce with it? With a laser engraving tool like xTool M1 you can transfer your drawings onto wood, canvas, tile and so much more. Think about using your hand magic and combining it with the power to cut and engrave.
You can read all about xTool M1 in my review where I share what this machine is capable of doing. Earlier I used it to customize and cut a wooden prop for simple and cozy Ramadan Decor ideas as well. At the same time, I was experimenting with using my drawings to create a custom gift for my friends. I checked options and results with laser engraving settings to find the perfect setting that works for my canvas.
How to laser engrave on canvas?
The process is so easy and automatic. All you have to do is snap a picture of your favorite drawing, transfer the image or photograph in xTool creative space and engrave.
Can you laser engrave on a painted canvas?
Yes, a painted canvas is the best option for laser engraving. It gives you a bright background making it perfect for engraving. The engraving tool engraves your design by peeling the upper layer which is the painted layer to reveal the canvas.
Material to laser engrave canvas:
You will need:
- xTool M1
- Air purifier
- Canvas
- Acrylic paints
- Paper tape
- Image
- Gold leaf sheets
- Mod Podge or tacky glue
- Paint brush
- Bronze Photo frame
How to engrave images on painted canvas?
There are a few steps involved in engraving the images on a painted canvas:
1) Select your image:
In this case we are focused on engraving our own hand drawn drawings. It is important to have an image drawing and not painting because the engraving tool works using positive and negative values. Therefore, crisp visible lines will result in beautiful results with every intricate design standing out.
2) Take a picture:
You can scan your drawing. But for the purpose of this tutorial we are working with the phone camera. It is important to have a camera that can produce high definition images. I am using iPhone 13 Pro Max. Make sure to take a closeup picture that captures only the area which you intend to engrave on the canvas.
3) Image settings:
In order to assist the xTool laser engraving machine, you can make the lines vibrant and striking. This way the machine can recognize the negative and positive values and give you crisp results. The following settings are used for the purpose of engraving images on painted canvas:
Open the photo gallery in your mobile and click edit image:
- Crop the image: Resize to the image you want to engrave and remove unnecessary background.
- Brightness: Increase it to 100%
- Black point: Increase it to 100%
4) Select and paint canvas:
Choose a canvas. Paint a coat or two of acrylic paint and let it dry. Keep in mind that engraving is a slow process using xTool M1. It can take from 2-4 hours to engrave a 8×10 size canvas depending on the design choice. The drawings I engraved are very intricate and large but you can work with any design and canvas size. You can engrave on canvas boards but I like to frame my canvas so I opted for canvas panels.
5) Place the canvas in the working area:
The best part about xTool M1 is that it allows you to see the placement of your object in real-time. This allows you to set the canvas in perfect alignment with your design. I also used paper tape to stick the canvas panel in place. This helps because a canvas is light weight and may shift places. As the air filter fan sucks the air out there is some air pressure inside the working area. Paper tape keeps the canvas in place.
Please note: I highly recommend using air filter while engraving your projects.
6) Resize your image:
When you import the image into the software it will open a large picture. Adjust the size and zoom into your working space to align the image with your canvas.
7) Set engraving settings:
In your xTool creative space set the following settings to start engraving your design. Make sure to use air purifier when engraving a canvas or wood to keep the working space clean from dust. It is important not only for best results but to avoid fire hazard. The heat and dust in an enclosed environment can result in smoke and spark a fire.
The following settings work best for engraving canvas using xTool M1:
Speed: 80 (the machine gives less coverage as you increase the speed).
Power: 35 (the machine burns through the canvas at high power voltage).
Video tutorial custom image canvas engraving:
Here’s a video showing all the details to assist you in getting the best laser engraving results on canvas panel with xTool laser engraver.
Can I laser engrave photographs and online images?
You can use this method to not only engrave your drawings but any image or photograph. It can be a script, a poem, a photograph and so much more. Just keep it mind that your values are clear and visible for the laser engraver to recognize. You can use the in-built photo editor to tweak the settings. Make the image black and white, vibrant and striking before transferring it into the software for engraving. Use high resolution images for best results.
Finding the perfect settings for engraving canvas
I tried a variety of different speed and power settings to see how each engraves the image. The results were stunning, here’s a picture showing the settings and engraving intensity.
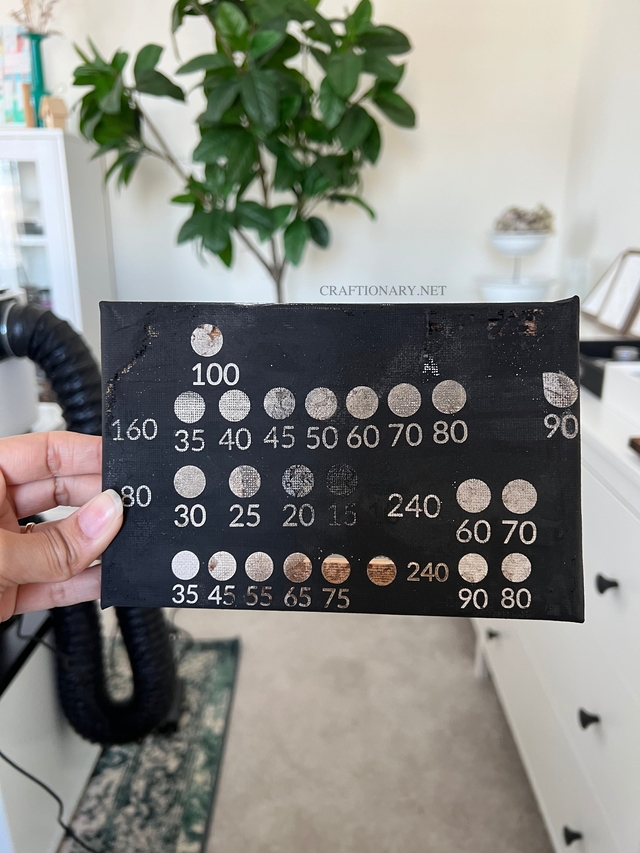
In this image I am using a speed of 80, 160 and 240 with power variation between 100-30.
A power of 100 typically burns through the canvas and as you reduce the power the results get better.
As you increase the speed the machine skips spaces not giving you a fully covered white space. Therefore, working with less speed is recommended.
It is interesting to note that using a variety of settings you can engrave a striking image with shading effects. The lighter and darker tones with bring interest. However, it may involve cropping the image using a photo editor like Adobe Photoshop and using different layers for engraving.
Experimenting with laser engraver for different results
I love the black and white results that this machine produced, it looks so modern and elegant. However, you can produce a variety of different shades and colors by coating the canvas with different acrylic paints.
Engraving on canvas works by removing the top layer of paint. You can spread a lighter and darker or vice versa coat to reveal fun colorful results. For example, coat the canvas with a light blue acrylic paint and let it dry. Now use royal blue for the second coat. This will reveal light blue engraving peaking through a dark background. You can do the opposite as well where the revealing engraved image is royal blue and background is light blue. However, keep in mind that painting a lighter coat on darker background has its on challenges.
Cleaning the engraving tool after work
Engraving involves a lot of dust accumulation inside the working space even with the air filter turned on. Therefore, it is important to clean the inside of xTool M1 after every engrave project. I use wet wipes to wipe of the working surface and side walls. Dry paper towel to wipe the laser and other tools which might not be waterproof. Let it dry completely by keeping the top screen open before working on the next project.
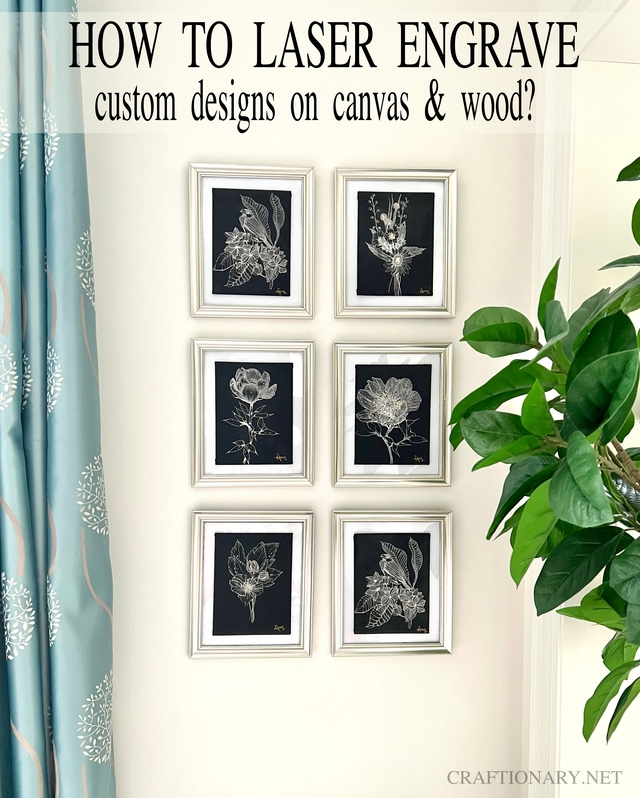
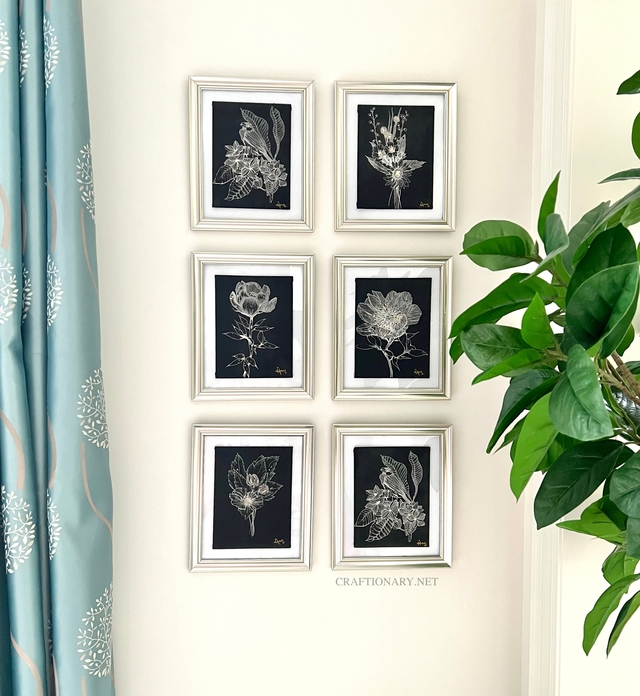
Engraved canvas wall art
Use a paint brush to brush off dust and reveal a clear engrave drawing. Use white glue to stick the canvas panel on a photo frame backing, remove the glass and frame it. The results stunning:
Gilding art with gold leaf:
To add a rich look to the drawing use gold leaf in accent details. You can use the gold leaf kit or get the gold leaf sheets and use mod podge for a budget friendly project.
1) Use a cheap paint brush to dip in mod podge or tacky glue and paint a thin layer of glue where you want to stick gold leaf. Apply it carefully where you want gold leaf to stick. Put a thin layer so that it doesn’t splat when you sandwich it between canvas and gold leaf sheet.
Let it dry such that it is tacky but not wet. Conversely, you can also place the gold leaf sheet on the glue and let it dry.Use a dry brush to brush the gold leaf sheet flat on the surface. This will remove the air space between the sheet and glue. Watch the video above to get a better idea of the process and get intricate results.
Both ways allow 10-15 mins for the glue to dry such that it is sticky but not wet. This step is important as we are working with a delicate film which will tear apart and not stick if the glue is wet and you try to brush the extra away.

2) Use a dry paint brush to gently brush off the excess. Keep your hand soft and smooth. This will reveal a beautiful gilded motif.

3) Keep the excess gold leaf in a mason jar for later use.
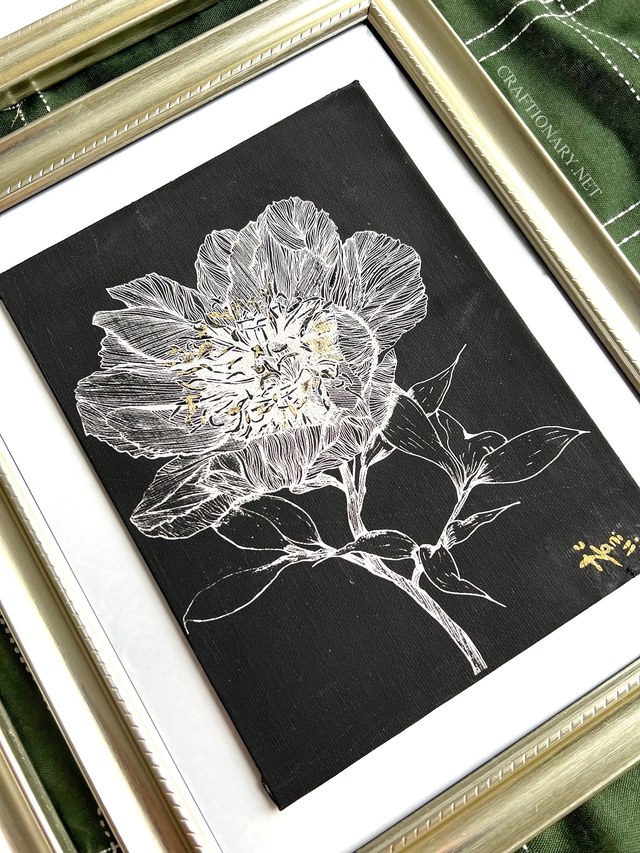
Now use tacky glue to stick the canvas board on the glass of your frame. These engraved canvases are ready to sell, gift or decorate your home.
You can use engraving tool for signature on your canvas which will look cool in my opinion. I hope you enjoyed this tutorial and if you have any questions leave them down in the comments section. I will get back to you.