This post may contain affiliate links. Please see our full Disclosure Policy for details.
Want to create modern, eye-catching wall art using simple materials? This DIY scallop wall art made from paper circles is the perfect project! Easy, affordable, and stunning in any space, it mimics the look of fish scales or modern abstract art — all using just paper, glue, and a wooden frame.
Whether you’re decorating a blank wall, sprucing up a gallery space, or looking for a weekend craft project, this paper circle art is beginner-friendly and endlessly customizable!
Why You’ll Love This Project
- Budget-friendly: Made with scrapbook paper or cardstock
- Customizable: Choose your own colors and layout
- Easy to make: No drawing or painting skills required
- Beautiful: Modern and textural, especially in neutral or ombre tones

How to Make Wooden Frame Art
Materials:
- Wooden frame (with or without glass) — any size
- Colored paper, cardstock, or scrapbook paper
- Circle punch (1.5” to 2” works well), circle cutter or scissors
- Craft glue or glue stick
- Ruler and pencil
- Foam board or cardboard backing (if not using frame glass)
- Optional: Mod Podge or matte sealer spray for added durability
Step-by-Step: How to Make Scallop or Fish Scale Wall Art
1. Choose Your Color Scheme
Select 2 to 5 coordinating shades of cardstock or paper. Ombre, pastel, metallic, or bold combinations work beautifully. You can also use textured, glitter, or patterned paper for added depth.
2. Cut Your Circles
Use a circle punch or trace and cut circles by hand. You’ll need anywhere from 50 to 200 circles depending on your frame size and how tightly you layer them. I cut 50 paper circles that are an inch in diameter for a 4″x6″ frame.
Tip: For an 8”x10” frame, around 100 paper circles will usually cover the space depending on size of cutout.
3. Prepare the Frame
Remove the glass if you want a 3D layered look. Attach foam board or thick paper to the frame backing as your base.
4. Layout Your Pattern
Start at the bottom of the frame and work your way up. Lightly draw horizontal lines with a pencil to help you keep the layers even. Place the circles so the bottom row is only half visible, then slightly overlap each new row above, like fish scales or roof tiles.
- Alternate colors row by row or use a gradient effect for a more dynamic look.
- Since I used an undesirable color of cardstock, I spray paint it, and let it dry. I love a little distressed red color on the sides.
5. Glue the Circles
Use a glue stick or a small dab of craft glue on the top back edge of each circle. Don’t glue the entire circle — letting the edges lift slightly gives texture and movement.
6. Trim the Edges
Once all rows are glued down and dry, carefully trim any circles that hang over the frame edges for a clean, finished look.

7. Seal It (Optional)
For extra durability and a slight sheen, brush on a layer of Mod Podge or spray with matte sealer.
Related: Best Sealer for Craft Surfaces
8. Insert into Frame and Hang
Place your art into the frame (glass removed or added depending on your design preference), secure the backing, and display!
- I traced a stencil on the frame and painted it with a brush. When the paint dried, I assembled the frame.
- It can be painted to match and decorate any space. Whether it’s your living room, entry way, baby nursery, playroom or kitchen.

Fish Scales Art Design Variations
- Monochrome Chic: Use all one color for a clean, minimalist effect
- Ombre Gradient: Arrange shades from dark to light or light to dark
- Rainbow Pop: Bright multicolor rows — fun for kids’ rooms or play areas
- Textured Mix: Use fabric, felt, or recycled paper for visual interest
- Mini Version: Make small versions as gifts, cards, or ornament-style decor

FAQ: DIY Paper Circle Wall Art
1. Can you use a glue gun?
Not recommended — it may create lumps and be too bulky for thin paper. Stick to craft glue or glue sticks.
2. Will the paper lift or curl?
If using thicker cardstock and only gluing the top portion, it should hold shape well. Use a sealer if you want more permanence.
3. Can you use a canvas instead of a frame?
Yes! You can glue your circles directly onto a canvas for a frameless look. Paint the background first for extra contrast.
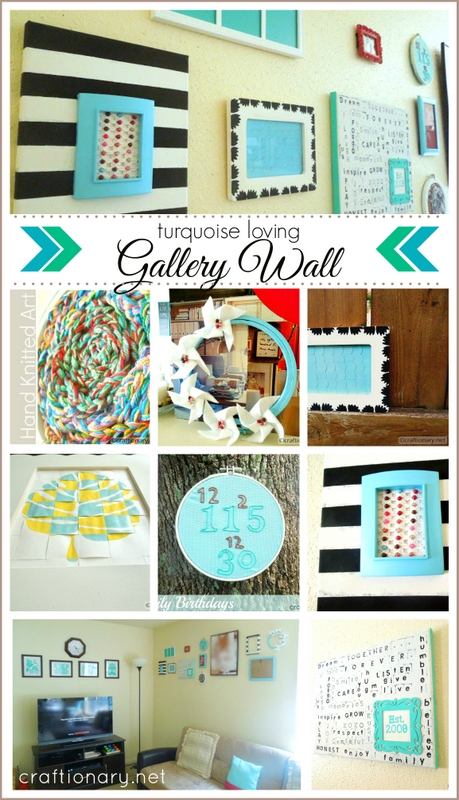
Check out my Gallery Wall reveal.
This DIY wooden frame art using scalloped paper circles is the perfect mix of simplicity and elegance. It’s a great way to reuse leftover craft paper, bring a pop of color to your wall, or create personalized home décor on a budget.
Ready to get creative? Punch out those circles, layer them up, and turn a wooden frame into a unique conversation piece!
You will also like:
Vintage PRESSED FLOWERS in frame of gold in seconds
How to Paint Black and White Stripes on Canvas
Clothespin Display Frame (Switch photos and art)
Find more trending ideas on DIY wall art updated regularly on pinterest.


I`m stunned! Great job!
I think it's awesome, Hani!! You could do so many things with this. It's so simple but looks great! Think of all the frame variations you could do!
Hani, this is so classy! I love the black/white/turquoise combo!
That looks great. BRAVO!
So cute!!! I love that idea!
Hani! This is super cute!!!
Thanks soooo much for sharing this at The DIY Dreamer.. From Dream To Reality! Don't forget to stop by this evening and link up your newest creations! 🙂