This post may contain affiliate links. Please see our full Disclosure Policy for details.
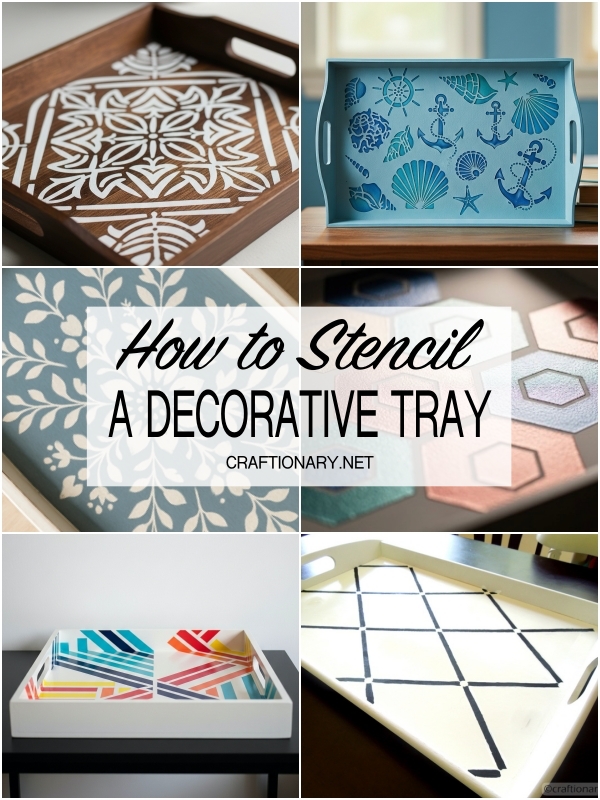
Looking to add a personalized touch to your home decor? One of the easiest ways to elevate your space is by creating a DIY stenciled decorative tray. Whether you’re using it to serve drinks, organize essentials, or simply for display, a hand-painted tray adds charm and style.
Stencils are popular for painting walls and floors on larger scale but that doesn’t mean stencils are not useful for smaller projects. In this beginner-friendly tutorial, you’ll learn how to stencil a tray, what paints to use, and design ideas that pop!
Why Stencil a Tray?
Stenciling offers a professional-looking finish without requiring advanced painting skills. It’s one of the top searched DIY tray decorating ideas because:
- It’s budget-friendly
- Stencils allow for intricate designs without freehand painting
- You can reuse old trays or inexpensive ones from thrift stores

Step-by-Step: How to Stencil a Tray
Materials
To get started with your painted tray DIY, gather the following materials:
- A wooden, metal, or plastic tray (any shape works)
- Acrylic paint or chalk paint (your choice of base and accent colors)
- Stencil of your choice (floral, geometric, boho, or text)
- Painter’s tape
- Stencil brush or foam dabber
- Sandpaper (optional for prepping wood)
- Clear sealer (spray or brush-on)
- Drop cloth or newspaper to protect your work surface
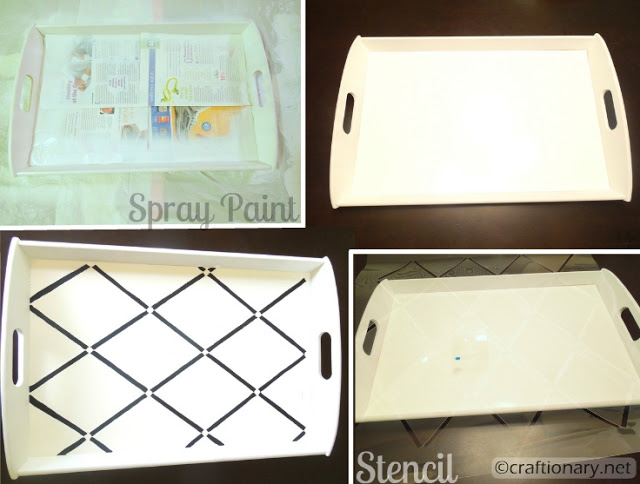
1. Prep the Tray
Start by cleaning your tray with a damp cloth. If it’s wooden or glossy, lightly sand the surface to help the paint adhere better. Wipe away dust before painting.
2. Paint the Base Coat
Apply your chosen base color using a foam brush or roller. Let it dry completely. You can do two coats if needed for full coverage. Since my tray’s base was already white I spray paint the sides by placing newspaper on the tray’s surface to keep it save from paint.
Popular tray base color ideas: white, navy, sage green, black, blush pink, or wood-stain finish.
3. Secure the Stencil
Once dry, tape your stencil in place using painter’s tape. Make sure it’s flat and centered. Use light adhesive spray for large or intricate stencils to prevent paint bleed.
4. Apply Paint to the Stencil
Dip your stencil brush or foam dabber in paint, then dab off the excess on a paper towel. Dab the paint on stencil at right angel 90° not sideways.
Use an up-and-down dabbing motion (not brushing) to prevent bleeding under the stencil.
Pro tip: Less paint = cleaner stencil lines!
5. Peel and Reveal
Carefully lift the stencil while the paint is still wet. Let the design dry fully before handling or sealing.
6. Seal for Durability
To protect your tray, especially if it will be used for serving, apply a clear sealer. Choose a matte, satin, or glossy finish depending on your look. I applied two layers of mod podge letting each dry before applying the next.
Related: How to Waterproof Acrylic Paint on Different Craft Surfaces
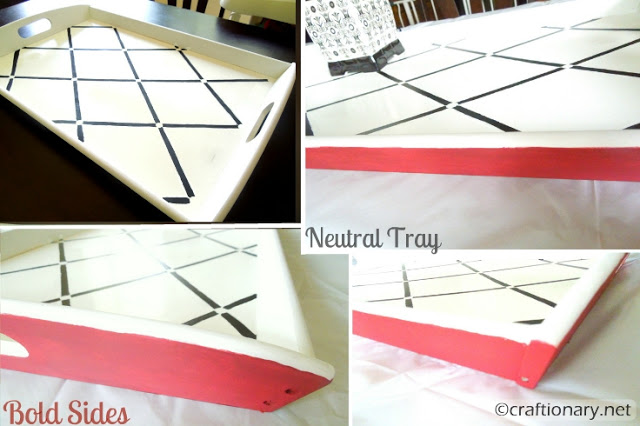
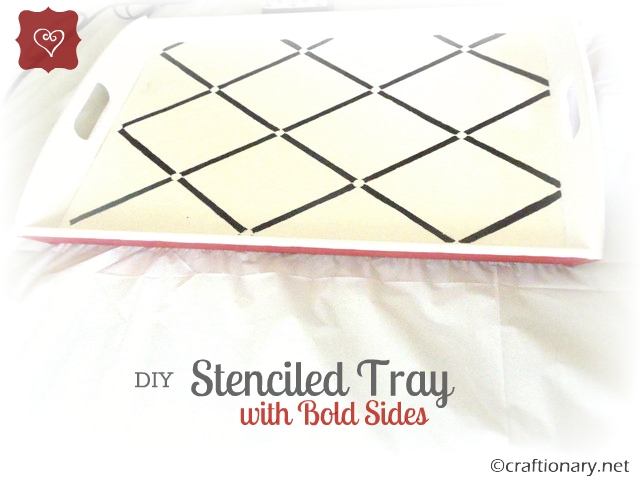
This is what you get.
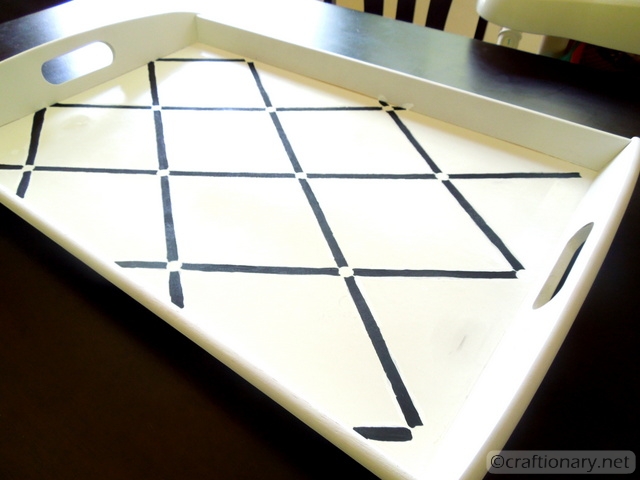
Paint the sides of the tray a different color. A bold color for contrast!
Decorative Tray Painting Ideas
Looking for inspiration? These decorative tray stencil ideas are trending:
- Farmhouse: Use white chalk paint with a black French market stencil
- Boho: Try mandala or sunburst patterns in earth tones
- Coastal: Light blue base with white coral or shell stencil
- Modern: Bold shapes like hexagons or stripes in metallics
FAQs: Decorating a Tray with Stencils
Can you stencil on a metal or plastic tray?
Yes! Just make sure to use a primer or chalk paint made for slick surfaces. Always seal after painting.
What kind of paint works best for trays?
Acrylic paint or chalk paint is ideal for decorative trays. Use outdoor or multi-surface paint if the tray will be exposed to moisture.
Related: How to Waterproof Acrylic Paint on Different Craft Surfaces
Can you make your own stencil?
Absolutely! You can cut designs from stencil plastic using a craft knife or cutting machine. Or download free printable stencil templates online.
Now that you know how to paint and stencil a tray, use your masterpiece to:
- Display candles or books on a coffee table
- Organize perfumes or skincare on a vanity
- Serve breakfast in bed
- Wrap it up as a handmade gift!
You will also like:
How to Make a Resin Tray DIY that Looks Classy
DIY Backsplash tile tray that looks expensive
Check out DIY Trays and Vases board on pinterest for latest inspirations.


Oh I have that exact same tray. I love what you did with it. The stencil is great.
Greetings from Germany
Catrin
Thanks for the tuorial. You can do wonders with a plain old tray, just takes a bit of imagination.
This is really cool, I love the black and white with a pop of color around it. Love!
Tanya 🙂
This is GREAT Hani!!! I want it!!
Now, I hope you are planning on sharing this at The DIY Dreamer.. From Dream To Reality!! Please!!
Thanks for sharing at The DIY Dreamer.. From Dream To Reality!
Super Cute! great way of transforming any ordinary tray. Me like!
Great project, Hani!
Love it, I have an obsession with anything stenciled!
love this ! such a simple, yet fabulous way to make over your tray !! 🙂 saw you on positvely splendid. 🙂
What a pretty tray, love the stenciling!
Love your easy tray revamp! I've been dieing to try out some of these new stencils. By the way I shared your project on Sew Woodsy today!
It looks so pretty, I love it! What a great idea
Love the colors are great! That turned out AWESOME! Thanks for linking up with us on “Strut Your Stuff Saturday!” We hope to see you next week! -The Sisters
Love it!! I especially love the splash of color on the sides!!
I'm so glad you shared this at Romance on a dime. I'm pinning this!
Loving it! I am going to do my first stencil project this week 🙂 Thanks for sharing at Toot Your Horn Tuesday 🙂
Great tutorial. It's really pretty!
Mary