This post may contain affiliate links. Please see our full Disclosure Policy for details.
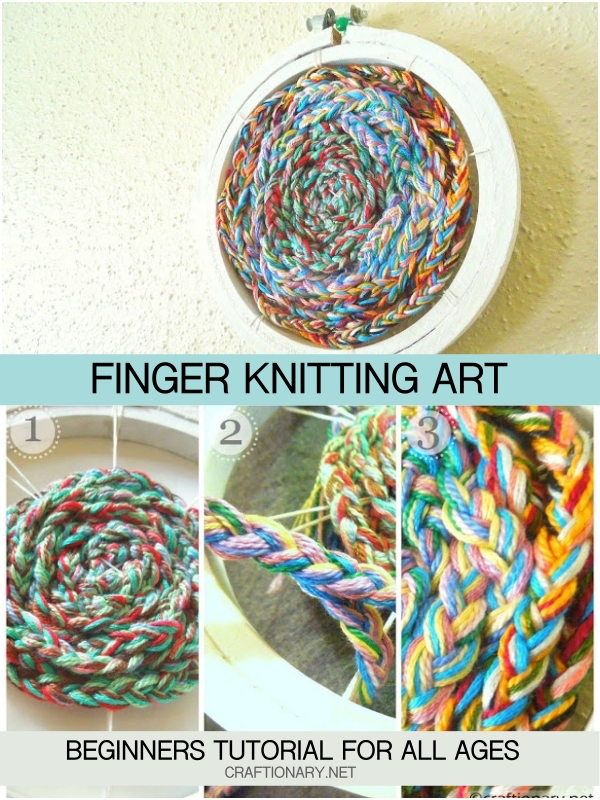
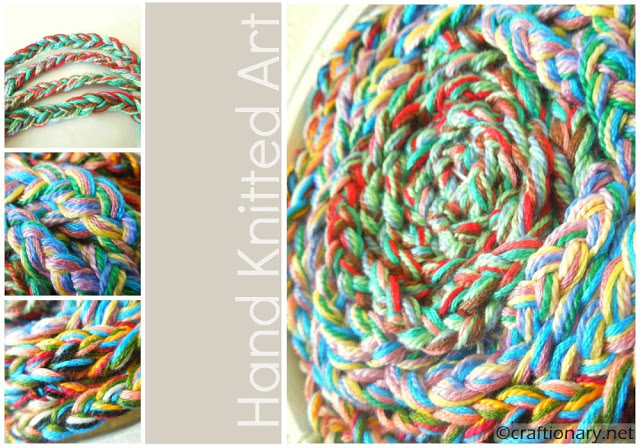
Finger knitting art is a simple technique to knit on an embroidery hoop using braids. These braids can easily be made using thread or yarn. However, most commonly a chunky yard is used to knit chains like the ones we make with crochet to make finger knit yarn projects. This technique involves braids like the ones we make in our hair.
If you’re looking for a simple, meditative, and budget-friendly project, finger knitting is the perfect craft—no needles needed! When paired with an embroidery hoop, it becomes a stunning framed piece of textured wall art, kids’ craft, or boho-style gift.
Whether you’re a beginner crafter, homeschooling parent, or someone looking for a new fiber art hobby, this project offers creativity, sustainability, and charm.
Materials:
- Yarn, (chunky or medium weight recommended) embroidery floss, or crochet threads
- Scissors
- Embroidery hoop (wooden or plastic, any size)
- Optional: Hot glue gun, felt backing, wooden beads, or pom-poms
Instructions: Make Finger Knitted Art in a Embroidery Hoop
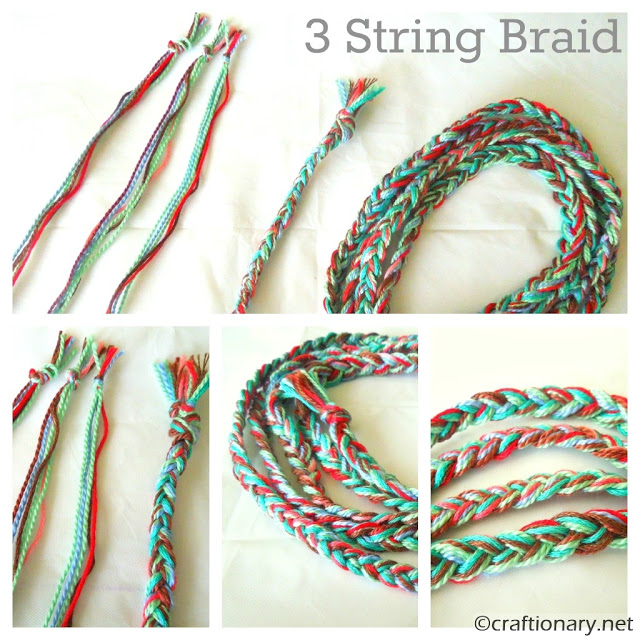
1. Finger Knit Your Yarn (Make a basic 3-strand braid):
There are a variety of different designs and patterns you can finger knit. This method involves making braids:
- Secure the Top: Tie the three strands together at the top or tape them to a table to keep them stable while braiding.
- Separate into Three Sections: Lay the strands out in front of you: left (A), middle (B), and right (C).
- Start Braiding
- Cross the right strand (C) over the middle strand (B).?Now your order is: A – C – B
- Cross the left strand (A) over the new middle strand (C).?Now your order is: A – B – C again.
- Repeat:
- Continue alternating: right over middle, then left over middle.
- Keep your braid tight and consistent by pulling gently as you go.
- Finish It: Once you reach the end, tie it off with a knot or a small elastic band.
Tips:
- You can use 3 strands of chunky yard or 6-9 strands of embroidery floss cut in equal lengths such that 2-3 strands together make 1 strand, this can increase the thickness of your 3-strand braid.
- You can also work with different colors of strands for an ombre or colorful effect using more strands to make groups of 3.
- Long strands of about 2-3 ft. will make long braids to cover more surface.
- Make a decorative braid using different colors for each strand.
- For wall decor, secure both ends with glue or tuck into a frame or hoop.
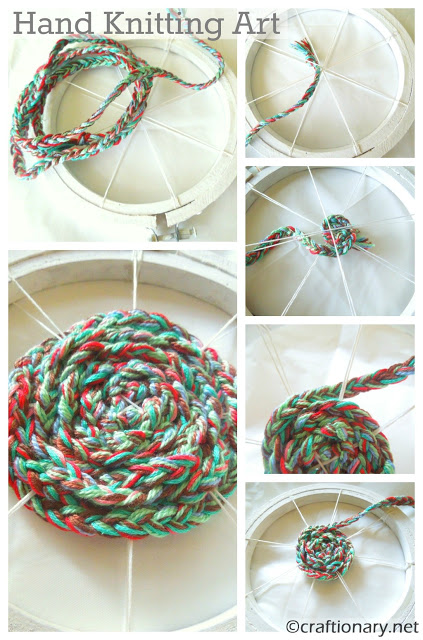
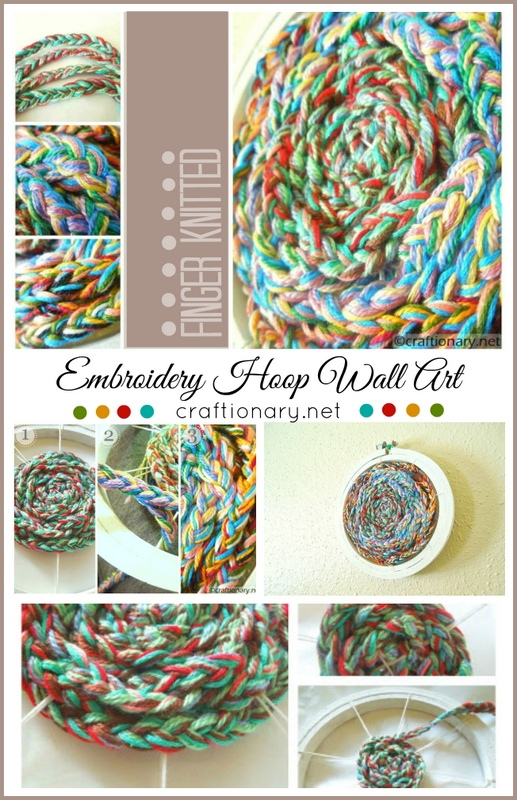
2. Prepare Your Grid on the Hoop
- Take the embroidery hoop apart.
- Stretch a piece of fabric (optional) or just use the hoop alone if you want a woven airy look.
- Tighten the outer ring.
- Prepare a grid for knitting the braids: You can use as many as you like from 8-sections being the minimum to keep the strings intact to 32-sections depending on the pattern and size of your art.
- Loop the thread on the inside ring and on the opposite side. Now tie tightly. I used 4 strings stretched around the embroidery hoop, leading to 8-sections from the center to work with!

3. Attach the Knitting
You have two popular options:
a. Spiral Method:
- Coil the finger-knitted strand into a spiral inside the hoop.
- Hot glue or stitch in place as you go to secure.
- Spiral in an alternative pattern (Round 1- Above, Below, Above, Below the hoop thread-sections)
- After completing first round to secure the braid continue the pattern but switch (i.e. Round 2- Below, Above, Below, Above).
- Alternative rounds hides the white grid strings.
- You can also tie a small piece of fabric or ribbon to help you note that a round is complete.
- Make sure you tighten up the braid and secure it in place one a strand is finished.
b. Woven Method:
- Weave the finger-knitted cord back and forth like a loom.
- Secure the ends to the hoop using glue or knots.
- Add fringe, beads, felt flowers, or pom-poms to embellish.
Related: Loom knitting for beginners with toilet paper roll
Hand Knitted art
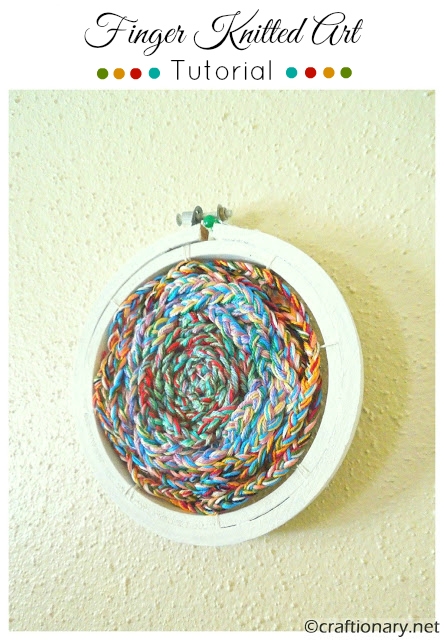
Measurements: How much yarn is needed for finger knitting art?
Since, I was not sure about how many braids I will be needing for completing this finger knitting embroidery hoop art. I continued making 1-braid at a time. Which lead to creating 3-braids about 3 ft. long for covering a 6″ embroidery hoop with the finger knitted art.

Color Combinations:
- Working with 3 braids, I used 7 colors for each braid and 21 colors for the entire project.
- I used a combination of dark and light braids, with shades of Blue as the main color through out the project.
This is also a fun project to do with kids for their bedroom or playroom.
Design Ideas
- Boho Dreamcatcher Style: Use natural-colored yarn and add feathers or tassels.
- Kids’ Name Art: Shape finger-knitted strands into the child’s name and mount inside.
- Rainbow Wall Decor: Use multi-colored strands for a vibrant look.
- Minimalist Circle Art: Monochrome yarn spiraled inside a plain wooden hoop.
Why This Project Is Perfect for Eco-Friendly and Mindful Living
- Uses leftover yarn—great for zero-waste crafting
- Encourages screen-free time and mindfulness
- Great bonding activity for parents and kids
- Easy to gift, display, or personalize
FAQs: Finger Knitting Art
1. What can you use finger knitting for besides scarves?
Finger knitting isn’t just for scarves! You can use it for wall hangings, coasters, keychains, wreaths, plant hangers, and framed hoop art like this.
2. What’s the easiest finger knitting craft for beginners?
Wrapping finger-knitted strands into an embroidery hoop is one of the easiest and most satisfying beginner-friendly crafts with no sewing required.
3. Can you use finger knitting for home decor?
Absolutely! Framed finger-knitted art looks great in nurseries, boho rooms, or gallery walls. Add embellishments for a custom look.
4. What kind of yarn works best?
Chunky, soft yarn gives the best texture. Try cotton, chenille, or t-shirt yarn for bold, cozy results.
5. Can kids do this?
Yes! Finger knitting is safe and fun for ages 5+, and framing it in hoops turns their creations into keepsake gifts or art.
Finger knitted embroidery hoop art is a rewarding way to explore texture, shape, and color in a minimalist, cozy format. It’s quick, creative, and deeply customizable for all ages and skill levels.
Whether you’re looking for a weekend craft, homeschool project, or cozy home decor piece, this is a project that keeps on giving.
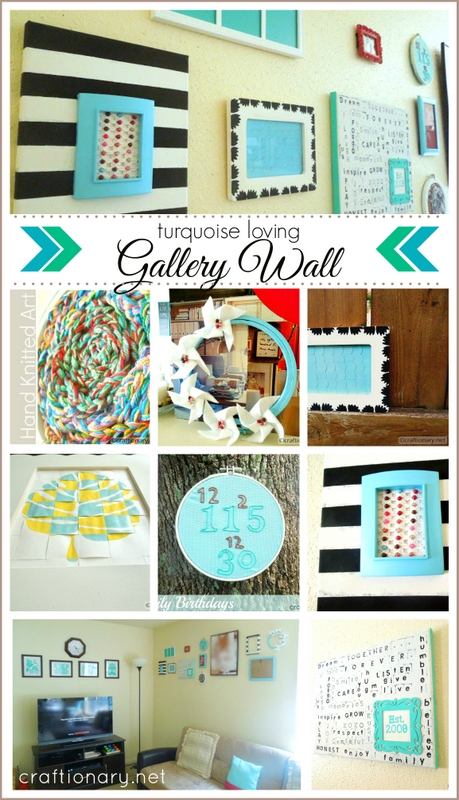
I would love for you to check out my Gallery Wall reveal.
You will also like:
Learn to warp and weft using cardboard loom
Paper Woven Art: How to Create Strip Weaving from Two Artworks


Love this Hani! You should join the Hookn' on Hump Day, a party for fiber art.
It's so easy to make. Amazing idea Hani 😀
Came over from Friday Fun party (Is that weird?) This is one crazy cool project!
Distressed Donna Down Home
Love this! My kids have been wanting to learn how to crochet but I'm not sure they're old enough quite yet. This would be perfect! Thanks for sharing! 🙂
This is so beautiful Hani..awesome!!
Great job Hani! Thanks for sharing. Laura stopping by from Real Momma and the Best of Your Best Blog Hop!
So Colorful and Creative Thanks so much for linking up at the the Best of Your Best Blog hop at Miss Information!
This is way cool looking, and simple! Thanks so much for sharing at The Fun In Functional!
This is very striking. Thank you for sharing the idea.
Awesome work, Hani! Look great, very colorful!
Tres cool! And so simple to do (so you make it seem, anyway!).
What an interesting idea! I've never seen anything like that before. Very creative! Thanks for linking up at Hookin On Hump Day!
Hani,
This is beautiful! My daughter would love to make one. Thanks for sharing at Creative Thursday each week. I appreciate YOU! Can't wait to see what you link up next 🙂
Michelle
So pretty and colorful! It looks like fun to make too! Such a lovely idea. I'm so happy to have you share your beautiful projects at my Throwback Thursday party. I hope you'll come back again this week!
Oh, very pretty!! Thank you for sharing at Sharing Saturday!!
Very creative!!! 🙂 Thanks for sharing!
Looks awesome! Very creative. Thanks for linking up at Romance on a Dime!
Looks awesome! Very creative. Thanks for linking up at Romance on a Dime!
This is really cool. I really like this idea and all of your wall art ideas. Thanks so much for sharing on Marvelous Mondays!
This is soooo CUTE Hani!! I'm going to show this to Gabrielle.. she's going to love the fact that she can create this too!
Thanks for sharing this at The DIY Dreamer.. From Dream To Reality!
What a fun project! I love that it's something easy enough that the kids could make their own.
Thanks for sharing on Show & Tell at SNAP!
xoxo, Tauni
This is really unique. I've never seen anything like it before!
Definitely pretty! Thanks for sharing this at the Crafty Saturday Party! we are featuring this at the party today, Hanni ^^) I can't wait to see what you have in store for us this week!
hugs,
Lelanie
I am loving ur blog 🙂