This post may contain affiliate links. Please see our full Disclosure Policy for details.
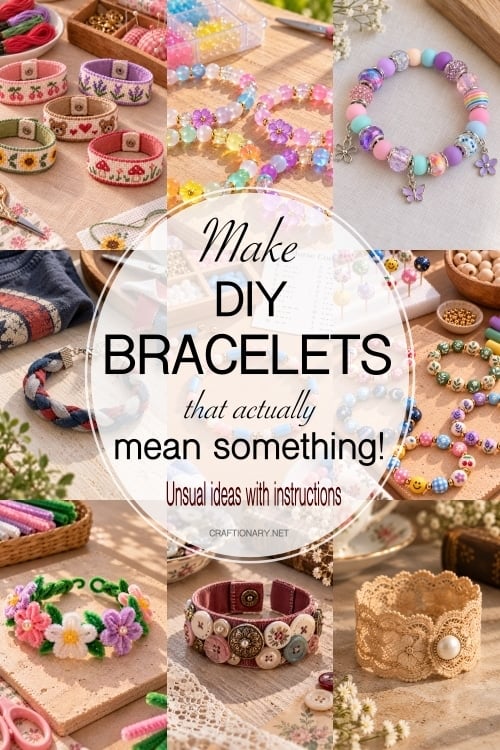
Looking to make DIY bracelets? You’ll mostly find the same three projects on repeat: letter beads on stretch cord, a friendship band, and a macrame knot. They’re perfectly good bracelets. They’re also exactly what everyone has already made.
These inspirations go somewhere else. You’ll find 30 bracelets built from things people actually have around: seashells from a beach trip, a jar of old buttons, pressed flowers, old jewelry pieces, a worn-out favorite shirt, fabric scraps, even a handwritten note from someone you miss. There are party-friendly ones that need zero experience, matching sets for friends, and a few that do a real job, like carrying a secret message in Morse code or keeping your pins within reach while you sew.
Every idea lists the supplies, the steps, and the mistake most people make, so you can skip it. Everything comes from home, a hardware store, a craft store, or Amazon.
Which bracelets fit your plan?
| You plan | Start with these ideas |
| Crafts night with friends | #8, #14, #17, #24 |
| Kids’ birthday party (ages 7+) | #9, #11, #12, #13, #14 |
| Matching bracelets for a friend group | #10, #15, #16, #17 |
| Keepsake or holiday gift | #1, #3, #4, #5, #6 |
| Adults who won’t wear “craft” jewelry | #23, #24, #27, #29, #30 |
| Done in under 20 minutes | #9, #11, #13, #15, #26 |
The basics that make every bracelet better
How to size a bracelet?
Wrap a strip of paper or a soft tape measure around your wrist, mark where it overlaps, and measure that length. Then use this guide:
- Stretch cord: Finished bracelet about ½ inch larger than your wrist measurement. Cut the cord 6 inches longer than that for knotting.
- Chain or clasp: Wrist measurement plus ½ inch for snug, 1 inch for standard, 1½ inches for loose. Count the clasp in that length.
- Cuff: Wrist measurement, leaving about a 1-inch opening so it slides on.
- Rigid bangle: Wrap the tape around your hand at its widest point with your thumb tucked in. That’s the smallest bangle that will slide on.
- Kids: Measure, don’t guess. Elementary-age wrists often land around 5 to 6 inches, but they vary a lot.
The basic bracelet toolkit
- Two pairs of flat-nose pliers (or one flat-nose and one round-nose)
- Wire cutters or side cutters
- 1 mm clear stretch bead cord, plus a roll of 0.8 mm for small beads
- Assorted jump rings and lobster clasps
- Clear jewelry glue such as E6000 or G-S Hypo Cement
- A bead mat, a towel, or a shallow tray so beads stop rolling away
Beads and charms:
- Clay disc beads
- Glass beads
- Pearls
- Letter beads or wooden letter beads
- Bead charms or enamel charms for adding color or a personal touch.
Three techniques that unlock most of these bracelets
- The surgeon’s knot (stretch cord): Pull the cord ends in opposite directions a few times first so it doesn’t sag later. Cross the ends, pass one end through the loop twice, and pull snug. Repeat, add a dot of glue, and hide the knot inside a bead with a large hole.
- Opening jump rings: Hold the ring with a pair of pliers in each hand and twist the ends sideways, one toward you and one away. Never pull the ends apart like a letter C, because that weakens the metal. Close it the same way.
- The sliding knot (adjustable cord): Overlap the two cord ends. With each end, tie a simple overhand knot around the opposite strand. Pull the knots snug, and now the bracelet adjusts by sliding them apart or together.
Safety and sourcing notes worth reading
- Nickel allergy: If you or your friends react to costume jewelry, choose stainless steel, titanium, sterling silver, or nickel-free plated findings, and patch-test anything unfamiliar.
- Resin, glue, and nail polish: Work in a ventilated room. Wear gloves with resin, and follow your product’s curing instructions.
- Small parts: Many beads, charms, and candy pieces are choking hazards for children under 3.
- Collecting shells and stones: Check local rules first. Some beaches, parks, and protected areas don’t allow you to take anything.
- Oven crafts: Polymer clay and shrink plastic vary by brand. Trust the package over any general guideline, including this one.
Keepsake Bracelets (Ideas 1 to 7)
These turn small, ordinary things into something you’ll actually want to wear and keep.
1. Rainbow Jump-Ring Chain Maille Bracelet
Best for: adults and teens who like puzzle-style crafts · Time: 1½ hours · Cost: about $12
You’ll need: 150 to 200 anodized aluminum jump rings (around 6 mm inside diameter is easy to work), two pairs of flat-nose pliers, a lobster clasp.
Make it:
- Open most of the rings by twisting the ends sideways, and keep two closed rings to start.
- Lay the two closed rings side by side. Pass an open ring through both and close it, then pass a second open ring through the same two and close it. You now have a new pair.
- Keep going: each new pair goes through both rings of the pair before it. Switch ring colors every few pairs.
- Finish by attaching the clasp with a final ring.
Pro tip: The first inch looks messy to everyone, and the pattern locks in after a few pairs. Buy extra rings so you can practice.

Get this: Chain Maille Bracelet
2. Seashell Sliding-Knot Bracelet
Best for: a beach-trip keepsake · Time: 30 minutes · Cost: under $10
You’ll need: 1 to 3 small shells with a natural hole (or a pin vise hand drill with a 1 mm bit), 30 inches of 1 mm waxed cotton or nylon cord, 4 to 6 seed beads, scissors, clear glue.
Make it:
- Rinse the shell and let it dry. If it needs a hole, mark the spot, keep the shell damp, and drill slowly with light pressure. Wear a dust mask, since shell dust is fine and irritating.
- Thread the shell to the middle of the cord and add a seed bead on each side to hold it in place.
- Overlap the cord ends around your wrist and tie a sliding knot on each side.
- Trim the tails and dab each knot with glue.
Pro tip: A thin coat of clear nail polish brings out a dull shell’s color and keeps the edges from chipping.
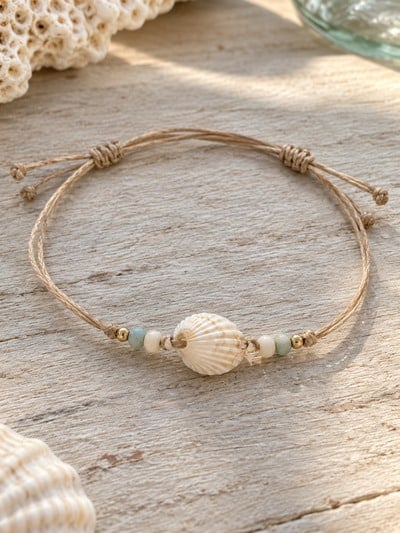
Seashell Bracelets: Pair small seashells with a length of chain for a bracelet that brings back memories of the beach.

3. Wire-Cage Pebble Bracelet
Best for: hikers and rock collectors · Time: 45 minutes · Cost: under $15
You’ll need: 3 to 5 smooth pebbles about 1 inch across, 22-gauge craft wire in silver or copper, a 7-inch cable chain bracelet with a clasp, 6 jump rings, flat-nose pliers, wire cutters.
Make it:
- Wash and dry the stones, then cut a 14-inch piece of wire for each one.
- Wrap the wire around the stone like you’re tying a gift box: once around the middle, once the other way, twisting where the wires cross.
- Finish with a small loop on top and tuck the cut end behind the stone.
- Attach each stone to the chain with a jump ring, spacing them evenly.
Pro tip: Lay your stones out in a row first and put the flattest one in the center. Flat stones sit comfortably against your wrist.
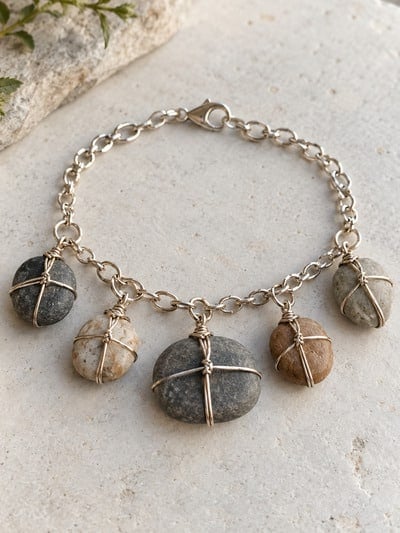
Wire-Wrapped Sea Glass Bracelet: Wrap thin craft wire securely around smooth pieces of sea glass, form small loops at the sides, and connect the pieces with jump rings and a clasp.

unknown source
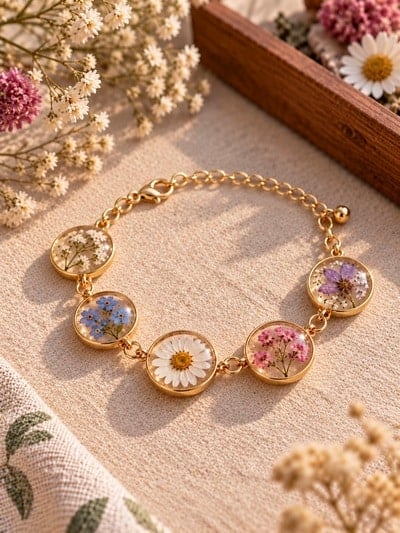
4. Pressed-Flower Resin Bezel Bracelet
Best for: saving a bouquet or a garden bloom · Time: 1 hour · Cost: $15 to $25
You’ll need: a bezel bracelet blank with shallow trays, UV resin and a small UV lamp (or two-part epoxy), fully dried flowers, tweezers, nitrile gloves, a toothpick.
Make it:
- Trim each flower to fit and test the layout in the dry tray.
- Pour a thin base layer of resin and cure it for the time your resin recommends.
- Set the flower with tweezers, cover with more resin, pop bubbles with a toothpick, and cure.
- Add a final layer for a gentle dome and cure once more.
Pro tip: Any moisture left in a flower turns it brown or cloudy inside resin. Press flowers for two to three weeks, and store them with a silica gel packet until you’re ready. Learn more: Nine Proven Methods to Dry Flowers
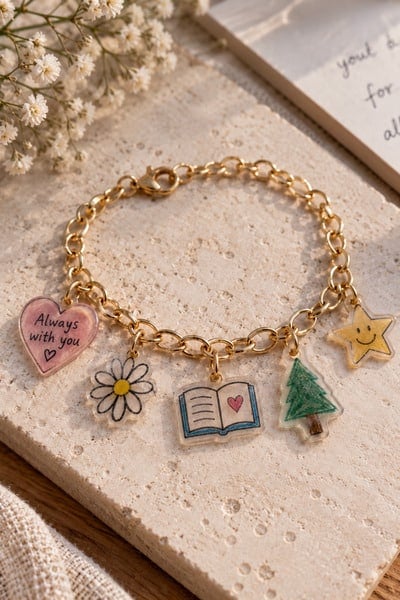
5. Handwriting Shrink-Plastic Bracelet
Best for: a loved one’s signature, a recipe card, or a child’s drawing · Time: 45 minutes · Cost: $10 to $15
You’ll need: printable shrink plastic (inkjet type), a scan or photo of the handwriting, a printer, scissors, a hole punch, parchment paper, an oven or toaster oven, jump rings, a chain bracelet.
Make it:
- Scan the writing or drawing and size it. Shrink film usually shrinks to somewhere between a third and half of its printed size, so print bigger than you want the charm.
- Cut around each piece and punch a hole near the top. Make it bigger than seems necessary, because the hole shrinks too.
- Bake exactly as the package says. The pieces curl, then flatten. Press them flat with a book right away.
- Add jump rings and hang the charms on the chain.
Pro tip: Thin pen lines can fade after baking, so darken them before you scan. Test one scrap first, since shrink ratios vary by brand.
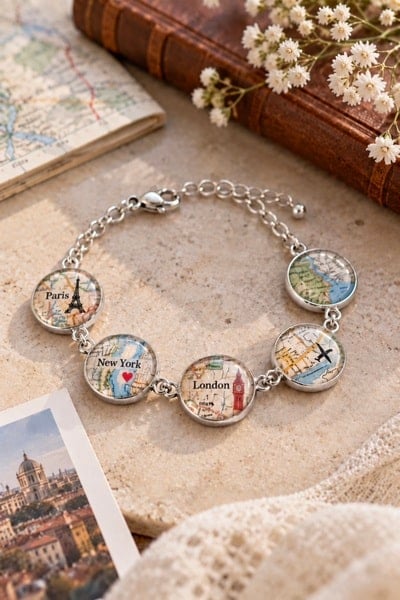
6. Map-Your-Memories Glass Dome Bracelet
Best for: couples, travelers, and “our first apartment” gifts · Time: 1 hour · Cost: $12 to $20
You’ll need: a bezel bracelet blank with round trays, matching clear glass cabochons, a printed map of a meaningful place (or a tiny photo), clear-drying glue or Mod Podge, E6000 or jewelry glue, scissors.
Make it:
- Trace a cabochon onto your map and cut out the circles, centering the street or spot you want.
- Brush glue on the flat side of a cabochon, press the paper face-down onto it, and smooth bubbles outward from the center.
- Let it dry, trim the edges flush, and seal the paper back with another coat of glue.
- Glue each cabochon into its tray and leave it for 24 hours.
Pro tip: Inkjet ink can smear when it gets wet with glue. Use a laser print or photocopy, or spray the printout with clear sealer first.
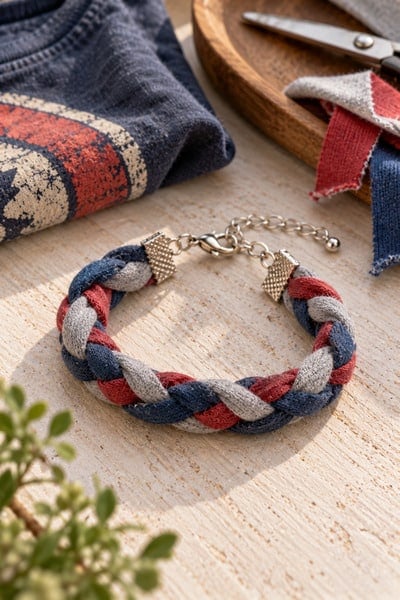
7. Old-Shirt Braided Bracelet
Best for: a concert tee, a school shirt, or a loved one’s shirt · Time: 30 minutes · Cost: under $8
You’ll need: a cotton t-shirt, fabric scissors, 2 flat ribbon clamps (10 to 15 mm), a lobster clasp and extension chain, strong glue, pliers.
Make it:
- Cut three strips about 1 inch wide and 14 inches long, cutting straight across the body of the shirt.
- Tug each strip firmly so it curls into a soft tube.
- Knot the strips together at one end, tape the knot to a table, and braid snugly until the braid is about 1 inch shorter than your wrist measurement.
- Trim, glue each end into a ribbon clamp, and squeeze shut with pliers. Add the clasp and chain.
Pro tip: Cut the strips from plain sections. Printed graphics crack when stretched, so save a small piece of the design for a fabric charm.
Similarly, you can use scrap strips of fabric and letter beads to make unique fabric beaded bracelets.

unknown source
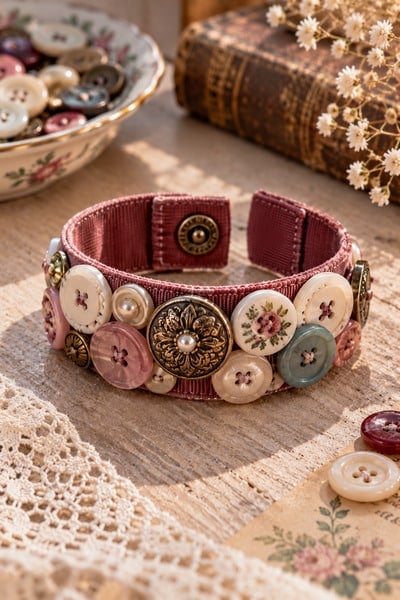
8. Vintage Button Ribbon Cuff
Best for: Grandma’s button tin or a thrift-store jar · Time: 30 minutes · Cost: under $10
You’ll need: 1-inch-wide grosgrain or velvet ribbon (wrist measurement plus 1 inch), 5 to 9 buttons in mixed sizes, needle and strong thread, a sew-on snap or hook-and-eye, fray-stopper liquid.
Make it:
- Cut the ribbon, seal the ends with fray stopper, and fold each end under ½ inch.
- Arrange the biggest buttons first, then fill gaps with smaller ones. Overlap a little, because the crowded look is the whole charm.
- Sew each button on with two passes of thread and a tight knot at the back. Stack a small button on a big one for height.
- Sew a snap or hook-and-eye at the ends so the ribbon overlaps cleanly.
Pro tip: Buttons with a metal shank get sewn through the shank loop, not through holes.
Button Bracelets: Link colorful spare buttons together using small metal jump rings, finishing the strand with a clasp and a tiny bell charm for a creative, upcycled jewelry piece.

Crafts Night and Birthday Party Bracelets (Ideas 8 to 14)
These work for a table full of people: quick, forgiving, and fun to watch happen.
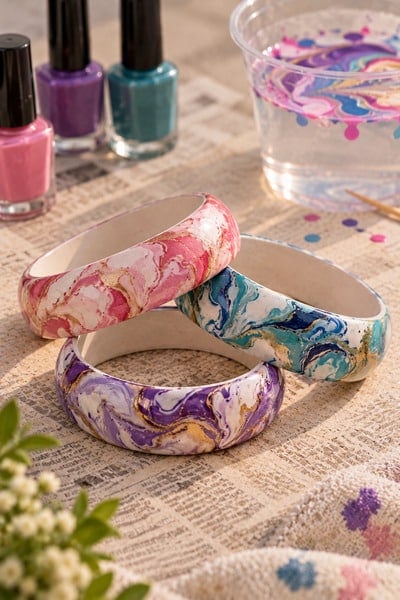
9. Marbled Nail Polish Bangle
Best for: teens and adults at a crafts night · Time: 30 minutes plus drying · Cost: about $10
You’ll need: plain wooden bangles, white acrylic paint, 3 to 4 nail polishes, a disposable cup of room-temperature water, toothpicks, clear top coat, newspaper, gloves.
Make it:
- Paint each bangle white and let it dry fully. The white base makes the colors pop.
- Drop 2 to 3 polishes onto the water and swirl once or twice with a toothpick.
- Wearing gloves, dip the bangle quickly, rotating it through the film on the surface, then lift it out slowly.
- Clear leftover film with a toothpick before the next dip. Dry 24 hours, then add a top coat.
Pro tip: The polish skins over within seconds, so have everything ready before the first drop. Work in a ventilated room.
Related: Nail Polish Dipping Art: How to do Water Marbling
10. Color-Changing UV Bead Bracelet
Best for: kids’ parties (ages 6+ with supervision) · Time: 15 minutes · Cost: $8 to $12
You’ll need: UV-reactive color-changing beads (they look white indoors and turn color in sunlight), 1 mm stretch cord, scissors, clear glue.
Make it:
- Give each guest a small cup of beads and ask them to guess which colors they’ll end up with.
- Thread about 7 inches of beads in any pattern.
- Tie a surgeon’s knot, add glue, and hide it in a bead.
- Head outside and watch the colors appear.
Pro tip: Have everyone write a color prediction on a sticky note first. A blacklight flashlight works if it’s raining.
11. Mini-Food Polymer Clay Charm Bracelet
Best for: matching sets for friends with inside jokes · Time: 1½ hours · Cost: $15 to $20
You’ll need: polymer clay in several colors, a craft knife, a toothpick, eye pins, jump rings, a chain bracelet with a clasp, clay glaze, parchment paper.
Make it:
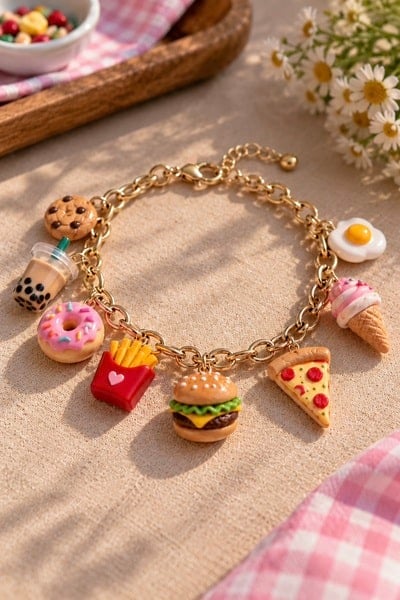
- Roll tiny foods that fit your group: a boba cup (translucent clay with brown dots), fries in a red sleeve, a mini burger with layers.
- Push an eye pin into the top of each piece before baking.
- Bake following the clay package (many brands bake somewhere around 230 to 275 °F), then cool completely.
- Brush on glaze, and attach each charm to the chain with a jump ring.
Matching twist: Each friend makes one piece of a combo meal. Together, you’ve got dinner.
Pro tip: Bake on parchment over a ceramic tile. Metal sheets can leave shiny patches on the clay.
Related: Polymer Clay Jewelry Ideas to Help You Get Started
12. Fuse-Bead Pixel Link Bracelet
Best for: kids, teens, and retro-game fans · Time: 1 hour · Cost: about $10
You’ll need: fuse beads (Perler or a similar brand), small pegboards, an iron, parchment paper, jump rings, a lobster clasp, pliers.
Make it:
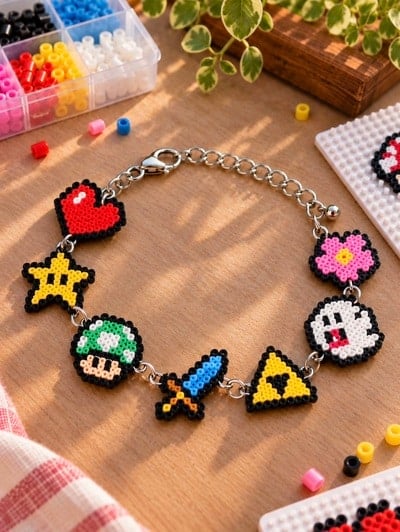
- Build 6 to 8 small shapes, such as a 5 × 5 heart, star, mushroom, or initial. Keep an edge bead on each one for a jump ring to pass through.
- Iron through parchment on a medium setting until the beads just fuse, then flip and iron the other side.
- Press flat under a book until cool.
- Link the pieces together with jump rings and add a clasp.
Pro tip: Too much heat melts the center holes shut, so stop as soon as the beads look flat and joined.
Related: Aesthetic Perler Bead Ideas and Patterns for Elevating Your Space
13. Pipe Cleaner Flower Garden Cuff
Best for: ages 5+ and anyone who wants a 15-minute win · Time: 20 minutes · Cost: about $5
You’ll need: 12 to 15 chenille stems in 3 colors, extra green stems for the base and leaves, scissors.
Make it:
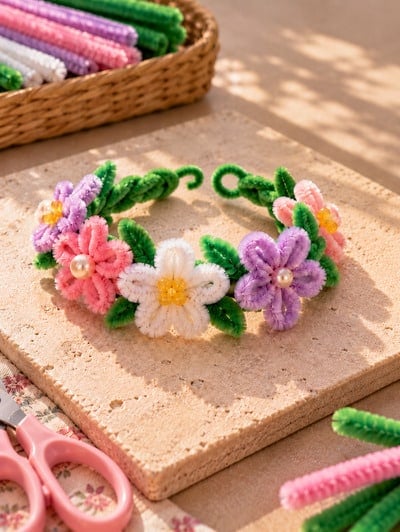
- Twist two green stems together into a rope the length of your wrist plus 1 inch.
- For each flower, wrap a stem around two fingers 5 times, slide it off, and twist the center closed to form petals. Poke a contrasting 2-inch piece into the middle.
- Twist each flower onto the base and fold a green stem into a leaf beside it.
- Bend the ends into small hooks that link together, folding cut ends back so no wire pokes out.
Pro tip: Slide a bead onto the center stem for a pearl-like middle.
Related: These Pipe Cleaner Crafts Are So Cute It’s Hard To Pick One
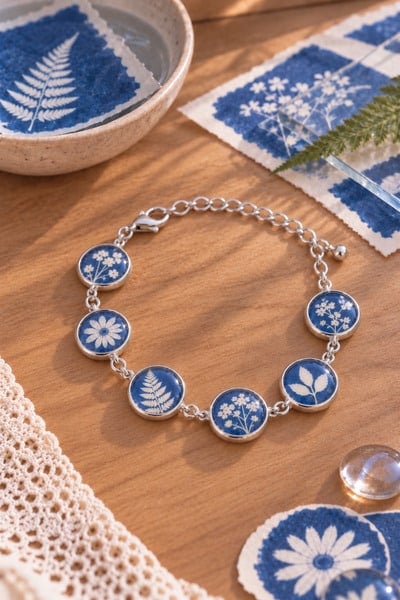
14. Sun-Print Cyanotype Dome Bracelet
Best for: science-craft parties and nature lovers · Time: 45 minutes plus sun time · Cost: $15 to $25
You’ll need: cyanotype (sun-print) paper, small flat objects (leaves, ferns, lace, feathers), a piece of glass or clear acrylic to press them flat, a bowl of water, glass cabochons, a bezel bracelet blank, glue.
Make it:
- Indoors in dim light, arrange items on the paper and cover with glass.
- Move to bright sun for the time your paper specifies. The paper fades as it exposes.
- Rinse in water for about a minute. The covered areas stay white and the rest turns deep blue. Dry flat.
- Cut circles to fit your cabochons, glue them under the glass, seal the backs, and glue the domes into the bracelet trays.
Pro tip: Ferns and lace make the crispest silhouettes. Expose on a clear day for the cleanest contrast.
Matching Bracelets for Friends (Ideas 15 to 17)
Matching bracelets are better when the match means something only your group understands.
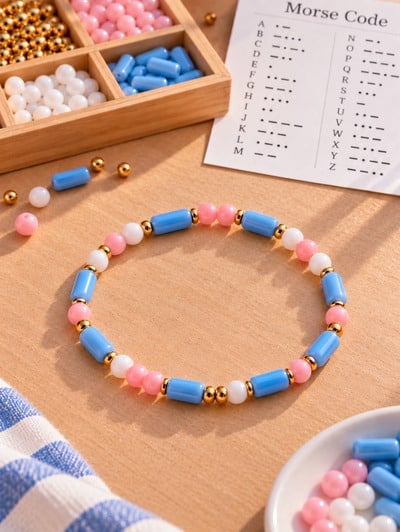
15. Morse Code Secret-Message Bracelet
Best for: besties, siblings, and couples · Time: 20 minutes · Cost: about $8
You’ll need: round beads for dots, tube or oval beads for dashes, a different-colored spacer bead, 1 mm stretch cord, a printable Morse chart.
Make it:
- Pick a short word. HOPE and BFF.
- Thread dots as round beads and dashes as tube beads, with one spacer between letters and two between words.
- Tie a surgeon’s knot and glue it.
- Split a phrase across the group so each friend wears one word and it takes everyone together to read it.
Pro tip: Make dots and dashes look obviously different from each other. Same-size beads in similar colors make the message hard to read.
16. Two-Halves Puzzle Piece Bracelet
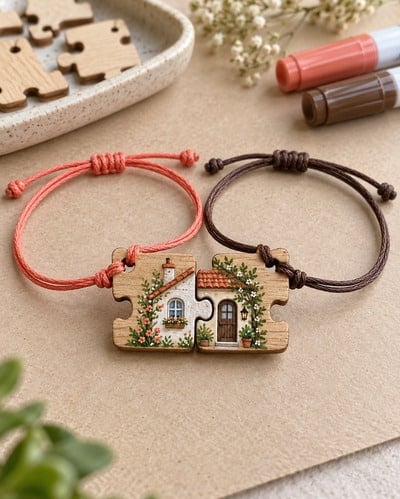
Best for: two best friends or siblings · Time: 40 minutes · Cost: about $10
You’ll need: wooden or acrylic interlocking puzzle-piece blanks with a hole (search for interlocking puzzle pendant blanks), acrylic paint pens, clear sealer, 2 mm leather or waxed cord.
Make it:
- Pair the pieces and plan a design that only makes sense when joined: a split heart, sun and moon, or two halves of a sentence.
- Paint the front and edges, let dry, then add a second coat.
- Seal with a clear sealer.
- Thread each piece onto its own sliding-knot bracelet.
Pro tip: Sketch lightly in pencil first, since paint pens don’t forgive. Test the fit before sealing so painted edges don’t stick together.
17. Paint-Pen Bead Swap Bracelet
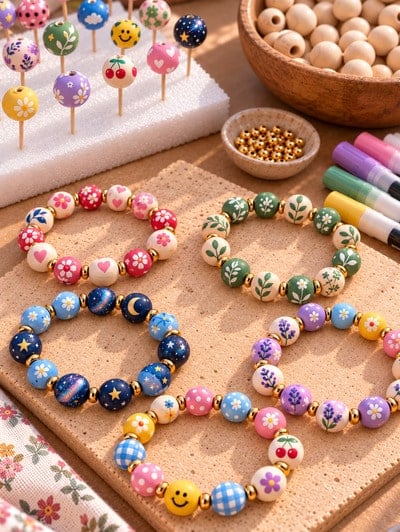
Best for: a crafts night with 4 to 8 friends · Time: 2 hours · Cost: about $20 for the group
You’ll need: plain wooden beads (10 to 12 mm), acrylic paint pens, a foam block and toothpicks for drying, clear spray sealer, stretch cord, small spacer beads.
Make it:
- Count your group. If five friends are swapping, each person paints five identical beads in her own design: dots, flowers, a galaxy swirl.
- Dry the beads, then seal them.
- Swap so everyone keeps one and gives one to each friend. Everyone ends up with one bead from every person.
- String with spacers and knot.
Pro tip: Stick each bead on a toothpick pushed into foam so you can paint every side at once.
For Stitchers and Scrap Savers (Ideas 18 to 21)
If you already own a stash of floss, yarn, fabric, or paper scraps, start here.
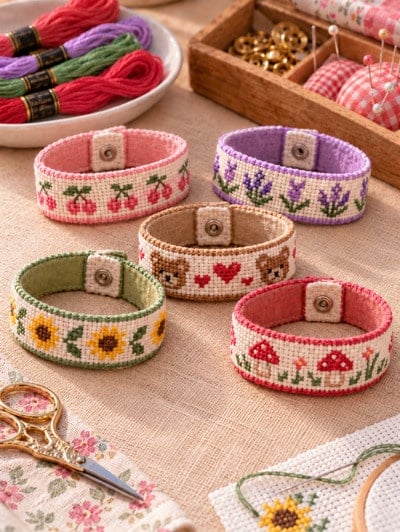
18. Cross-Stitch Aida Band Bracelet
Best for: embroidery fans · Time: 1½ hours · Cost: about $12
You’ll need: 1 to 1½ inch wide 14-count Aida band, 2 to 3 colors of embroidery floss, a size 24 tapestry needle, small scissors, a sew-on snap or Velcro, a scrap of felt.
Make it:
- Cut the band to your wrist measurement plus 1 inch and fold it in half to find the center.
- Stitch a tiny motif (a daisy, heart, mushroom, or initial) from the center outward with 2 strands of floss, keeping every top stitch leaning the same direction.
- Outline with a single strand of backstitch if you like.
- Fold the ends under, sew on the snap or Velcro, and back with felt to hide the thread.
Pro tip: 14-count Aida has 14 squares per inch, so a design about 9 or 10 squares tall fits a 1-inch band with room to spare.
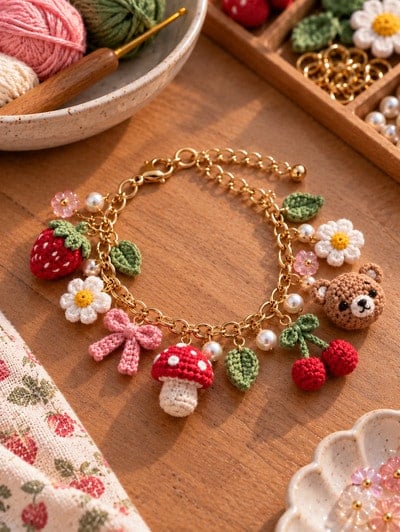
19. Amigurumi Mini Charm Bracelet
Best for: crocheters who want to wear their work · Time: 1 hour for 3 charms · Cost: about $10
You’ll need: cotton yarn or crochet thread (sport weight or lighter), a 2.0 to 2.5 mm hook, fiberfill, a tapestry needle, jump rings, a chain bracelet.
Make it:
- Crochet a tiny strawberry, mushroom, or acorn: magic ring with 6 single crochet, increase to 12, work 2 to 3 plain rounds, then decrease.
- Stuff firmly before you close the last few stitches.
- Sew a small loop of thread to the top and slip a jump ring through it.
- Hang each charm on the chain.
Pro tip: Use a hook a couple of sizes smaller than the yarn label suggests so the stuffing doesn’t peek through. A light mist of spray starch helps the shapes hold.
Related: Cute Crochet Amigurumi Miniatures Free Patterns and Instructions
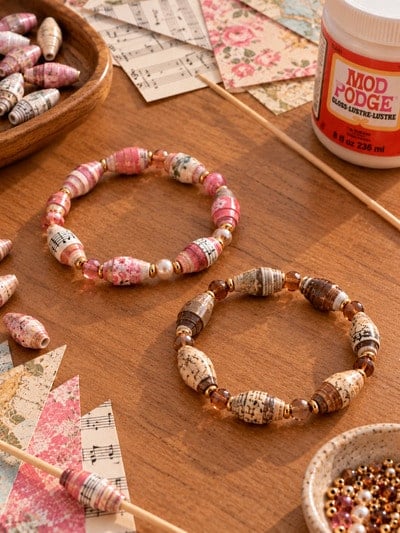
20. Scrapbook-Scrap Paper Bead Bracelet
Best for: leftover sheet music, maps, and scrapbook paper · Time: 1 hour plus drying · Cost: about $5
You’ll need: patterned paper, a glue stick, a wooden skewer, Mod Podge or glossy varnish, 1 mm stretch cord, small spacer beads.
Make it:
- Cut long, skinny triangles about 1 inch wide at the base and 8 inches long.
- Glue the back, roll tightly from the wide end around the skewer, and glue down the tip.
- Slide each bead off the skewer while the glue is still slightly tacky, then seal with 2 to 3 coats of Mod Podge or varnish, drying between coats.
- Thread with spacer beads and knot.

unknown source
Pro tip: Paper beads aren’t waterproof even when sealed, so take the bracelet off before washing your hands. Sheet music with black seed beads looks especially good.
Everyday Bracelets for Adults (Ideas 22 to 30)
These look like something you’d buy, not something you made at a craft table.
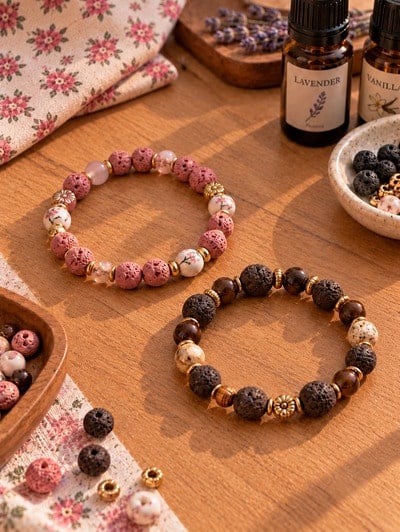
21. Scent-Memory Lava Stone Bracelet
Best for: carrying a smell you love · Time: 15 minutes · Cost: $10 to $12
You’ll need: lava stone beads (they’re porous), a few accent beads, 1 mm stretch cord, essential oil or a fragrance you like.
Make it:
- String 6 to 7 inches of lava beads and accents, then knot and glue.
- Put one drop of oil on a bead and let it soak in for a minute or two.
- Wipe off any excess before wearing, and refresh when the scent fades.
Pro tip: Essential oils bother some skin, so patch-test first and use oil sparingly. Check with your doctor if you’re pregnant or have a skin condition, and keep the bracelet away from pets.
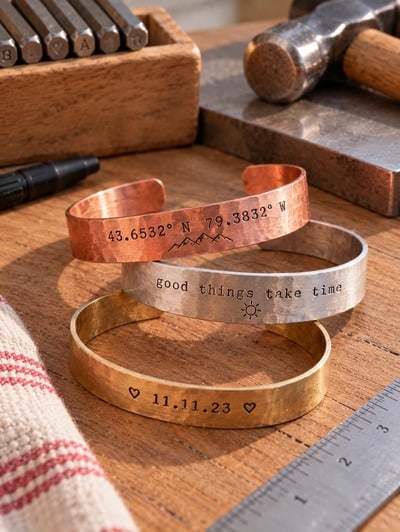
22. Hand-Stamped Secret-Message Cuff
Best for: coordinates, a date, or a line only two people know · Time: 1 hour · Cost: $15 to $25 for a starter kit
You’ll need: an aluminum or copper cuff blank about ½ inch wide, a metal stamp set (3 mm letters), a steel bench block, a 12 to 16 ounce hammer, masking tape, a permanent marker, rubbing alcohol.
Make it:
- Tape the blank to the bench block, mark the center, and lay out your text with a ruler.
- Stamp each letter with one firm hammer strike, working outward from the center.
- Rub marker into the letters, then wipe off the surface ink with alcohol on a cloth.
- Gently bend the cuff around a rolling pin or thick marker to shape it.
Pro tip: Practice on a scrap blank first, because mistakes can’t be erased. Stamp inside the cuff if you want the message to stay private.
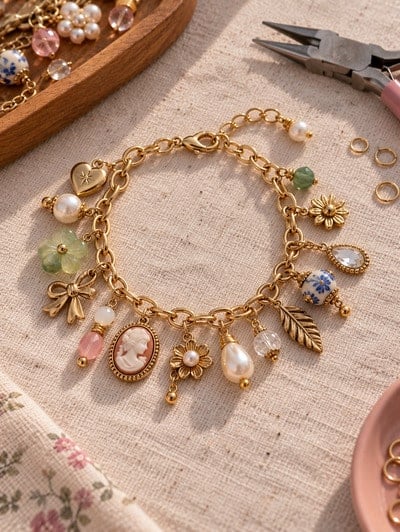
23. Orphan-Earring Remix Bracelet
Best for: single earrings, broken chains, and jewelry from someone you miss · Time: 40 minutes · Cost: about $5
You’ll need: single earrings and old necklaces, a chain bracelet blank, jump rings, pliers, wire cutters, strong jewelry glue, flat-pad bezel discs.
Make it:
- Lay everything out on a towel, play with the arrangement, and take a photo so you remember it.
- For dangling earrings, remove the ear wire and attach the dangle with a jump ring.
- For studs, clip the post flush with wire cutters and glue the front onto a flat-pad bezel disc, then link the disc onto the chain.
- Cut leftover necklace chain into short lengths and use them as extra dangles.
Pro tip: Odd numbers look more balanced than even ones. File any cut post smooth before it touches skin.
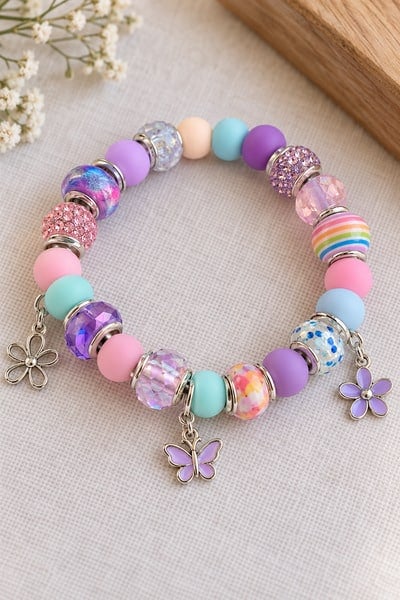
24. Fidget-Friendly Calm Bracelet
Best for: teens and adults who feel better with busy hands · Time: 15 minutes · Cost: about $10
You’ll need: 1 mm stretch cord, spinner beads (beads with outer rings that rotate), silicone beads, textured wood beads, charms, a few smooth beads.
Make it:
- Pick three textures: ridged, smooth, and bumpy.
- Thread them in a repeating pattern, centering a spinner bead on the top of the wrist.
- Knot, glue, and hide the knot inside a bead.
- Roll the beads between your fingers to test, and shorten the pattern if they clump.
Pro tip: This is a handy outlet for restless hands, not a treatment for anxiety or any condition. Skip clicky beads for classrooms and quiet offices.
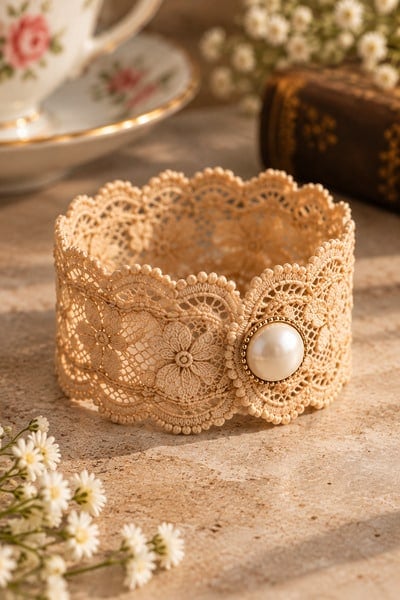
25. Tea-Dyed Lace Cuff
Best for: weddings, tea parties, and vintage lovers · Time: 1 hour plus overnight drying · Cost: about $10
You’ll need: cotton lace trim 1 to 1½ inches wide, 3 black tea bags, hot water, fabric stiffener (or white glue mixed 1:1 with water), a pearl button, a sew-on snap or hook-and-eye, a jar wrapped in plastic wrap, needle and thread.
Make it:
- Steep the tea bags in a bowl of hot water for 5 minutes, soak the lace for about 10 minutes (longer for a darker color), then rinse and press dry in a towel.
- Brush or dip the lace in stiffener, wrap it around the plastic-covered jar, and let it dry overnight.
- Slide it off, trim to your wrist measurement plus ½ inch, and sew on the snap or hook-and-eye.
- Sew the pearl button over the closure.
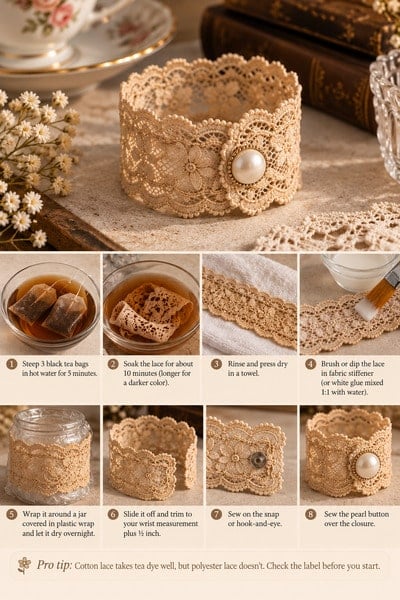
Pro tip: Cotton lace takes tea dye well, but polyester lace doesn’t. Check the label before you start.
26. Glass-Gem Mosaic Bangle
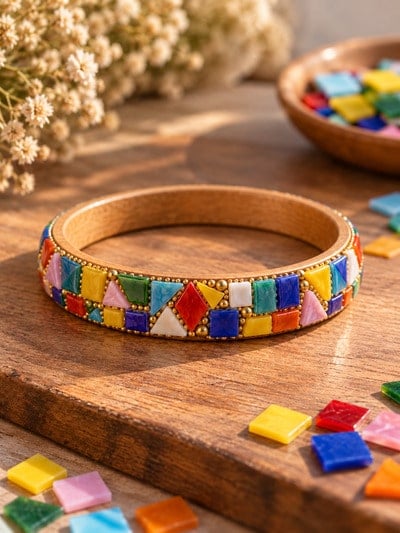
Best for: color lovers and anyone with a bag of leftover gems · Time: 45 minutes plus 24 hours to cure · Cost: about $10
You’ll need: a plain metal cuff or wooden bangle, flat-back glass gems or flat glass mosaic pieces, E6000 or clear jewelry glue, tweezers, a toothpick, seed beads for filling gaps.
Make it:
- Lay out your pattern on a towel first, then dry-fit a few gems on the bangle and take a photo.
- Dab glue on the back of each gem with the toothpick and press it in place with tweezers.
- Fill small gaps with seed beads.
- Let it cure for 24 hours without moving it.
Related: Glass Marbles and Glass Gems: 20 Creative Uses and Craft Ideas
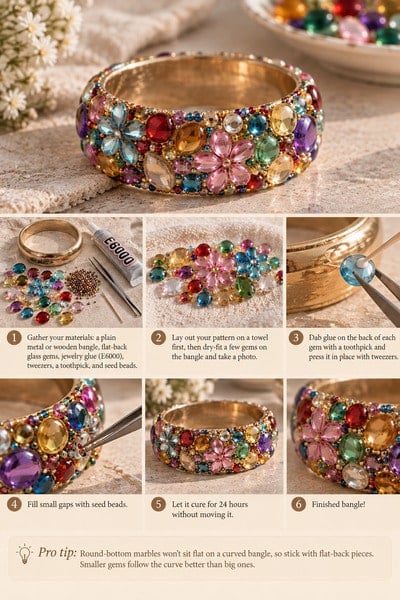
Pro tip: Round-bottom marbles won’t sit flat on a curved bangle, so stick with flat-back pieces. Smaller gems follow the curve better than big ones.
Related: MAKE Mosaic Coasters – A Cool DIY Project
27. Dainty Charm Bracelets
String small beads onto cord or wire and attach a few playful charms to a center ring for a light, delicate everyday piece.

28. Upcycled Denim Strip Bracelets
Sew or glue beads onto a thin strip of old denim fabric, then clamp metal ribbon ends with a clasp for a rustic, eco-friendly accessory.

unknown source
Common Questions About Making DIY Bracelets
1. What is the easiest bracelet to make for a beginner?
The Morse Code bracelet (#15), the fidget bracelet (#26), and the UV bead bracelet (#9) are the easiest. All three use stretch cord and one knot, and you can finish any of them in about 15 minutes.
2. What materials do you need to make bracelets at home?
A basic kit is stretch cord, two pairs of flat-nose pliers, wire cutters, jump rings, lobster clasps, and clear jewelry glue. Beyond that, you can use buttons, shells, old shirts, hardware washers, paper scraps, or whatever you already have.
3. What size should a DIY bracelet be?
Measure the wrist, then add ½ inch for a snug fit, 1 inch for standard, or 1½ inches for loose if it has a clasp. Stretch bracelets should be about ½ inch larger than the wrist. See the sizing table near the top for details.
4. What string is best for making bracelets?
Use 1 mm clear stretch cord for most beaded bracelets, and 0.8 mm for tiny beads. Waxed cotton or nylon cord is better for sliding-knot bracelets, and leather or paracord suits heavier hardware and chunky beads.
5. How do you stop a stretch bracelet from breaking?
Pre-stretch the cord before you thread beads, use a surgeon’s knot with a dot of glue, and choose beads with smooth holes. Cheap thin elastic snaps faster. If the bracelet gets tight over your hand, take it off gently instead of tugging it over your knuckles.
6. How do you make a bracelet without beads?
Try the old-shirt braid (#6), the pipe cleaner cuff (#13), the stamped metal cuff (#24), the inner-tube cuff (#28), or the Aida band (#18). None of them need a single bead.
7. What are good DIY bracelet ideas for a birthday party?
The candy bracelet bar (#11), UV color-changing beads (#9), fuse-bead links (#12), and sun-print domes (#14) all work well for groups. Keep small parts away from kids under 3.
8. How do you make matching bracelets for friends?
Pick a design that has a hidden meaning, like Morse code (#15), puzzle pieces (#16), or a bead swap (#17). A match works best when each friend’s bracelet is a little different but makes sense together.
9. How can you turn a keepsake into a bracelet?
Shells, stones, buttons, pressed flowers, maps, and old shirts all work. Choose the idea from the Keepsake section that fits the object: shells (#1), stones (#2), flowers (#3), handwriting (#4), maps and photos (#5), clothing (#6), buttons (#7).
10. How do you make a bracelet waterproof?
Seal paper, wood, and clay pieces with clear varnish, and use stainless steel, silicone, or glass beads where you can. Even sealed, paper and wood pieces should come off before swimming or washing up.
11. Can you sell the bracelets you make?
Yes, but be careful with licensed characters, and read your local rules. In the US, jewelry made for children has lead and cadmium limits that apply to sellers. This is general information, not legal advice, so check the CPSC website or a professional before you start selling.
Which One Should You Make First?
If you only have 20 minutes, make the Morse Code bracelet (#15) and send one to a friend. If you’ve got an afternoon and something sentimental sitting in a drawer, pick the keepsake that matches it: a button tin becomes #7, a beach shell becomes #1, an old shirt becomes #6. And if you’re hosting a crafts night, the bead swap (#17) will make everyone leave with a bracelet that has a piece of every friend in it.
Drafted by: Sabah Waqas
Written by: Hani Shabbir
You will also like:
Safety Pin Bead Craft: Beaded Safety Pin Brooch Patterns (9×9 Pixel Art)
Making Bead Crafts for Adults: From Simple to Stunning Ideas