This post may contain affiliate links. Please see our full Disclosure Policy for details.
Ready to turn nature’s canvas into stunning, personalized art? Leaf painting is a wonderful, accessible craft that allows you to capture the beauty of the outdoors and bring it inside. This guide will walk you through everything, from collecting the perfect leaf to sealing your finished masterpiece, ensuring beautiful, long-lasting results. You will find:
- When and where to collect leaves for painting
- Preserve and Prepare leaves for paint: cleaning, priming, and strengthening
- Painting techniques that work on leaves (acrylics, markers, watercolors, metallic)
- How to seal so paint and color last, and artwork stays durable
- Creative painting ideas and craft uses for painted leaves
- Troubleshooting, safety, and storage tips
Collecting and Preparing Your Canvas (The Perfect Leaf)
The key to a great leaf painting is starting with the right canvas. You want leaves that are intact, relatively flat, and sturdy enough to hold paint.
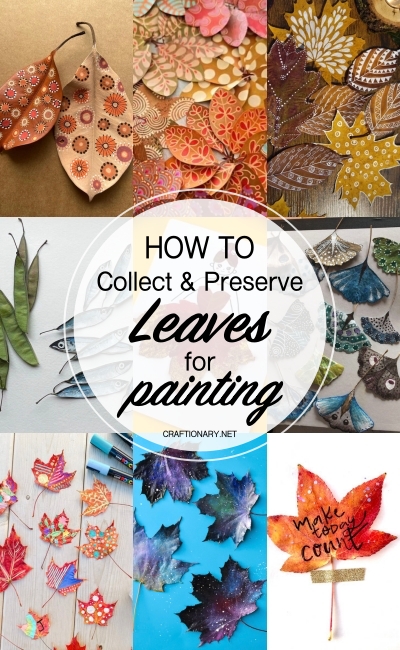
1) Collecting leaves — timing, types, and ethics
- When to pick: Collect leaves when they’re freshly fallen or still slightly flexible (early autumn is best). Avoid brittle, already-crumbled leaves.
- Which leaves work best: Choose flat, intact leaves with strong veins and smooth surfaces — maple, magnolia, beech, oak, sycamore, and ficus are top picks. Big leaves (magnolia, sycamore) give you more painting “canvas.”
- Ethics and legality: Don’t take from protected areas or private property. Collect fallen leaves rather than plucking from living plants when possible.
2) Cleaning and Flattening (The Preservation Secret):
- Clean: Gently wipe off any dirt or debris with a dry cloth. Do not rinse, as moisture can cause mold.
- Press:
- This is crucial for creating a flat, paintable surface. Sandwich your leaves between sheets of wax paper or paper towels inside the pages of a heavy book (or a dedicated flower press).
- Sandwich leaf between paper towels and microwave in short intervals (20–30s), checking often to avoid burning. Then press flat.
- Wait: Leave the leaves pressed for 1-2 weeks to completely dry and flatten. This step prevents the leaves from curling up later and cracking your paint.
Expert Tip for Preservation: For leaves you want to remain more supple and less brittle, a glycerin bath (2 parts water to 1 part glycerin) or a coat of Mod Podge before painting are popular methods to seal in moisture and preserve color.
Related: Nine Proven Methods to Dry Flowers is ideal for drying and preserving leaves as well.
3) Prep the leaf for painting (clean, strengthen, and prime)
- Clean: Gently brush off dirt and blot with a damp cloth; allow to fully dry.
- Strengthen (optional): For brittle pressed leaves, coat the back with a thin layer of Mod Podge to add strength. This helps prevent cracking when you handle or bend the leaf.
- Prime: For best paint adhesion, a thin coat of clear gesso or matte medium helps acrylics and markers stick better than bare leaf surface. Let it dry fully.
Best paints and techniques for leaf painting
- Acrylic paint: Most reliable — opaque, fast-drying, and flexible when thin layers are applied. Use fluid acrylics for delicate work.
- Paint markers and Posca pens: Excellent for fine lines, lettering, and doodles on leaves. Markers dry quickly and are beginner-friendly.
- Watercolors: Work best on pressed leaves with a sealed matte medium base — colors will be more translucent.
- Black waterproof pens: Black pens or micro pens for outlining. Available in a variety of sizes for different thickness. Use it on dry paint to avoid damaging the tip of your pen.
- White gel pens for details and fine designs.
- Metallics and gilding: Metallic acrylics or gold pens give dramatic accents—great for edges and veins.
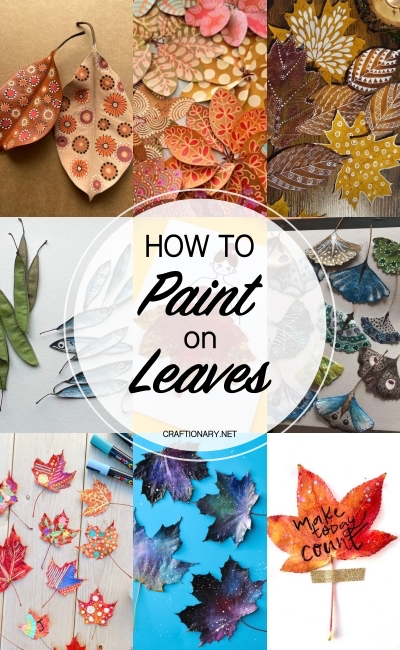
How to Paint on Leaves?
Create stunning painted leaves artwork with the following supplies and technique:
Required materials
- Fully pressed and dried leaves
- Primer or base coat – acrylic paint or Gesso (for darker leaves).
- Pencil, Non-bleeding markers, poscas, and acrylic paint pens for outlining.
- A mix of flat and fine-tip brushes for fine detailing.
- Acrylic paints for creating art.
- Sealant to secure the design.
Related: Best Sealer: How to Waterproof Acrylic Paint on Craft Surfaces
The Painting Process
- Once the leaves are clean, cured, and base-coated, start outlining the selected design with a pencil. Select easy, practical, and less intricate designs for practice as a beginner. Then try detailed designs such as mandalas, geometric patterns, or intricate landscapes.
- Apply the large block of colors first to lay the foundational roadmap of the painting. This technique is effective for complete surface coverage, helps maintain the tonal range, and creates a cohesive base for further detailing. Make sure that the color layers are thin and smooth to prevent any damage to the leaves.
- Once the main layers dry, add the smallest details and bright highlights (dots, stars or fine lines) for final touches.
- Applying sealant for longevity.
Related: 40 Magical Dried Flower Crafts
Sealing Your Masterpiece for Longevity
After your paint is completely dry (allow at least 24 hours), you must seal the leaf to protect the paint, prevent fading, and keep the leaf from crumbling over time.
The Best Sealants:
- Clear Acrylic Spray Sealer (Matte or Gloss): The most popular and easiest method. Lay your painted leaves on newspaper in a well-ventilated area and apply 2-3 light, even coats, allowing drying time between each.
- PVA or Diluted Mod Podge (Matte or Gloss): Use thin coats with a soft brush; gives control for edges but may slightly darken colors. Mod Podge alone is not ideal for long-term color retention of leaves, per comparative tests. If using Mod Podge, pair with an acrylic spray top coat for extra protection.
- Varnish (Acrylic-Based): Offers a very durable, protective finish, often used for more intricate, art-focused pieces.
- UV-Resin coating (high gloss, durable): For ornaments, jewelry, or heavy-use items, use clear epoxy resin to fully encase the leaf. Requires careful mixing and PPE (gloves, ventilation). The result is glassy and highly durable.
Related: Best Sealer: How to Waterproof Acrylic Paint on Craft Surfaces
Step-by-step: 3 mini-projects you can do today
1. Framed Single Leaf (pressed + painted)
- Collect a flat maple or magnolia leaf. Press between paper for 5–7 days.
- Apply 1 thin coat of matte medium on both sides; let dry.
- Paint with acrylics or paint markers (thin layers). Let dry.
- Spray 2 light coats of clear acrylic sealer (both sides).
- Mount on acid-free mat board and frame.
2. Glycerin Leaf Garland (flexible + painted)
- Soak leaves in 1:2 glycerin:water for 3–5 days; blot dry.
- Paint with metallic acrylic on veins and edges.
- Seal with spray sealer. String on fishing line or twine.
3. Wax-dipped Holiday Ornaments (fast)
- Press leaves briefly then dip in melted paraffin; cool on parchment.
- Add a small hole near stem, thread ribbon, and tie. Optional: paint small accents before dipping for subtle depth.
- Hang on tree or use as gift toppers.
Related: 40 Unseen Pressed Flower Crafts
Troubleshooting and FAQs
1. Leaf paint is flaking — what went wrong?
Likely poor adhesion — prime with matte medium or gesso, use thin acrylic layers, and seal with a spray topcoat.
2. The leaf changed color after preserving — help!
Glycerin darkens slightly (expected). Pressed leaves fade over time. For color retention, wax dipping or immediate sealing reduces color loss. Test methods first.
3. Is Mod Podge good for leaves?
Mod Podge can strengthen and seal, but tests show it doesn’t prevent color loss and may darken pigments; pair it with an acrylic spray for best results.
4. Can you frame unsealed painted leaves?
You can, but they’ll be vulnerable to humidity and UV. Use UV-filtering glass and store/display away from direct sunlight, or seal beforehand.
5. How long will preserved painted leaves last?
With proper preservation and sealing, sealed leaves can last years indoors. Avoid humidity and sun to slow color degradation.
Safety and Sustainability Notes
- Work in ventilated areas for sprays/resins; use gloves and masks for resin or strong solvents.
- Reuse materials where possible — don’t over-harvest leaves. Repurpose old jars, paper, and strings for displays.
- Prefer biodegradable sealers where possible and avoid microplastics in glitter.
You will also like:
Make Beaded Succulent Plants: A Forever Blend of Craft and Nature