This post may contain affiliate links. Please see our full Disclosure Policy for details.
Cute crafts are one of the most viral trends of last year that have successfully entered into this year. After all, this “dopamine decor” is not only aesthetic, cute, but offers fantastic opportunities for personal expressions, community building, and tangible handmade results that are an ultimate counterbalance to sole digital entertainment. The soothing effect of their crafting process makes them a huge success online as well as in physical form.
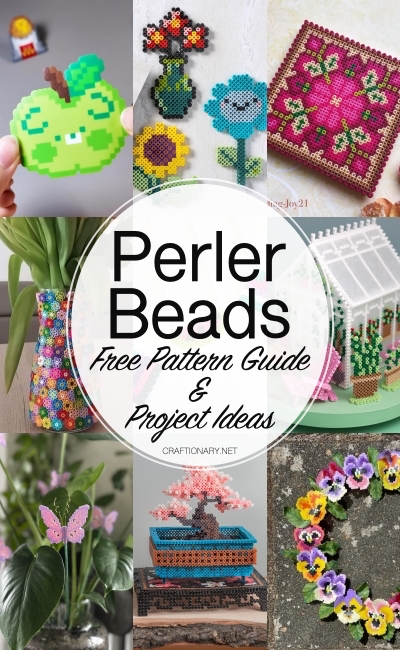
One of these remarkable crafts is Perler Beads. This craft initially gained popularity as a therapeutic tool in Sweden in the early 1960s. Soon, Perler bead artwork fused pixel art, pop culture, and complex patterns for creating detailed characters, designs, and artwork. Their sizes range from 2.6mm to 10mm. Perler bead ideas are a fun and whimsical way of turning ordinary beads into kid and adult-friendly crafts.
This article is written to help beginners and experienced crafters find inspiration, understand techniques like the “tape method” for professional finishes, and confidently create visually pleasing perler bead designs with useful tips and guidelines.
What Are Perler Beads?
Perler beads (also called fuse beads, melty beads, iron beads, or Hama beads) are small plastic beads that melt together when heat is applied using an iron. They’re arranged on pegboards to create designs, then fused to form a solid piece.
From pixel art to functional items such as gift tags, bookmark, desk organizer, keychains, fridge magnets, jewelry and hair accessories, bag and phone charms, coasters, photo frames, decorative trays, sun catchers, wall art, and home decor items, by ironing them together.
Materials for Perler Bead Crafts
Make sure to have all the supplies listed below for an ultimate Perler Bead crafting experience:
- Perler Beads: If you are starting your perler bead crafts journey, I would recommend purchasing this fuse bead kit with 5mm beads in abundant color options. You can also purchase this Meland fuse bead kit with patterns for practice before starting complex projects.
- Perler Beads Board: Also known as pegboards, perler bead boards are canvases that help in arranging beads according to the selected pattern and design.
- Perler bead tweezer kit
- Tweezers (optional): Tweezer or bead dispenser for kids helps in managing smaller perler beads, especially while making changes to the design.
- Ironing: Craft Iron is one of the most important components for bringing the design together. Make sure to cover your project completely with ironing paper to avoid any mess on your working space, hands, and iron due to the melting process. You can also use parchment paper instead of iron paper, but the results would be different.
- Optional accessories: Frames, keychains, magnets, or hanging tools for the final product.
How to Make Perler Bead Project (Step-by-Step):
- Select your Design: Create a pattern (learn how to create your own below) or download one from online resources focusing on colors and shapes. Make sure to follow the right proportions for striking results.
- Set-up: Place the pegboard on a flat, heat-free, and practical working space away from children.
- Arrange the project: Place beads on the pegboard according to the selected pattern. Make sure there are no visible gaps or design errors.
- Iron: Set the iron to medium and cover the beads with ironing or wrinkle-free parchment paper. Iron on slow in a circular motion for 20-30 seconds and check occasionally without pressing hard. Once completed, flip the side and repeat the ironing process. Use fresh parchment/ ironing paper for each side.
- Cooling and finishing the project: Once the project has cooled down completely, place a heavy book on it to keep it flat and prevent warping.
How to Make Perler Beads Look Professional
The biggest difference between a “crafty” look and an “aesthetic” look is the melt. To achieve a professional finish, follow these expert techniques:
1. The “Full Melt” vs. “Open Center” Aesthetic
Full Melt: Ironing the beads until the holes completely close. This creates a smooth, plastic tile look that is perfect for magnets and keychains.
Open Center: Ironing just enough to bond the beads while keeping the circular holes visible. This is often preferred for wall art to maintain the “beaded” texture.
2. The Masking Tape Method
To protect your pegboards from warping and ensure an even melt use the taping method:
- Place masking tape over your finished (un-ironed) design.
- Rub the tape firmly so all beads stick.
- Lift the design off the board, flip it over, and poke holes in the tape for each bead (to allow air to escape).
- Iron the non-taped side.
Safety tips for kids using Perler Beads
- Age appropriateness: Perler beads are small and delicate and are ideal for inducing fine motor skills in 6+ children. Make sure to select 5mm-10mm perler beads to reduce the chances of ingestion, loss, and the cleanup process.
- Adult supervision: Perler beads can be dangerous if ingested. In addition, the final stage of Perler bead crafts requires ironing, which can be dangerous for children. Therefore, children must always commence their projects under adult supervision.
- Storage and Cleanup: Always store beads in suitable and segregated containers, and clean up immediately after spills and crafts to prevent ingestion.
Things to avoid during Perler Beads crafts:
- Using incompatible or low-quality beads: There are various commercially available bead brands offering a wide variety of sizes and colors; however, avoid mixing different types due to their different melting points and general handling guidelines.
- Skipping the planning phase: Never start a new project without a clear pattern, an idea of proportions, and a preplanned color scheme. Any mistake in proportions can waste time and effort.
- Selection of design: Avoid choosing over-complicated or intricate designs at the beginner stage. Begin with smaller designs and flourish to more advanced patterns.
- Ironing mistakes: Never leave an iron unattended in the presence of children. Even when a child is completing a perler bead project, an adult should handle the iron to prevent any injuries and burns. Make sure to apply appropriate pressure on the iron at medium settings to avoid excessive blowout.
- Replacing iron paper with wax paper: Never substitute ironing paper (parchment paper) with wax paper. Wax paper may leave a waxy residue on your project and can potentially ruin your iron and beaded project.
- Not letting the design cool properly: Each design requires a specific time to cool and stiffen to retain its shape and size. Therefore, never lift the ironing paper or move the design off the pegboard.
- Expecting highly detailed design: The results of perler bead crafts depend upon a number of factors, such as the nature and quality of the circular beads and the fusing process. Therefore, the design might not be as detailed or symmetrical as assumed.
Perler Beads Ideas by Skill Level
Easy Perler Beads Ideas for Beginners
Perler bead crafts might seem easy, but it’s important to master the technique on less complicated projects with fewer colors before experimenting with difficult ones.
Simple Shapes:
1. Perler Beads Heart: Select any three colors and start crafting a Perler bead heart from the bottom towards the top like this Pokemon heart. Make sure to allocate each color a specific space for fantastic results.

Eclectic Momsense
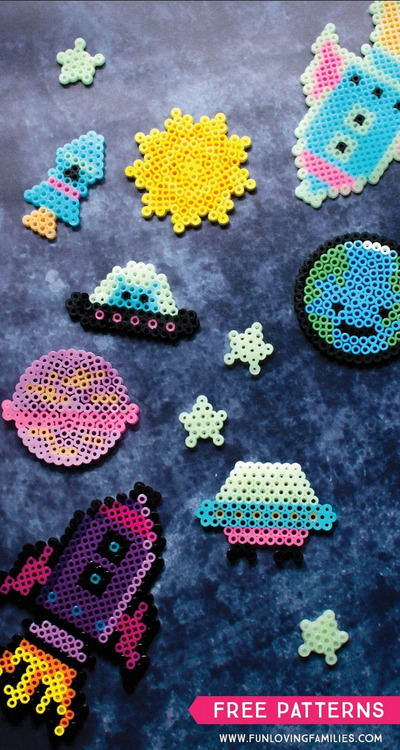
2. Space-themed perler bead projects: Create eye-catching, easy-to-make perler bead space-themed projects, such as stars, Earth and rockets, by using space perler bead free pattern.
Fun-Loving Families
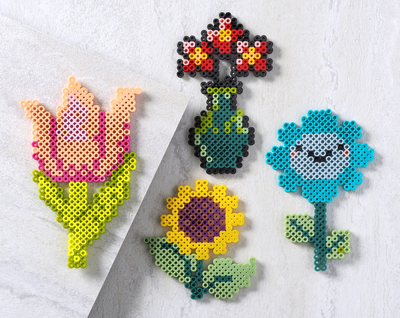
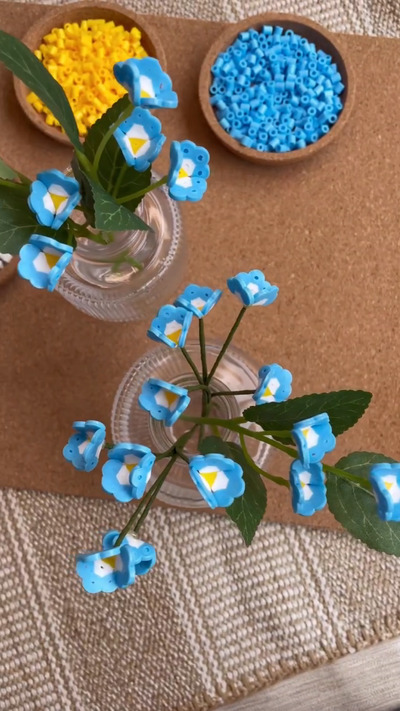
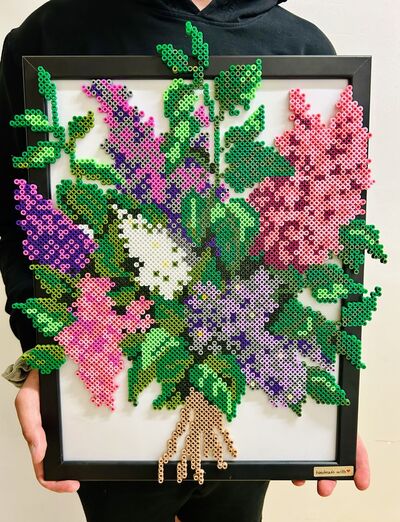
3. Adorable Flowers: from simple daisies to entire bouquets, craft amazing perler bead flowers with precision by using simple techniques.
4. Vase decoration: Craft any flower in your choice of color and use them for decorating transparent vases. This colorful fusion of shapes and shades can help to elevate any boring corner of the house.
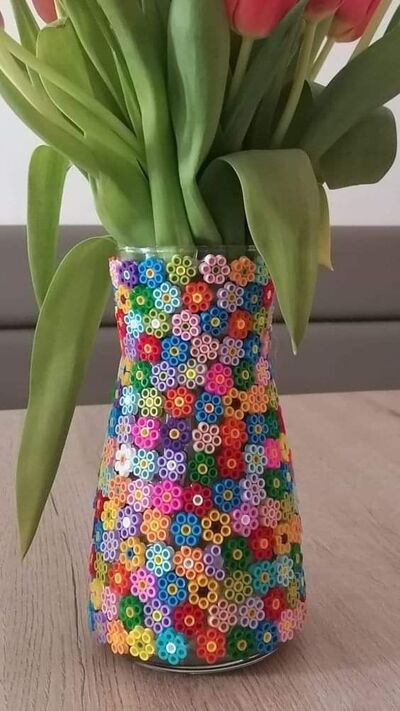
Mariska Bokhorst
5. Emoji and Smiley faces: Craft spectacular keychains, emojis, coasters, magnets, and badges using perler bead emoji free template.
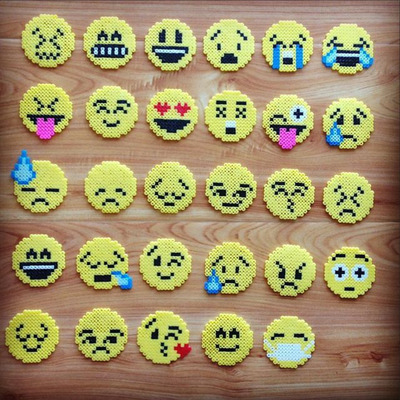
Crafty What Not
6. Creative Letters: Impress your family and friends by crafting melty beads alphabet projects that can be completed easily using free alphabet template.
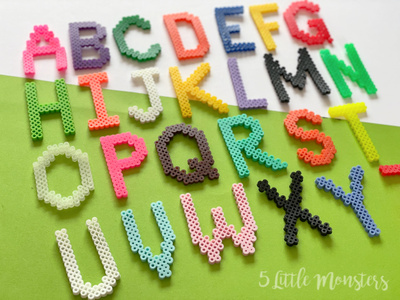
5 Little Monsters
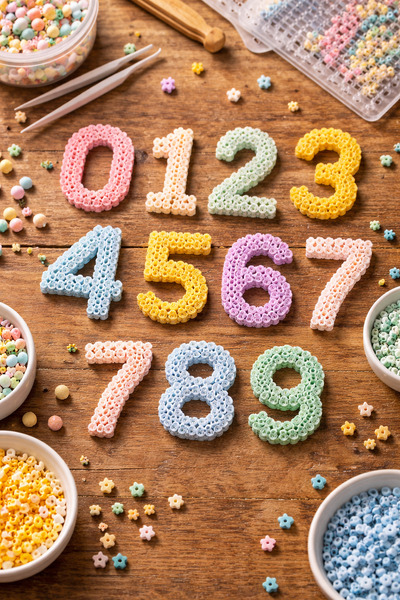
7. Simple Numbers: Design spectacular number-themed perler bead projects using contrasting color combinations as recommended in number free template.
Basic Animals Perler bead crafts:
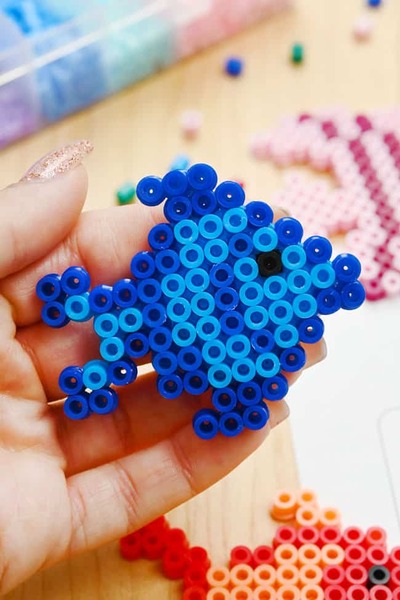
8. Perler Bead Fish: Craft adorable perler bead fish for endless fun, creativity, and relaxation.
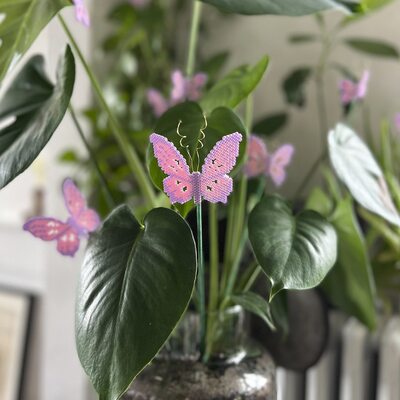
9. Perler Bead butterfly Garden Markers: Bring your choice of patterns and colors to life with these decorative butterflies.
Intermediate Perler Bead Projects
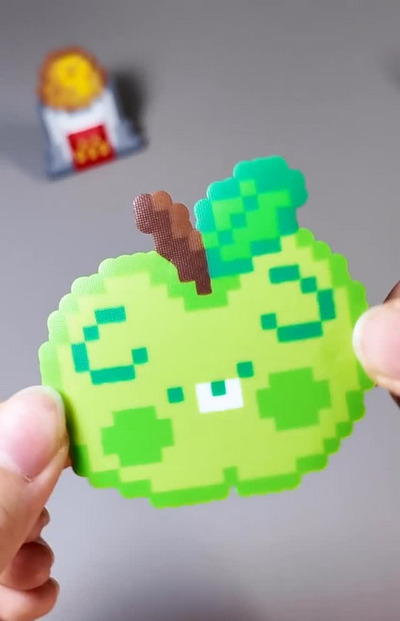
10. Perler bead apple: Intermediate-level perler bead crafters can try creative patterns without templates, such as this adorable green apple. The artist has completely melted the design to create a pixel effect.
11. Perler bead bookmarks: Cute perler bead book stack for book lovers.
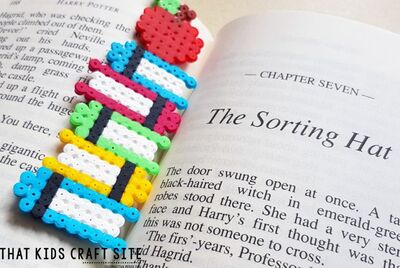
That Kids Crafts Site
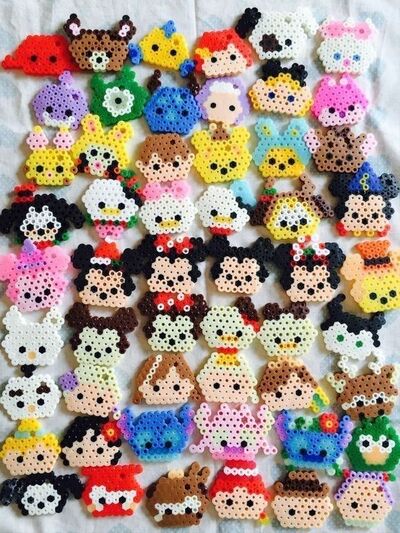
12. Cartoon characters: Craft eye-catching magnets, charms, and keychains by choosing these free kandi patterns.
13. 3D Perler Bead Pansy Wreath: Design a unique wreath for home decoration using Perler beaded pansies. You can download a free pansies pattern.
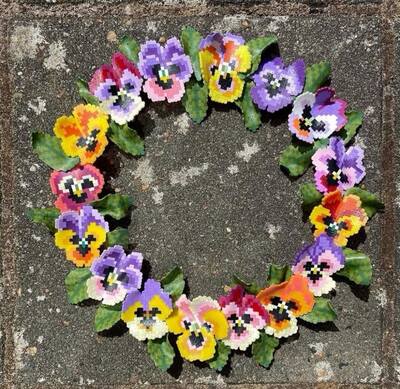
Emily Anne Hayes
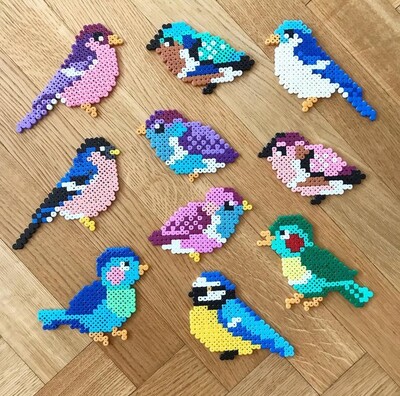
14. Perler bead birds: Welcome spring with the chirping of these adorable perler bead birds right in your house!
15. Forget-me-nots bouquet: Craft an easy yet detailed decorative item or gift for your friends using this easy 3D perler bead technique.
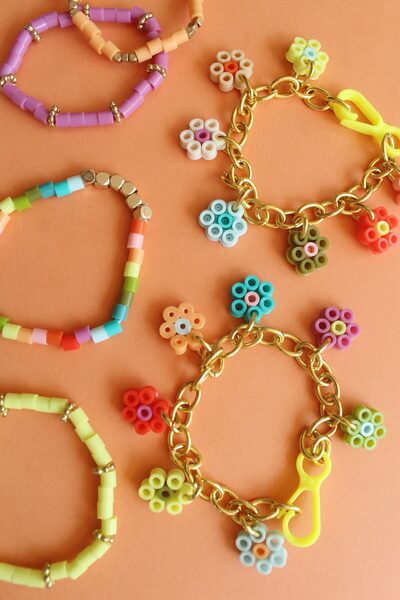
16. Flower Charm Perler Bead Bracelets: Style-up your wardrobe by adding these adorable flower charm perler bead bracelets to your collection.
Pretty Life Girls
17. Fused beads pendants: Create unique pendants in mini sizes in your preferred shapes, styles, and colors for a creative perler bead crafting experience.

Creative Kids Co.
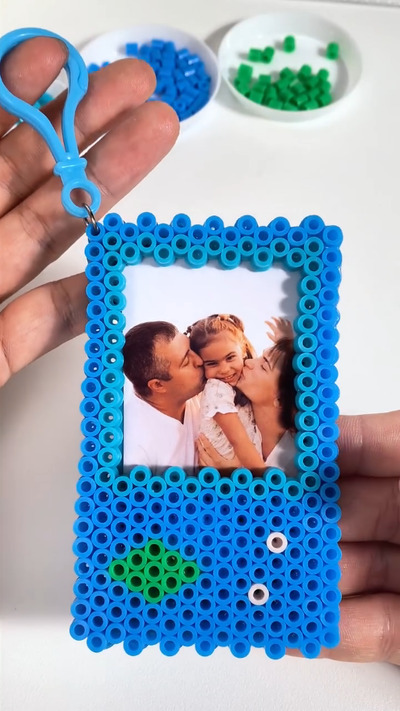
18. Fuse beads photo frame keychain: Craft a unique photo frame keychain for always carrying your precious memories with you.
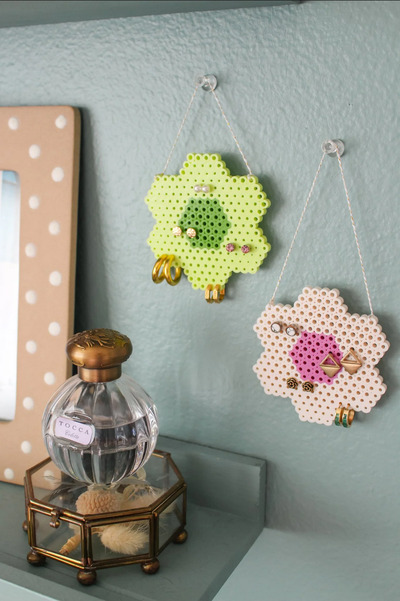
19. Perler bead earring holder: If you are into functional aesthetic decor, then this idea is suitable for you. Use a daisy (or any pattern of your choice) with two colors to create this hanging perler bead earring holder.
Entertain Idea
Advanced Perler Bead Ideas
Geometric Designs
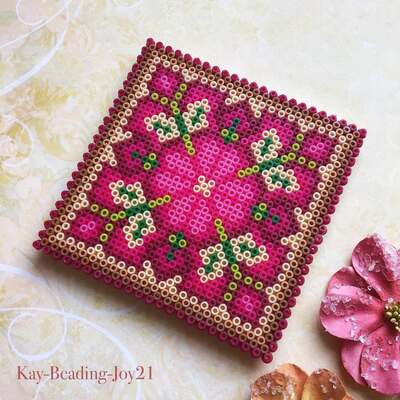
20. Geometric Floral Design: Mastering the art of Perler bead ideas is incomplete without geometric patterns. Use warm tones and earthy hues to create breathtaking patterns on boxes and artwork.
3D sculptures
21. DIY Birdhouse: Create an entire miniature village by mastering 3D Perler bead crafts. You can also craft customized butterfly feeders, bird feeders or specific holiday houses such as Halloween or gingerbread house.
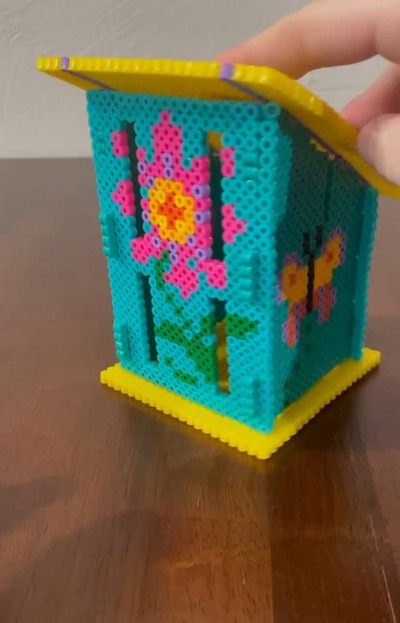
Perler Work by Tonya
22. Perler bead cloud lamp: Use tube beads to craft your dreamy cloud-shaped lamp that lights up cozy in the dark!

Panduro
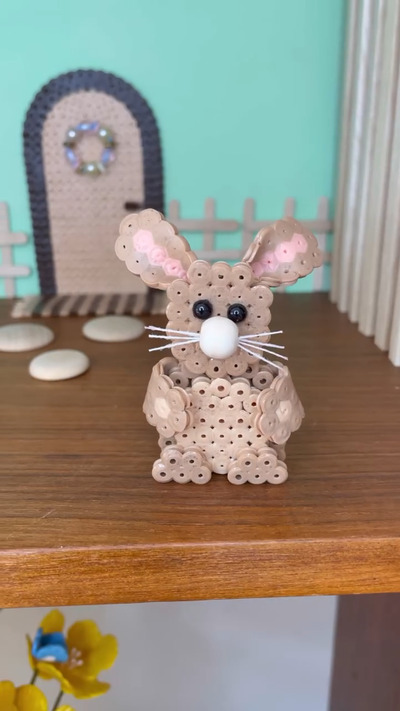
23. 3D Perler bead Easter bunny: Little details enhance the overall outlook of a project.
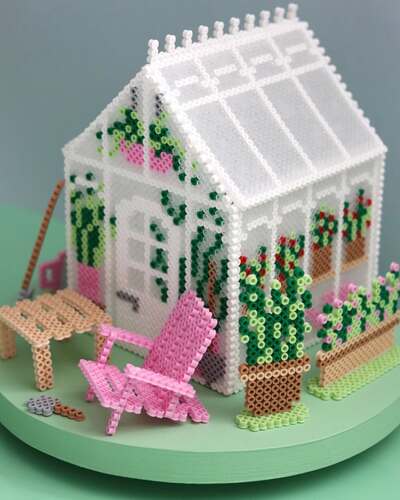
24. Perler bead greenhouse: A project of excellence! Create an entire 3D scene with tools and furniture to decorate your greenhouse. Make sure to have abundant transparent Perler beads to complete the walls of the greenhouse. Pro tip: Add LED lights inside for aesthetic appeal.
25. Perler bead boxes: Whether you are looking for a unique trinket box or a cute addition to your vanity table, this 3D perler bead heart box is a perfect solution for you.
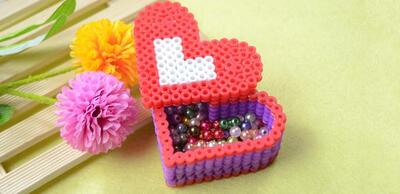
Learning Center
Decorations and Wall hangings
26. Blossoming Tree Wall Art: Fusion bead artwork on the wall in the library to inspire imagination.
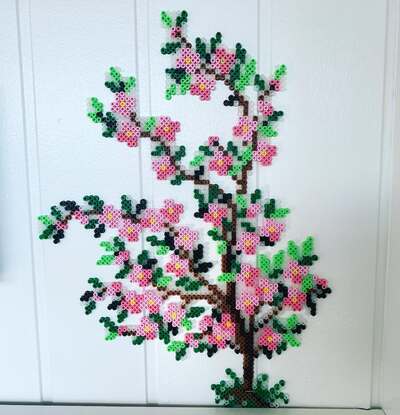
Kreative Thjem
27. Perler Bead Shadow Box: Replicate the magic of art with natural elements using Hama and photopearl fusion beads.
Bez
Related: Shadow Box Ideas – Practically Smart Ways to Display
28. Perler Bead Botanical Activitiy Kit: Use perler brand creative kits to create unique one-of-a-kind 3D fuse bead artwork like this blossom bonsai tree.
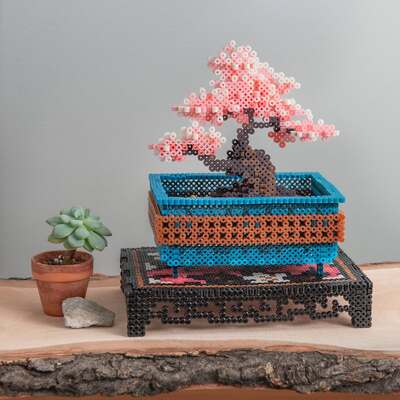
Shop: Perler brand
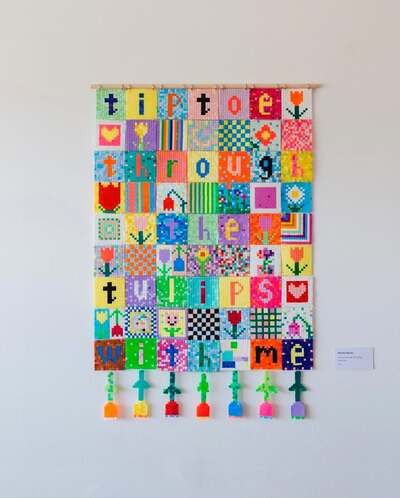
29. Melty Beads Wall Hanging: This project is lengthy and requires attention to detail. Join your favorite letters, numbers, characters, and flowers according to the design to craft a breathtaking wall hanging visual board.
30. Mixed Media Perler Bead Art: Using perler bead artwork on reclaimed paintings is a unique way of giving a second life to decorative items.

Where to find Perler Bead Patterns and Inspirations?
You can find hundreds of free perler bead pattern websites offering beginner-friendly to advanced level perler bead project templates on Pinterest, Instagram, and YouTube. Amazon is a great resource offering unique and budget-friendly free pattern books, such as
- Beadcraft Arcade for easy beading design inspirations.
- Perler Bead Pattern Kit for crafting multiple projects with precision.
- Use Pixel-Beads to convert any image of your choice into a perler bead template! Cool, effective, and highly customizable!
FAQs
1. How long do Perler Beads last?
Perler Beads can be used for a long time if stored correctly. As they are made up of plastic, they don’t expire but might become inconsistent due to constant exposure to heat, direct sunlight, or other storage issues. Similarly, Perler Bead Crafts should be framed or hung for longevity.
2. Can you reuse Perler Bead Crafts?
It’s impossible to reuse perler beads in their original form due to the melting; however, there are various methods for repurposing them:
- For finished projects: Finished perler bead crafts can be melted in the oven to create decorative bowls, suncatchers, or other art. Some slightly fused Perler Beads can be disintegrated and given a second life for other projects.
- For unfinished projects: Use the taping method or manual disassembly to lift them off the board and start again!
Make sure to check with your local program for recycling LDPE plastic products for effective recycling of Perler Bead Crafts.
3. What temperature should the iron be on?
Perler Beads require a dry iron on a medium setting that can be adjusted if required. Keep checking the parchment paper for steam and the melting rate according to the requirements of the selected design. Here is a step-by-step ironing guide for Perler Bead Crafts:
- Prepare the surface: Place your design on a flat, heat-resistant surface. Place a smooth piece of parchment paper or ironing paper on the design.
- Iron gently: Keep the temperature on medium setting and start ironing in slow, circular motion over the paper. Make sure to apply adequate pressure without pressing down hard. Keep a check on your progress after regular intervals of 5-10 seconds to prevent over-melting.
- Adjust heat according to requirement: If you want connected edges with open holes, keep the heat down and iron for less time. Similarly, if the design is not fusing, turn the heat up or iron a bit longer.
- Cool and flip: Once the design has fused according to your requirement, cool slightly, flip, and iron the other side following the same instructions.
Best Heating Tips for Perler Beads:
- Use a dry iron on a medium setting (like wool or cotton)
- Avoiding steam and iron over parchment paper in a circular motion, checking frequently.
- Start with medium heat and adjust as needed: lower if beads melt too much (closing holes), higher if edges aren’t fusing, aiming for connected edges with still-open centers for a classic look, or hotter for a completely flat melt.
4. Are Perler Beads safe for kids?
Made with food-grade, non-toxic plastic (LDPE), Perler Beads are safe for kids aged 6 and above. They may pose a choking hazard for younger children and require adult supervision to ensure appropriate use, prevent burns (during ironing), and avoid misuse at any cost.
5. What is the best way to prevent warping?
Warping occurs when the pegboard gets too hot. Always use the tape method mentioned above. If you iron on the board, use a medium-low heat setting and move the iron in a constant circular motion.
6. What is the difference between Perler and Hama beads?
Fusion Beads crafts are trendy; however, there are a lot of differences between every type of bead based upon their sizes, composition, brand, and region. Perler Beads are a standard in the US, while Hama Beads are more common in Europe and the UK. Both types offer unique color, composition, and size variations. Unlike Hama Beads, Perler Beads require slight iron adjustments for melting.
7. Are Artkal and Perler beads compatible?
Yes, but with a caveat. Most 5mm fuse beads (Hama, Perler, Artkal) can be used together, but they may have slightly different melting points. For the most consistent, aesthetic finish, it is recommended to stick to one brand per project.
Perler Beads ideas are a cool and entertaining way of achieving pixel art in physical form. Make sure to take your time during placement patiently for the best results. Once you start experimenting, it offers more than just regular shapes and icons. Craftionary has curated some easy-to-practice Perler Beads Ideas and inspirations just for you! Keep on trying and share your experience with us in comments and on our social media!
Drafted by: Nageen Sohail
Written by: Hani Shabbir
You will also like:
The Ultimate Guide: Make Chicken Wire Beaded Suncatchers
Make Beaded Succulent Plants: A Forever Blend of Craft & Nature