This post may contain affiliate links. Please see our full Disclosure Policy for details.
Looking for a fun and creative way to upgrade a plain shirt? One of the easiest and most eye-catching methods is DIY buttons art on plain shirt. With just a few colorful buttons, a needle, and some imagination, you can turn a boring tee into a stylish statement piece. Whether you want a minimalist heart, a name tag, or a full-button masterpiece, this DIY project is perfect for all skill levels.
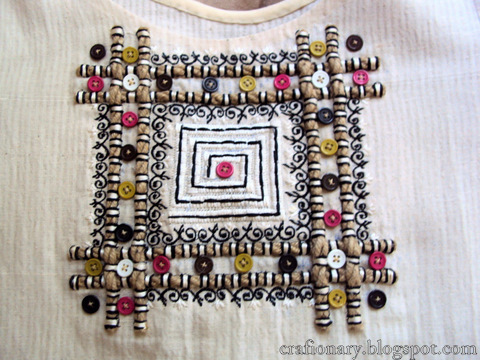
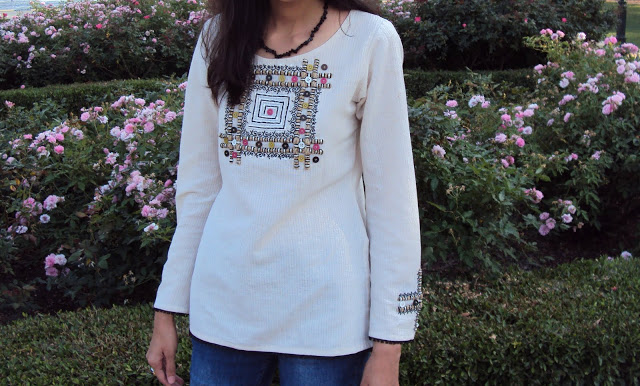
Buttons Art on Shirt
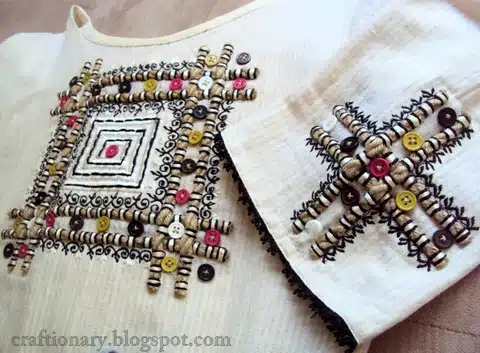
A simple off-white cotton shirt, which I revamped using burlap strings and buttons to make boutique style buttons shirt.
Why Try DIY Buttons Art on Plain Shirt?
Plain shirts are like blank canvases – and buttons are the paint. This craft not only allows you to express your style but also gives new life to old clothes. Plus, it’s eco-friendly, budget-friendly, and totally unique.
Benefits:
- Most supplies are already at home.
- No sewing machine needed.
- Use any design, color scheme, or patterns to customize it.
- Great way to upcycle plain shirts or old buttons.
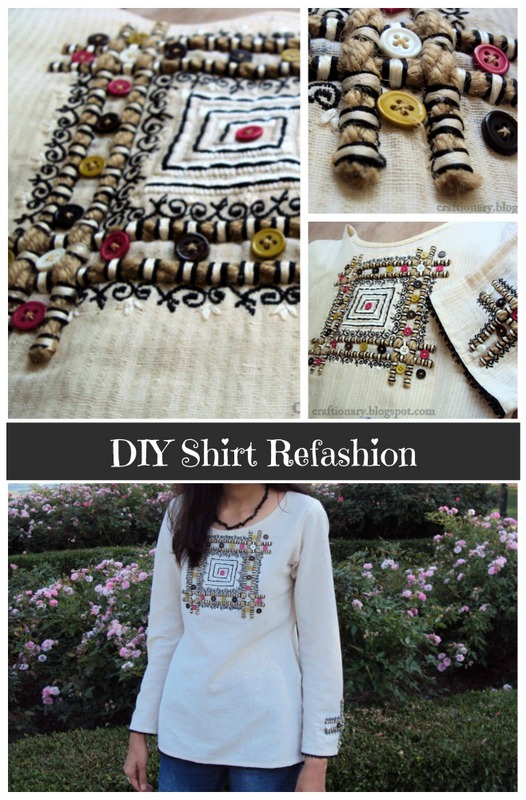
DIY Shirt Refashion
Burlap and buttons boutique shirt material
Here’s what you’ll need to create your own DIY buttons art on plain shirt:
- A plain cotton shirt (white or any solid color works best)
- Assorted buttons (different sizes, colors, shapes)
- Needle and thread (or fabric glue for no-sew option)
- Burlap strings
- Pencil or washable fabric marker (for sketching your design)
- Scissors
- Embroidery hoop (optional for easier sewing)
Step-by-Step Button Shirt Instructions:
Choose Your Design
Decide what kind of button art you want to make. Some trendy ideas include:
- A heart shape on the chest
- Initials or a name
- Flower patterns
- Abstract geometric shapes
- Animals or cartoon outlines
Sketch or trace your pattern using carbon paper on the shirt with a pencil or fabric marker.
Machine Embroidery Intricate Designs
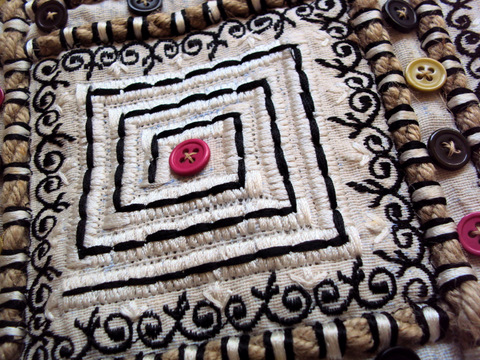
For this shirt, I choose to add some mixed media art, and had machine embroidered the intricate pattern design before stitching burlap and buttons. Another great option is to hand paint with fabric paints.
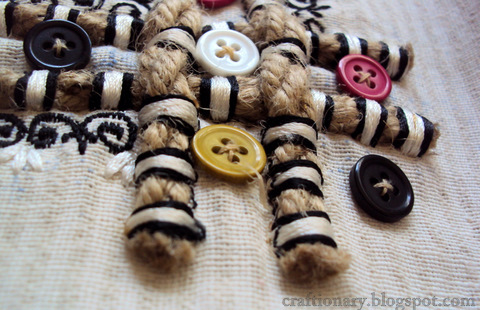
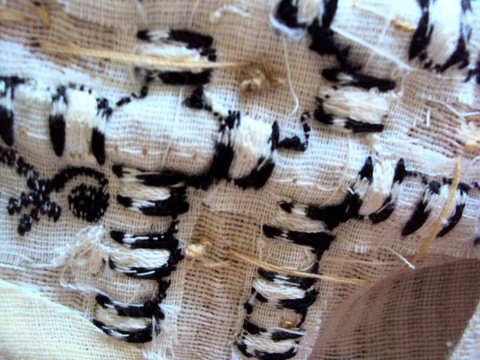
Add 3D effect with Burlap Strings
To make the box around the embroidery, you will need 8 strands of braided burlap strings.
- Cut them to the size of your design, and lit the ends to prevent fraying.
- Pin the braids in place and hand thread them into the fabric. I made 5 loops (3 white loops between 2 black loops) after each 1/4 inch.
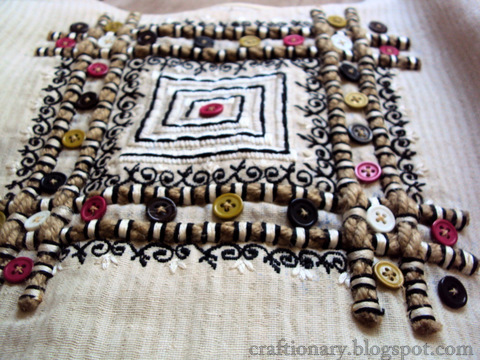
Arrange the Buttons
Place and arrange your buttons on top of the design. Try mixing sizes and colors to add texture and depth. This acts as a visual guide. When you are convinced with the look, sew or glue them in place.
Sew or Glue the Buttons
1. Sewing Method: (Preferred)
Thread your needle and start attaching the buttons one at a time, sewing through the holes and tying knots behind the fabric. An embroidery hoop can help keep the fabric taut.
2. No-Sew Method:
Use strong fabric glue to attach buttons. Let the shirt dry flat for 24 hours to ensure secure adhesion.

Secure and Clean Up
Once all buttons are attached, flip the shirt inside out and trim any loose threads. Give it a gentle press with an iron (avoid ironing directly on the buttons).
Burlap and Buttons Shirt Art Back
Style Tips for DIY Buttons Art
- Pair your buttoned shirt with jeans for a casual look or a skirt for a chic vibe.
- Use metallic buttons for a more glamorous feel.
- Match the button colors with your accessories to create a coordinated outfit.
How to Care for Your DIY Button Shirt
To preserve your new masterpiece:
- Hand wash or use a gentle cycle.
- Avoid high heat in the dryer.
- Store flat or hang carefully to prevent button strain.
DIY buttons art on plain shirt is more than a craft – it’s a wearable form of self-expression. Whether you’re refreshing your wardrobe, gifting a handmade shirt, or starting a small fashion side hustle, this project is fun, fast, and fashionable. Start simple, get creative, and make your shirt stand out!


Hi Hani……. fabulous really … it looks so smart… great job, choice of colours, design all is very beautiful really love it very much I may go one for my daughters long frock neckline like this,,, Thanks for sharing I am linked up it on my FaceBook page…
http://craftaworld.blogspot.com/
Love
Farah
This is a fabulous creation! I've seen a lot of diy clothing on blogs in the last year and am impressed by how different & creative this is {and how it doesn't look “homemade”, but more like something you'd get at a boutique}. Love it!
This is Super Cute..you did nice job,well i want to ask one thing..you did this machine embroidery yourself??or you just couch the threads according to embroidery?
& what about string folding,?is it easy to handle the several strings..?
over all its very nice 🙂
This is simply beautiful! Thank you for sharing. I am visiting from Ladybug Blessings.
Hani!! I saw this on you at Mariam's place, I didn't know you had made it! Thought you had bought it from Pakistan maybe.. but WOW! It looked SO smart! Love the pictures!!!
Oh my!! This is truly stunning!!!
Unique and stylish! I love it – great work!Thanks for linking to a Round Tuit!Hope you have a great week!Jill @ Creating my way to Success
Hani, this is brilliant! Totally loved your top and the work! Way to go girl!!
On a personal note, oh my gosh, you are so tall and lean…mashaAllah!
Wow that is really cool. It has that hippy chic look! My girlfriend will love this!
Wow!! thats super impressive! Love it 🙂
This looks so pretty, Hani! Wonderful!Thank you so much for sharing this
This is beautiful!! TFS!! Stopping by from Truly Lovely and your newest follower.Come on by my blog when you have a moment.
Amazing! Thanks for sharing at All Things Fee!
this is cool, looks like a lot of work, love it!!! turned out grerat
Hani – Your shirt is gorgeous! I love the burlap – very unique and cool! Beautiful work! Thanks so much for linking to The Sunday Showcase Party – I greatly appreciate it. I have featured this Sunday. Have a wonderful week.
~ Stephanie Lynn
gorgeous!
You are so super talented! Thanks for sharing:-)
-Tammy
Wow, the details are amazing! Really cool idea to braid burlap string for a shirt. Thanks for linking up with DIY under $5!
Amazing shirt!! Thanks for linking @'Sew Cute Tuesday'! I'll be featuring you on Tuesday, so be sure to stop by and grab a 'featured' button!
Wow! This is AMAZING!!
beautiful……………………………………………………………………………