This post may contain affiliate links. Please see our full Disclosure Policy for details.
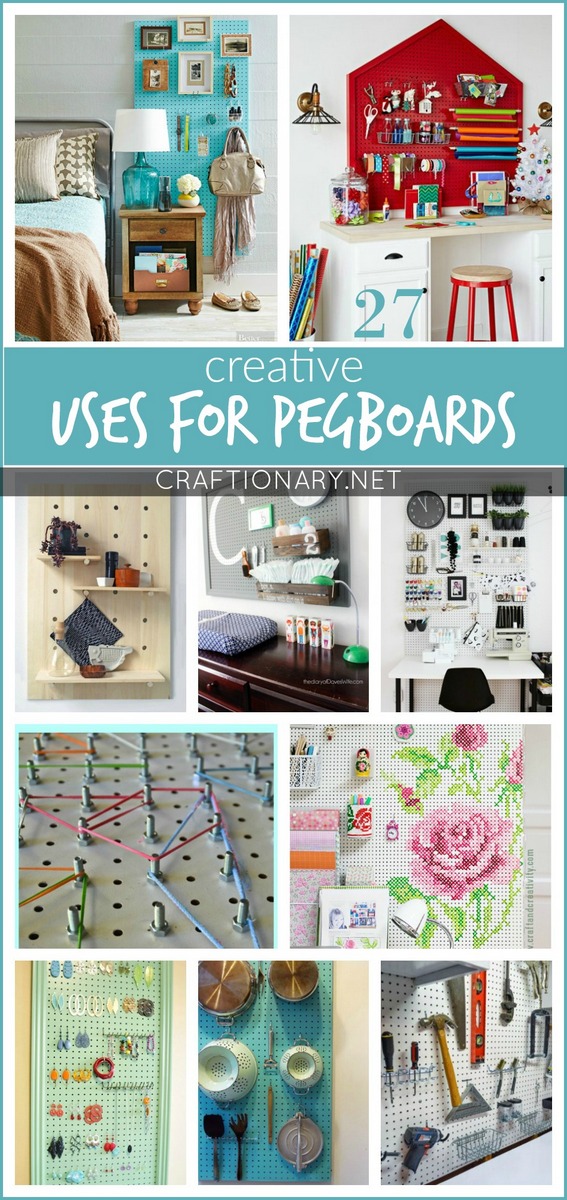
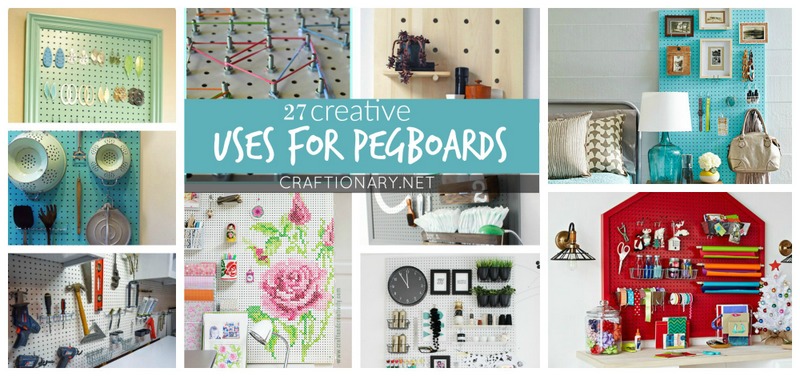
Pegboards have officially moved out of the workshop and into the heart of the home. Once relegated to holding rusty wrenches, this versatile tool has become a darling of the interior design world. Whether you’re a minimalist looking for a sleek “command centre” or a maximalist displaying a colorful plant collection, pegboards offer the ultimate customizable canvas.
This guide covers creative uses for pegboards, step-by-step project inspiration, styling tips, pegboard installation, and answers to the most common questions people ask—so you can confidently plan a pegboard project that actually works in real life.
DIY Creative Uses for Pegboards
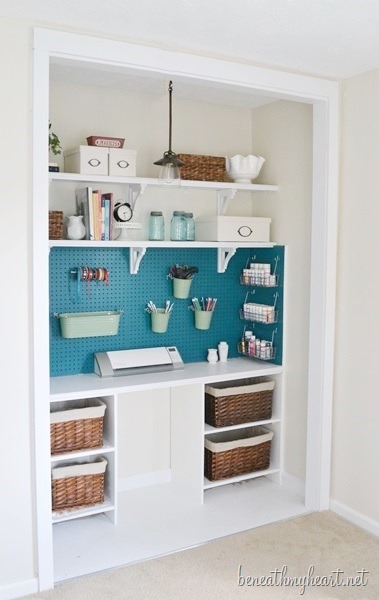
1. Craft Room Pegboard Organizer
A pegboard in a craft space keeps tools visible and accessible. Perfect for fiber artists who need quick access.
Best uses:
- Scissors, rotary cutters, rulers
- Thread spools and embroidery hoops
- Paint brushes and glue bottles
- Small baskets for beads or notions
- Sewing and Knitting – Yarn skeins, Patterns, Needles and tools, Measuring tapes
- Add dowels for yarn feeding directly into projects
Pro tip: Outline tool shapes with paint or tape so everything has a designated spot.
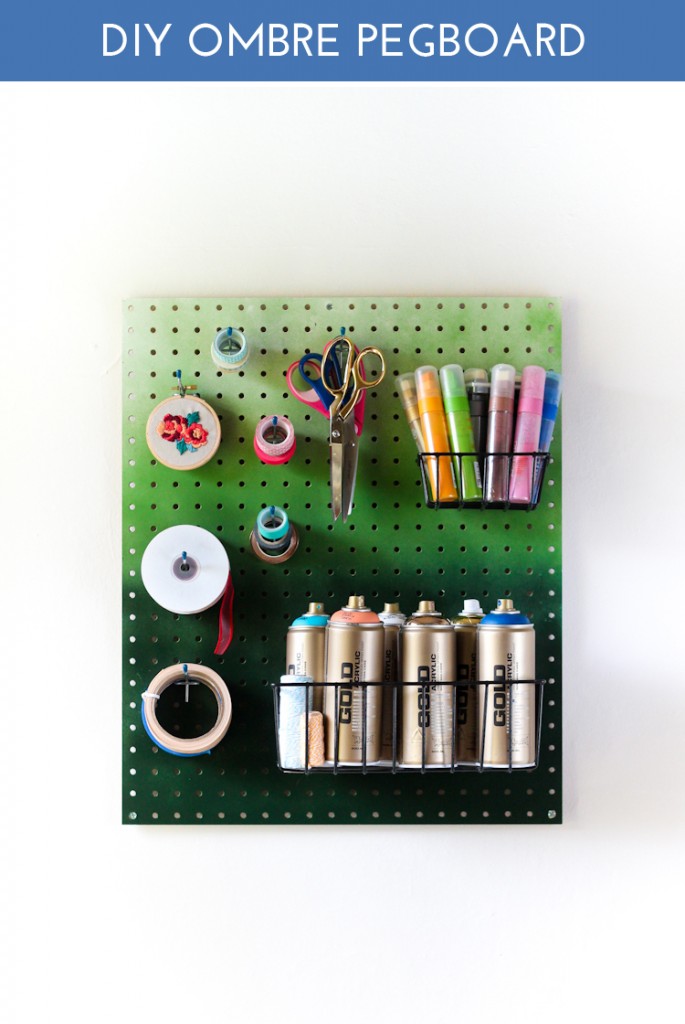
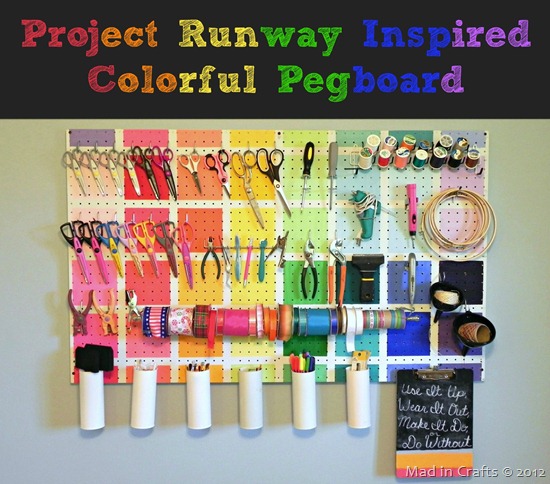
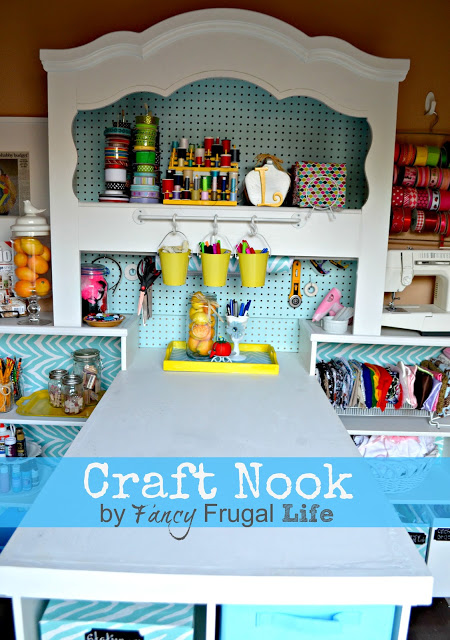
Craft room organization with pegboards.
Paint and make pegboard gift wrapping station. Hang hooks for wire baskets, wooden dowels for ribbons and gift wrapping paper.
Related: gift wrapping guide
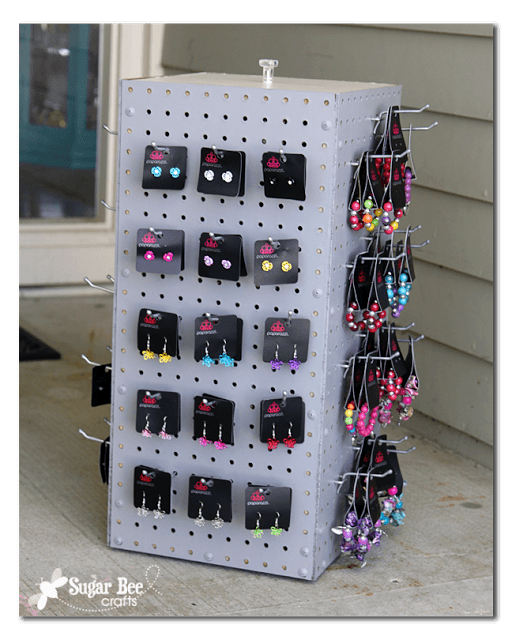
2. Pegboard Jewelry Organizer
Pegboards create a beautiful display while preventing tangles. This works especially well for small bedrooms and shared spaces.
Use hooks and bars for:
- Necklaces
- Bracelets
- Earrings
- Rings in small trays
Related: DIY Jewelry organizers
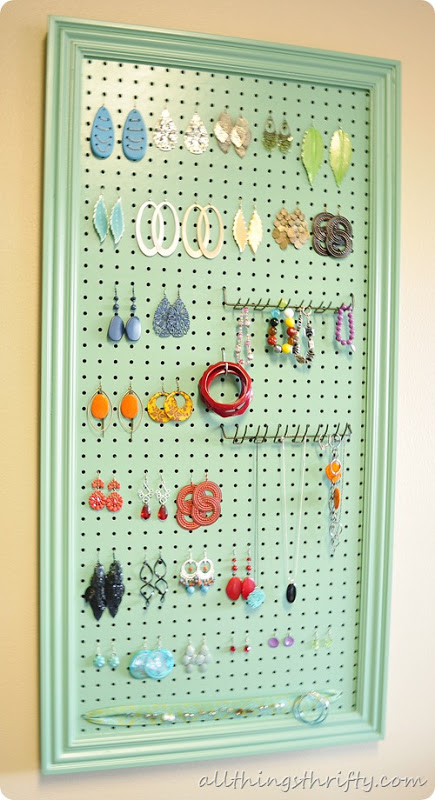
Peg Board Display Rack for jewelry using a grater or cut pegboard strips and attach them to a frame.
3. The Kitchen: More Than Just Pots and Pans
Inspired by Julia Child’s legendary kitchen, modern pegboards are becoming the go-to for “open shelving” enthusiasts.
Use pegboards to store:
- Coffee Bar: Hang your favorite mugs, a small shelf for your grinder, and a basket for pods.
- Spice Gallery: Use narrow acrylic shelves to display spices by color.
- The Hidden Pantry: Install a pegboard on the inside of a pantry door to hang measuring spoons, oven mitts, and small gadgets.
- Measuring cups and spoons
- Pots, pans, and lids
- Cooking utensils
- Small spice baskets
Design tip: Paint the pegboard the same color as your wall for a built-in look.
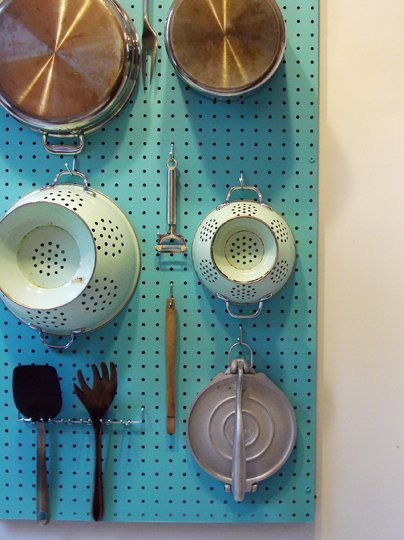
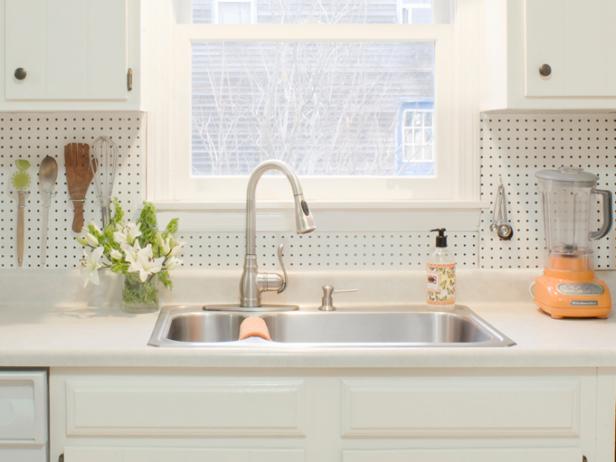
Kitchen Backsplash Pegboard Storage for space utilization.
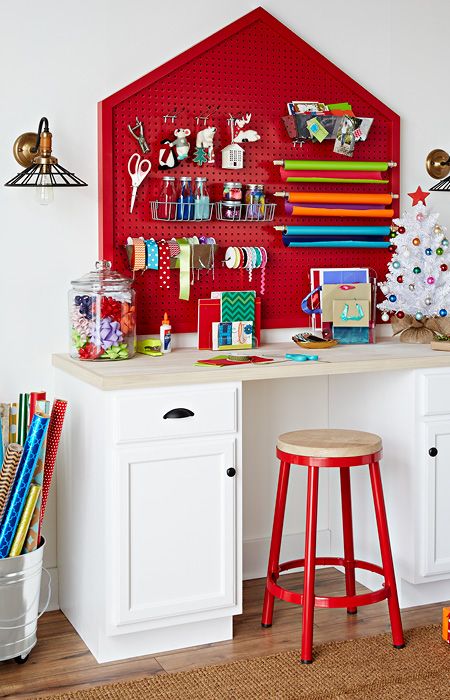
4. Entryway Pegboard Organizer
A pegboard near the front door acts as a compact command center.
Store:
- Keys and sunglasses
- Masks and hats
- Dog leashes
- Daily essentials
This is one of the most searched pegboard project ideas because it prevents daily clutter buildup.

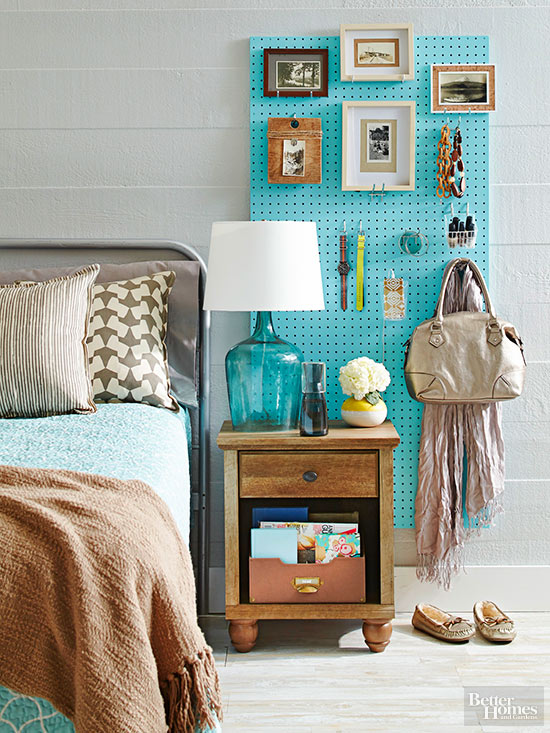
Night Stand Storage Idea
5. The Botanical Wall: For the “Plant Parent”
Why buy an expensive plant stand when you can have a living wall? Great for small apartments and sunny corners.
Ideas:
- Floating Succulents: Use small wooden or acrylic shelves to hold 2-inch pots.
- Propagation Station: Secure glass tubes to the board with elastic cords or specialized clips.
- Tool Storage: Hang your misting bottles, pruning shears, and gardening gloves.
- Pegboards can double as vertical gardens.
- Hanging planters
- Herb displays
- Air plant holders
- Lightweight shelves for pots
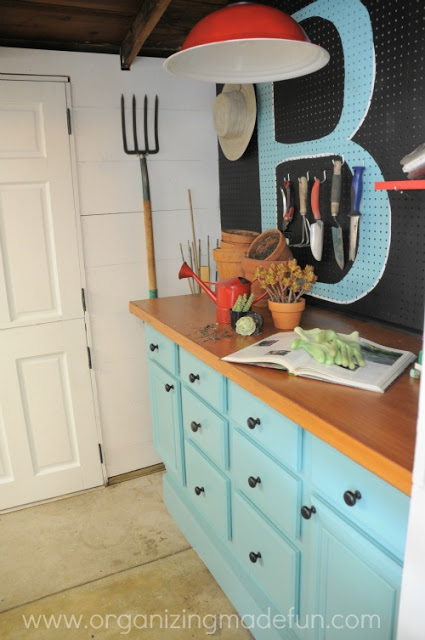
DIY Pegboard Wall in Potting Shed as garden tools organizer.
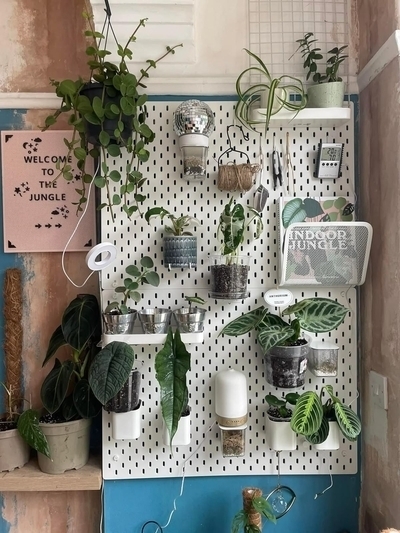
Pegboard plant wall and propagation station
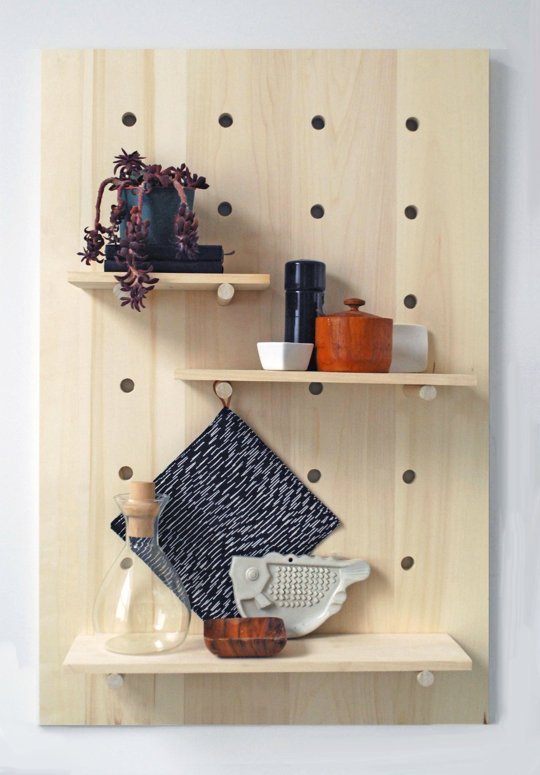
Pegboard shelves made from drilling holes in a wooden board and inserting using wood corks to lay shelves.
6. Garage and Tool Pegboard
Move beyond basic hooks. This improves efficiency and safety.
Enhancements include:
- Custom tool outlines
- Magnetic strips
- Shelves for power tools
- Charging stations
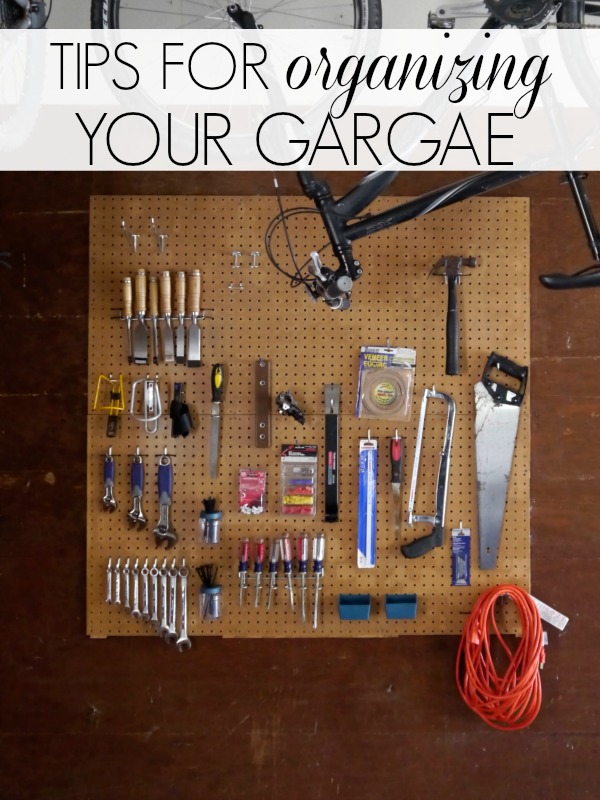
DIY Pegboard for Tools on garage walls.
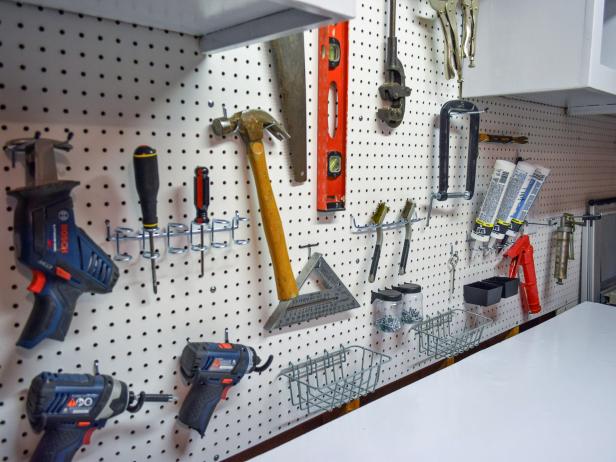
Utilize vertical wall space to hang DIY tools and construction materials.
7. Unexpected and Artistic Pegboard Art Hacks
Pegboards aren’t just practical—they can be decorative.
Uses:
- The Cross-Stitch Mural: Use the holes of the pegboard as a giant grid for oversized “cross-stitch” art using colorful yarn or thick rope.
- The Headboard: Mount a floor-to-ceiling pegboard behind your bed. Attach bedside lamps, a small shelf for books, and even a hanging plant to replace a bulky nightstand.
- Color-blocked pegboards
- Seasonal decor swaps
- Framed pegboard panels
- Minimalist layouts with negative space
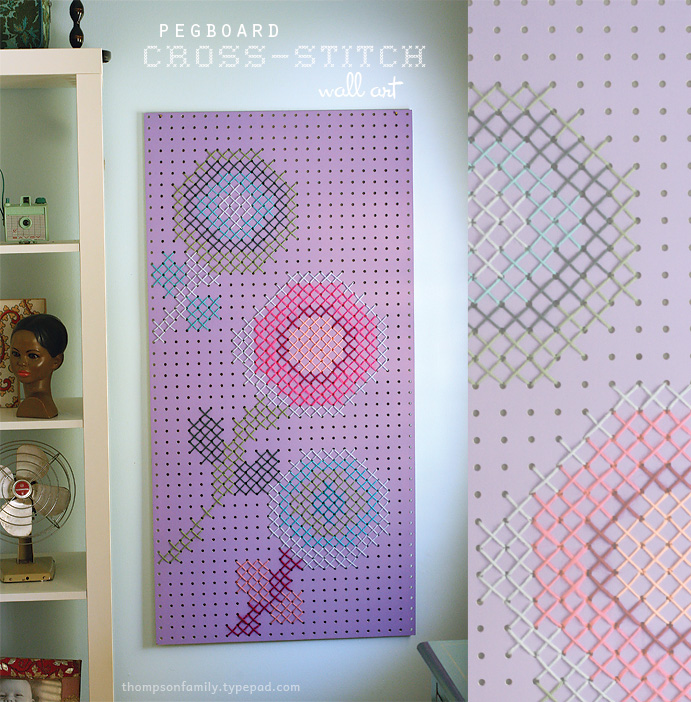
Cross Stitch Peg Board wall art.
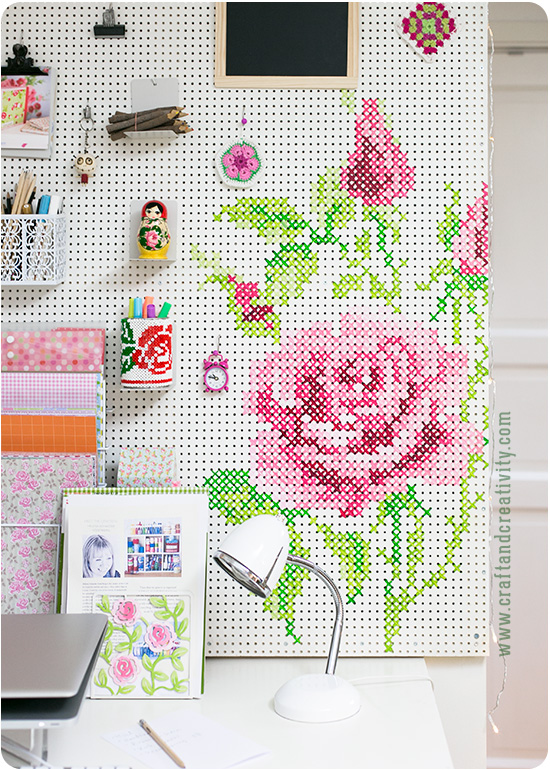
Painted cross stitch pegboard for office space.
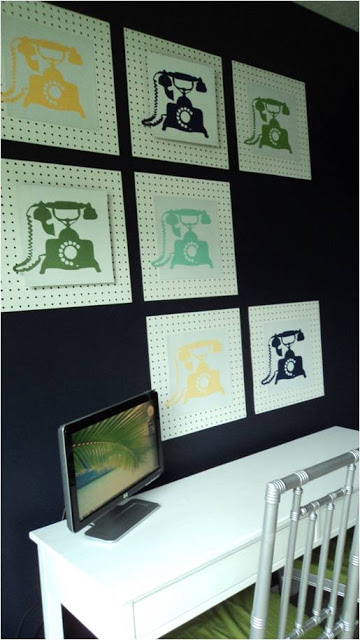
Square grid cuts of pegboards for displaying photos and art.
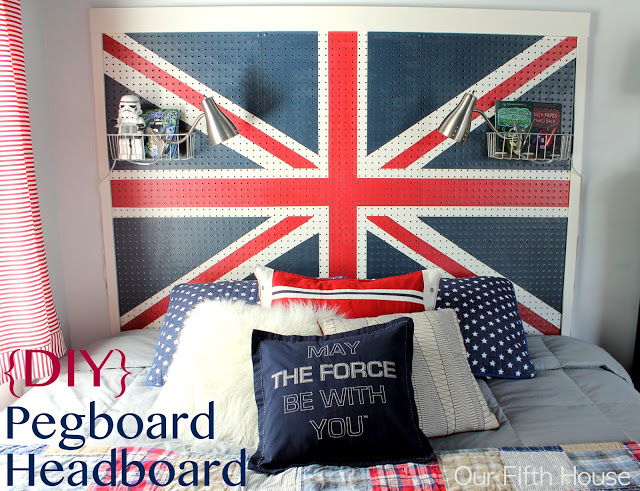
Make Pegboard Headboard for your bedroom.
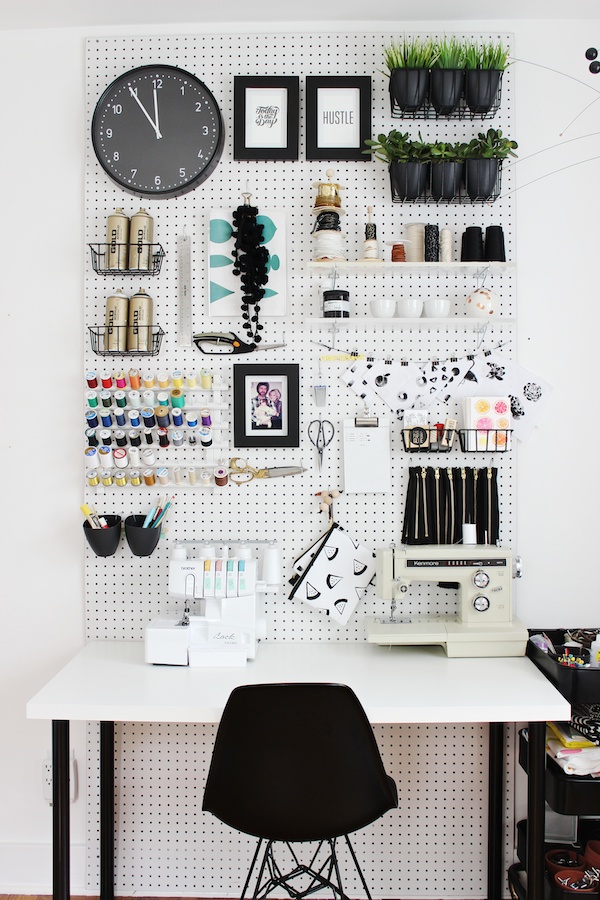
8. The Home Office “Command Center”
The biggest trend in 2026 is the vertical desk. Instead of cluttering your desktop with pen cups and sticky notes, move everything to eye level. This setup improves productivity while keeping desks clutter-free.
Ideas include:
- The Headphone Hook: Use a deep hook to keep your headset within reach but off your desk.
- Tech Station: Mount a small basket to hold charging cables and power banks.
- The Vision Board: Use binder clips on pegboard hooks to display inspirational prints or your current project roadmap.
- File holders for mail and notebooks
- Clipboards for to-do lists
- Mini shelves for plants and decor
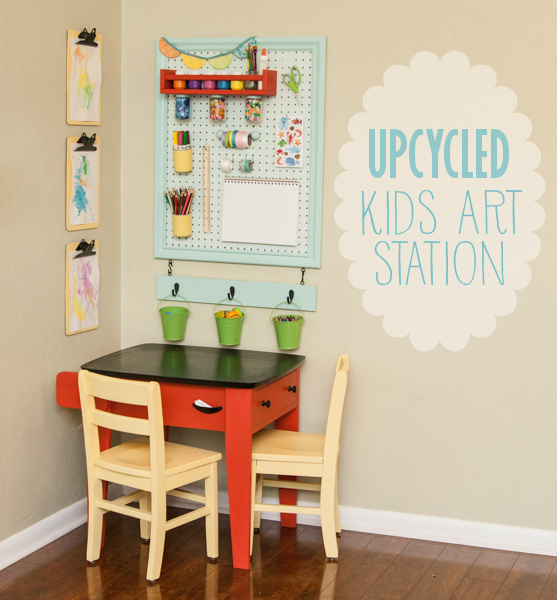
9. Kids’ Pegboard Activity Wall
Pegboards grow with kids and encourage independence. Use labeled bins to make cleanup easy and fun.
Creative ideas:
- Art supply storage
- Dress-up accessories
- Homework stations
- LEGO or toy displays
- Activity wall

Peg Board For Kids water wall in the backyard.
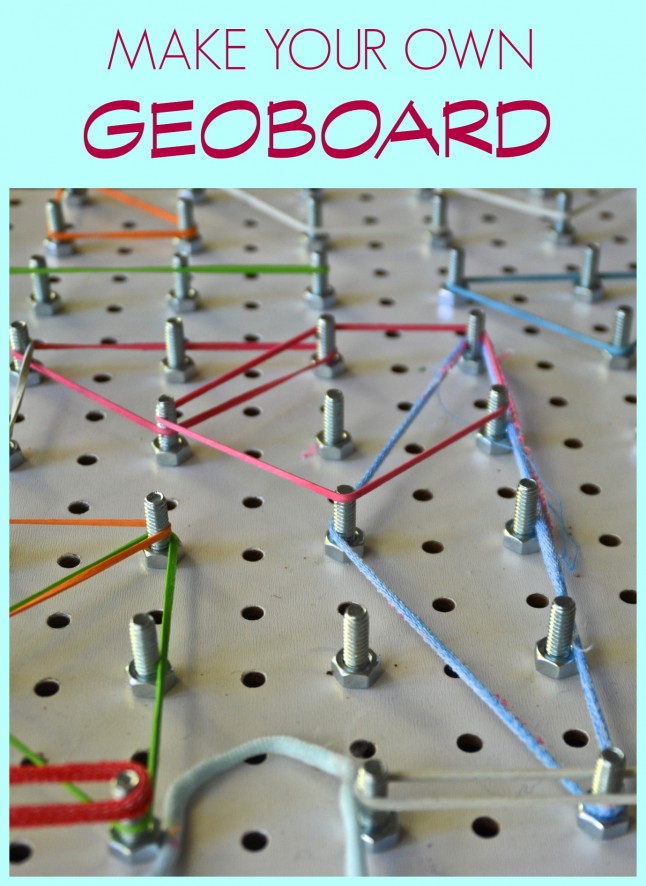
Geo Board using pegboards.
10. Nursery and Kids’ Rooms: Growing with Your Child
Pegboards are the ultimate “evergreen” furniture piece because they evolve as your child does.
- The Diaper Station: Use bins to hold wipes, lotions, and diapers at arm’s reach.
- The Art Gallery: Clip your child’s latest masterpiece to the board.
- Future-Proofing: As they grow, swap the diapers for LEGO bins, then for headphones and school supplies.
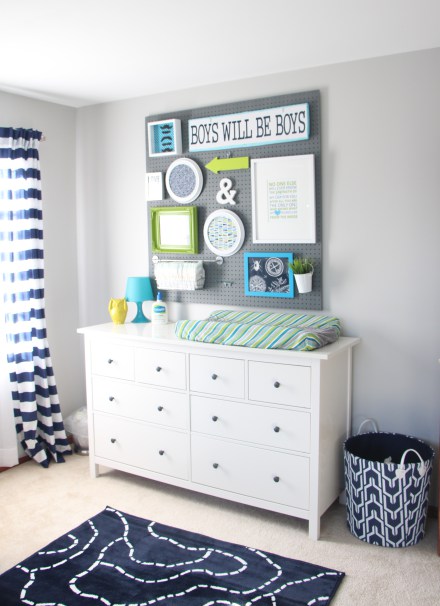
Kids Art Station pegboards organization.

Pegboard frame to hold diapers and baby supplies.
Custom Pegboard Accessories That Add Value
Useful accessories include:
- Wooden dowels
- Small floating shelves
- Metal cups
- Wire baskets
- Acrylic containers
Mix materials to avoid a purely utilitarian look.
How to Plan a Pegboard Project
1. Identify What You’re Storing: Tools, decor, or daily items?
2. Measure Your Wall Space: Plan layouts on paper first.
3. Technical Guide: Choosing the Right Material. Not all pegboards are created equal. Choose based on your project’s needs:
| MATERIAL | BEST FOR | PRO/CON |
| Masonite (Wood)
|
Crafts, Decor, Bedrooms
|
Pro: Cheap, easy to paint
Con: can sag if too heavy
|
| Metal (Steel/Aluminum)
|
Garage, Kitchen, Heavy Tools
|
Pro: Magnetic, durable
Con: Harder to customize color
|
| Acrylic/Plastic
|
Modern Offices, Bathrooms
|
Pro: Sleek, moisture-resistant
Con: Often comes in smaller sizes
|
4. Map Hook Placement Before Drilling: Pre-planning prevents unnecessary holes.
Pro Tips: How to Style Like a Designer
To move from “utility” to “chic”, follow these three rules:
- Frame It: Adding a simple wooden or painted trim around your pegboard instantly makes it look like a piece of furniture.
- Monochrome vs. Pop: Paint your pegboard the exact same color as your wall for a “built-in” look, or choose a bold, contrasting color to make it a focal point.
- The “Negative Space” Rule: Don’t fill every hole. To avoid a cluttered look, leave about 20% of the board empty to allow the eye to rest.
How to Install Pegboard on the Wall?
The Master Shopping List
Before you head to the hardware store, decide if you are going for Utility (Garage/Workshop) or Aesthetic (Office/Home).
The Board and Mounting Hardware
- Pegboard Panel: Standard sizes are 2′ x 4′ or 4′ x 8′. Choose 1/4-inch thickness for durability.
- Furring Strips: At least two (top and bottom) 1×2 wooden boards. These create the essential gap behind the board for hooks. Recommended: Furring strips or specialized pegboard spacers.
- 3-inch Wood Screws: To mount the furring strips into the wall studs.
- 3/4-inch Wood Screws: To attach the pegboard to the furring strips.
- Washers: To prevent the screw heads from slipping through the pegboard holes.
- Wall Anchors (Optional): If you cannot find a stud, use toggle bolts or heavy-duty drywall anchors.
Tools Needed
- Stud Finder: Essential for a secure mount.
- Spirit Level: To ensure your board isn’t crooked.
- Power Drill: With bits for pilot holes and driving screws.
- Tape Measure and Pencil: For marking your layout.
The Accessories (The Fun Part!)
- J-Hooks and L-Hooks: For hanging tools, scissors, or mugs.
- Pegboard Bins: For small items like screws, paperclips, or seeds.
- Wire Shelves: For items that can’t be hung.
- Paper Towel / Ribbon Holder: A horizontal bar accessory.
Step-by-Step Installation Guide
1: Prep and Paint
- If you bought a standard brown Masonite board, paint it now! Use a foam roller to keep the paint from clogging the holes. Let it dry completely before mounting.
2: Locate the Studs
- Use your stud finder to locate the vertical wood beams behind your drywall. Mark them with a pencil. Studs are typically spaced 16 inches apart.
3: Install the Furring Strips
- You cannot mount a pegboard flat against a wall, or the hooks won’t have room to go in.
- Cut your 1×2 furring strips to match the width of your pegboard.
- Hold the first strip at your desired height. Use the level to make sure it’s straight.
- Drill pilot holes through the strip and into the wall studs.
- Secure the strip using 3-inch wood screws. Repeat for the bottom strip (and a middle strip if your board is larger than 4′).
4: Mount the Pegboard
- Have a friend help you hold the pegboard up against the furring strips.
- Align the edges.
- Drive 3/4-inch screws (with washers) through the pegboard holes and into the furring strips. Space these every 12 inches along the strips for maximum stability.
5. Organize
- Insert your hooks and accessories. Pro-Tip: If a hook feels loose, use a small zip-tie or a specialized “peg lock” to keep it from falling out when you grab a tool.
Common Pegboard Questions
1. How much weight can a pegboard hold?
A standard 1/4-inch Masonite pegboard can usually hold about 100 lbs if properly mounted into studs. For heavier items (like power tools or heavy pots), always opt for metal pegboards.
2. Do you need a gap behind the pegboard?
Yes. This is the most common mistake. You need roughly a 1/2-inch to 3/4-inch gap between the board and the wall so the hooks can sit properly. Use furring strips or specialized pegboard spacers during installation.
3. Can you paint the pegboard?
Absolutely! Use a foam roller rather than a brush to ensure you don’t clog the holes with excess paint.
I hope you liked these pegboard storage and organizing ideas. Peg boards are very helpful for small spaces and crowded areas. They can be decorated and used in almost any space indoor or outdoor to keeps things in proper order and avoid clutter.
You will also like:
25 Organization tips from my home to yours