This post may contain affiliate links. Please see our full Disclosure Policy for details.
If you love sewing, quilting, or crafting, having a tabletop portable ironing board can make your work faster and easier. Unlike traditional full-sized ironing boards, these compact boards fit on any table, desk, or countertop, making them ideal for small spaces, travel, or quick touch-ups.
Learn how to make a custom DIY ironing board a simple and useful project for home and travel. Table top ironing board is a great substitute as it is portable. It can be placed on top of any flat surface for ironing like floors, a table and even on a carpeted area or bed. You can place it on kitchen or bathroom counter as well. The best material to make ironing board is 100% unbleached cotton or teflon ironing board covers.

Portable Table Top Ironing Board
If you have a small laundry and you can keep your ironing board away in the cupboard. If you love to sew use this ironing board for small projects. This new ironing board is perfect you can even leave it next to you while you’re sewing for ease of use. They are:
- Space-Saving: Perfect for apartments, dorms, RVs, or craft rooms.
- Portable: Easy to carry and store.
- Customizable: Choose size, shape, and fabric to fit your needs.
- Budget-Friendly: Made with inexpensive or repurposed materials.

Materials Needed:
- Plywood or MDF Board: A piece of wood at least 1/2 inch thick, cut to your desired size. Common sizes are 12″ x 24″ or 15″ x 30″.
- Wadding/Batting: High-density polyester foam (mine is an inch thick) or 100% cotton batting is ideal. This provides the soft, cushioned surface.
- Heat-Resistant Fabric: Look for a 100% cotton canvas or duck cloth. Crucially, ensure it’s unbleached and undyed. Synthetic fabrics or colored cottons can melt or stain your clothes under high heat. Silver-coated ironing board fabric is also an excellent, professional-grade option.
- Staple Gun and Staples: A heavy-duty nail gun is a must for securing the layers.
Tools:
- Measuring Tape or Ruler
- Pencil and Scissors
- Saw (if cutting your own board)
- Drill (optional)
Optional:
- Non-slip rubber feet or shelf liner (to prevent sliding)
- Heat-reflective fabric layer (for faster pressing)
- Screws if you plan to add legs or a handle.
- Thread and Needle for a stitched cover.
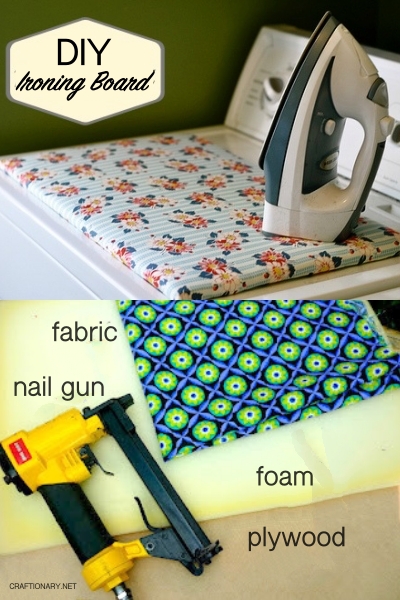
Table Top Ironing Board Instructions:
1. Cut and Prepare Materials:
- Board: First select and cut the plywood board to your desired size. You can have this cut at the home improvement store to your size. Lightly sand the edges to prevent splinters and snagging.
- Padding: Next cut the foam padding to the size of the board. For extra cushioning, you can use two layers of batting and for cotton battling place 2-3 sheets.
- Fabric: Cut the fabric to the size of the board leaving 4-6 inches seam for folding and stapling on the backside.

2. Position and Staple:
- Place the fabric wrong side facing up and lay the foam down.
- Make sure you have plenty of fabric to wrap around.
- Now place the plywood.

- Fold the fabric over twice, it gives it more stability.
- Begin to staple, be careful if you are using a power tool!
- Pull fabric tightly over the edges and staple to the underside of the board.
- Start by stapling the fabric on one long side, pulling it taut before stapling the opposite side. This is the most crucial step for a wrinkle-free surface. Be meticulous!
- Continue stapling around the board, pulling the fabric tight.
- At the corners, make a hospital bed fold and pull it tight for a clean finish.

Inspect the front surface to ensure there are no wrinkles or bubbles. Your DIY portable tabletop ironing board is now ready to use!

Add felt padding on the corners or attach non-slip pads or shelf liner to the bottom.

Variations and Customizations
This basic design can be adapted to fit your specific needs.
- With Legs: Attach collapsible folding legs (available at hardware stores) to the underside of the board. This turns your project into a mini, free-standing ironing station.
- With a Handle: Screw a cabinet handle or a piece of heavy-duty rope onto one end for easy transport and hanging storage.
- Iron Rest: Attach a small metal trivet or a piece of cork to one corner of the board to serve as a heat-resistant iron rest.
- Hanging Board: For a super-compact solution, make a smaller version and add a sturdy hook on the back. You can then hang it on the back of a door.
- Foldable Ironing Board: Use hinges to create a folding base.
- Travel Ironing Mat: Skip the wood base and make a padded roll-up mat.
- Magnetic Ironing Pad: Add magnetic strips underneath for use on metal surfaces like washers and dryers.
- Quilter’s Mini Board: Make a narrow, long version for pressing seams.
I will be leaving mine on top of the washing machine!

Crucial Considerations
The advice provided here is based on that firsthand experience.
Fire Safety: NEVER use synthetic fabrics like polyester, nylon, or blends for the cover. These fabrics can melt and release toxic fumes.
- Always use 100% cotton fabric and 100% cotton batting or a professional ironing board fabric.
- Another good option for fabric is the silver teflon coated fabric made for this purpose. It helps reflect heat back onto what you are ironing for a very efficient ironing.
- Even though we used foam to make this board and had no problems, a more durable option is cotton batting.
Heat Safety: Do not leave a hot iron resting directly on the board for extended periods, even on the heat-resistant fabric.
Ventilation: Use your ironing board in a well-ventilated area, especially when using steam, to prevent mold or mildew growth.
Ensure stability: Add non-slip pads to prevent sliding while ironing.
Keep away from water: Moisture can damage wooden bases and padding.
Common Questions About Tabletop Portable Ironing Boards
1. What’s the best size for a tabletop ironing board?
It depends on your space. 12” x 18” works well for crafts, while 18” x 24” is better for general clothes ironing.
2. Can you make one without wood?
Yes—use layered towels or a heat-resistant ironing mat for a quick, portable option.
3. How do you clean a DIY ironing board cover?
Choose a removable cover or spot-clean with mild soap and water.
4. Is MDF or plywood better for a tabletop ironing board?
Both work well. Plywood is generally lighter and more durable, while MDF is denser and less likely to warp.
5. Can you use felt instead of batting?
Yes, but felt is less heat-resistant. Batting is the preferred and safer option.
With just a wooden base, cotton padding, and a fabric cover, you’ll have a safe and reliable ironing surface ready whenever you need it.
You will also like:
How to Refinish a Table from Stripping to New Paint


Love the concept. I suggest using 100% cotton batting instead of the foam. Foam is highly flammable as it is synthetic. The fabric also needs to be 100% cotton. A synthetic blend fabric is also a fire hazard.
Another good option for fabric is the silver teflon coated fabric made for this purpose. It helps reflect heat back onto what you are ironing for a very efficient ironing.