This post may contain affiliate links. Please see our full Disclosure Policy for details.
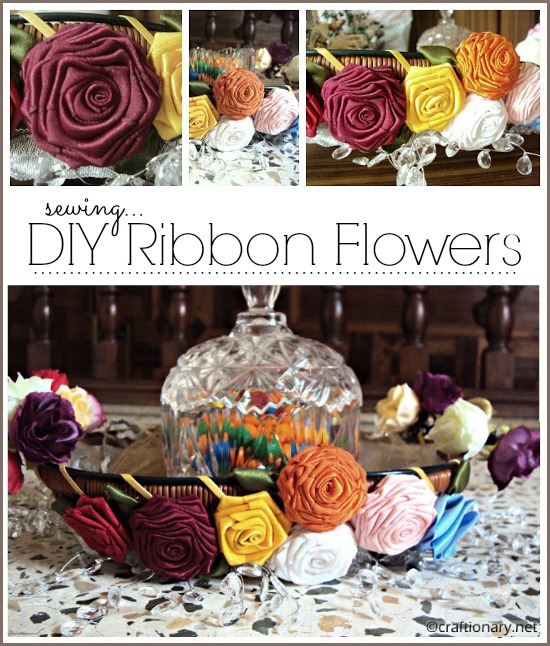
The flowers I am going to share today are very dear to my heart. I learnt to sew these flowers using ribbon to decorate a basket for my wedding. These ribbon flowers are beautiful.
Ribbon flowers are timeless, elegant, and versatile. Whether you’re decorating gifts, making hair accessories, designing bridal bouquets, or adding a handmade touch to home décor, ribbon roses are a beautiful craft project anyone can learn.
This guide will walk you through two beginner-friendly methods to make ribbon flowers that look like roses, plus expert tips to make them look realistic and long-lasting.
Why Make Ribbon Roses?
Ribbon roses are popular because they:
- Add a handmade, personal touch to projects.
- Last much longer than real flowers.
- Can be customized with different colors, sizes, and textures.
- Work as embellishments for clothes, crafts, or events.
With just a little ribbon and some basic tools, you can create flowers that look surprisingly lifelike.
Ribbon Flowers Tutorials:
These flowers require a steady hand and practice. There are various methods:
- Folded ribbon roses
- Gathered ribbon roses
- Other creative methods

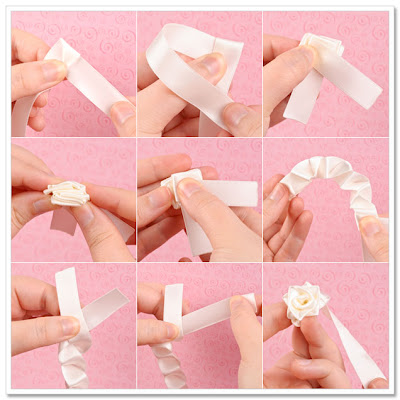
1. Folded Ribbon Rose
This makes a realistic, spiraled rose.
Materials:
- Satin or grosgrain ribbon (1–2 inches wide works best)
- Thread and Needle for sewing. (Optional: Hot glue or fabric glue as alternative)
- Scissors
- Lighter or clear nail polish (to seal ribbon ends)
Step-by-Step Instructions:
- Cut Ribbon – About 18–24 inches long (longer = fuller rose).
- Seal the Ends – Use a lighter or clear nail polish to stop fraying.
- Create the Center – Fold the 1″ wide ribbon in 1/2 and roll to the form of a bud (as you can see at the center). Roll the ribbon tightly a few turns to form the rosebud. Sew the bottom to secure.
- Start Folding Middle Petals – Once you have a supportive bud, big enough to hold in your fingers; start folding the ribbon a little loser to give an open petal-look. Form 3-4 loose petals and sew to secure the flare as you go.
- Start Folding Outer Petals – Fold the ribbon at a right angle, then wrap it around the bud. Continue folding and wrapping, sewing the bottom for every petal.
- Build the Rose – Keep folding and wrapping until you reach the end. The folds create the layered “petal” look.
- Finish – Sew the last bit under the flower. Trim, fold in and sew down any uneven edges to prevent fraying.

Next I just thread to secure each flower on the wicker basket. To match the gold and silver theme of the event and glued ribbon to the bottom of the basket. I also added a beads wired garland around the basket.

I am so happy with how it looks.

Here are some other ways to make ribbon flowers:
2. Gathered Ribbon Rose
Materials:
- Ribbon (about 12–20 inches)
- Needle and thread
- Scissors
Step-by-Step Instructions:
- Cut Ribbon – 12–20 inches long depending on desired size.
- Stitch Along One Edge – Sew a running stitch along one long edge of the ribbon.
- Gather – Pull the thread to gather the ribbon into ruffles.
- Roll the Rose – Start at one end and roll the gathered ribbon into a spiral, shaping petals as you go.
- Secure – Stitch or glue the base to hold it together.
Borrowed and Bleu
3. Cute Grosgrain Ribbon Flower
Glue loops of ribbon on each other and use beads to make the center.
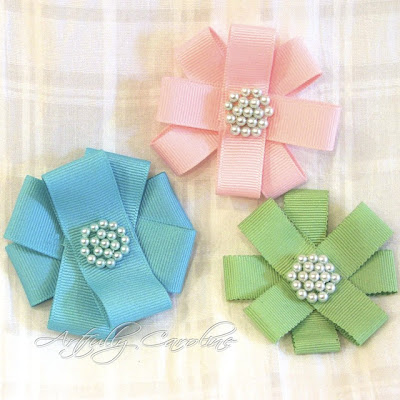
Artfully Caroline
4. Rolling Ribbon Flower
Roll your ribbon on a piece of wire. Now roll the wire to make flower.
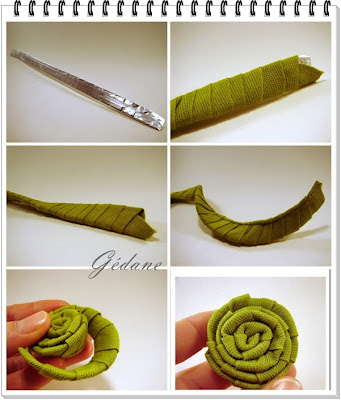
Gedane
5. DIY Easy Folded Ribbon Rose
Fold the ribbon to make this three petaled ribbon flower.

Tips for Realistic Roses:
- Use satin ribbon for a glossy, elegant look.
- Use organza ribbon for light, airy petals.
- Try ombre or variegated ribbon for a more natural petal color variation.
- Add a small piece of green ribbon at the base for leaves.
- Experiment with different widths—narrow ribbons create small buds, while wider ones make fuller roses.
Common Mistakes and How to Fix Them
- Loose petals falling apart? Add glue at the base after every 2–3 folds.
- Fraying ribbon edges? Always seal with a lighter or nail polish before starting.
- Uneven shape? Adjust folds as you go—don’t be afraid to redo a section.
Creative Uses for Ribbon Roses
- Hair clips, headbands, and pins
- Bridal bouquets or corsages
- Gift wrapping and favor boxes
- Clothing embellishments
- Scrapbooking and DIY cards
- Home decor like wreaths, garlands, and framed art
Learning how to make ribbon flowers that look like roses is a rewarding craft skill. With just a bit of ribbon and creativity, you can create stunning handmade flowers that bring elegance and personality to any project.
Once you master the basics, experiment with different ribbon textures, colors, and layering techniques to make your roses truly unique.


I learned how to make these roses before several months watching one video tutorial.I was happy like a child! Your flowers are perfect.Thanks for your version how to make such a lovely flowers:)
Love the basket and flowers for your wedding. Thanks for sharing that. Great inspiration for wedding season.
Lovely flowers! Thanks for the tutorial.
Wow, that's really beautiful! Thanks for sharing! Liz
These are gorgeous and very elegant!
Thank you for the tutorial – appreciate it a lot 🙂
I love your roses.
Perfect,beautiful flowers!!!:))
Stopping by from Nifty Thrifty! Your roses are so pretty and elegant looking. Thanks also so your tutorial! My fingers are crossed you’ll share your creative inspiration tonight with Sunday’s Best – sharing is a good thing! PS – I've pinned this!
Really beautiful roses! Thank you for sharing so many ways to make them :)Heini
Ok if I say the roses made perfect decoration for your basket? Beautiful work all around.Janet
I love the dress! You did a fabulous job on it. I'd love for you to link it up to our What I Wore Sunday link party. See you soon!~Natalie
Oh goodness. I meant flowers. I was talking about a dress…while I was typing…so sorry! 🙂
{{{blush}}}
perfect flowers!I would like to let you know about a new Craft Party,I would love to see your creations linked up with Crafty TuesdayEvery week I will choose few tutorials and they will be featured on my blog and my facebook, twitter and pinterest pageI hope to see you link up
LOVE the flowers!!! I want to make some too!
Thanks so much for sharing this at The DIY Dreamer.. From Dream To Reality!
Such pretty ribbon flowers! Was tickled you shared your creative inspiration with Sunday’s Best – you helped make the party a success!
Thanks for posting this. I've seen a lot of fabric flowers, but your's are especially pretty! Maybe I'll give them another go, my last ones turned out a bit wonky 🙁
Love all the flowers. I am making some right now out of fabric. Time consuming, but so nice. Thanks for sharing. Loved seeing all the different ones.
I love ribbon flowers. so very pretty!
So charming! Thanks for sharing.
Debra
Beautiful!! Thank you for sharing at Sharing Saturday!!
Those flowers are gorgeous!
Wow!! So beautiful! Lots of ways ou could use them too.
Thanks so much for linking up at I Gotta Create! <3 Christina
This tutorial is fabulous , i luv to make headbands for my daugther
Cheers karen
Greetings and Regards
Excuse me, my name is Amina from Iran, I am a beginner and would like you to learn how to make these beautiful flowers
So I ask, if possible, video clips of how to make some of these flowers please send me an email.
I do appreciate it, thanks.
Good luck
You can find tons of video tutorials on youtube to make various forms of ribbon flowers.
Nice tutorial
I want to learn how to make DIY RIBBONS flowers. pls send me he to do it.
I loved the ribbon flowers. Thanks for sharing the tutorial. you explained it in a very simple way