This post may contain affiliate links. Please see our full Disclosure Policy for details.
Stenciling is a fantastic way to add professional-looking designs, patterns, or lettering to your DIY boards—whether you’re working on wood, foam board, canvas, or a magnetic surface. However, paint bleed (leakage under the stencil) is one of the most common frustrations. The good news? With the right materials and method, you can get crisp, clean stencil results every time.
Learn everything you need from materials to step-by-step instructions and expert tips before attempting your next stenciling project and make it picture-perfect.
Why Stenciling on Board?
- Adds Detail: Easily incorporate intricate designs you might not be able to freehand.
- Customization: Personalize your projects with names, quotes, or unique patterns.
- Repeatable Designs: Perfect for creating consistent patterns across multiple items.
The Secret to No-Bleed Stenciling: The Dry Brush Technique
The key to crisp lines is using very little paint on your brush. This “dry brush” method prevents paint from seeping under the edges of the stencil.
How to use stencil to paint?
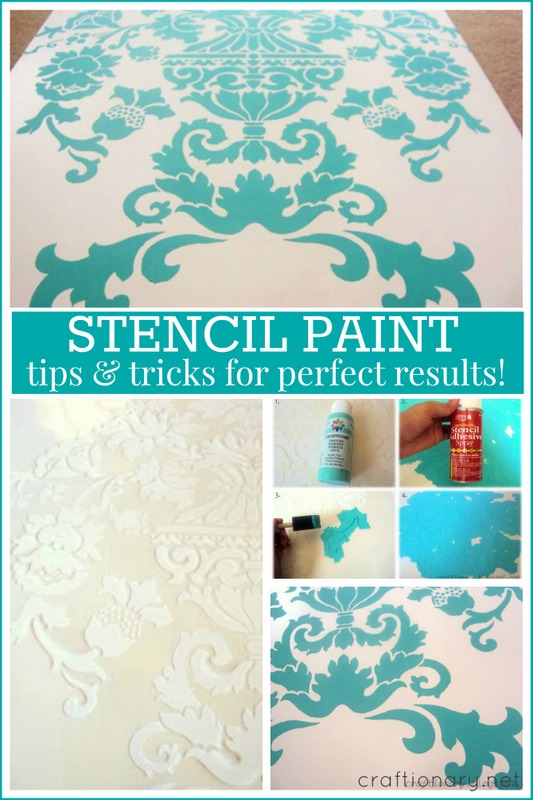
Materials You’ll Need
- Stencil (Reusable or adhesive stencil, depending on preference)
- Craft board or surface (wood, foam, canvas, etc.)
- Stencil brush, foam pouncer, or dense sponge: These apply paint with a dabbing motion, reducing the chance of seepage
- Painter’s tape or low-tack masking tape: To secure the stencil firmly.
- Acrylic Paint (or paint suitable for wood): A thicker consistency works best to prevent bleeding.
- Paper Towels or a Rag: To offload excess paint from your brush/pouncer.
- Palette or Plate: To hold your paint.
- Stencil Adhesive Spray (Optional): For extra insurance against bleeding.
- Mod Podge (Matte), polyurethane (for wood), or clear matte sealant: To protect your finished design.
- Ruler and pencil (for positioning)
- Sandpaper, base coat paint (optional)

Materials for stenciling
Step-by-Step to Stencil Perfection:
1. Prepare Your Surface:
Ensure the board is smooth, clean, and dry. If working with wood, lightly sand it and wipe off dust to help the paint adhere better. If desired, you can apply a base coat of paint and let it dry completely.
Prepare the stencil
2. Position and Secure Your Stencil:
Place your stencil exactly where you want the design. Use low-tack painter’s tape around the edges of the stencil to hold it firmly in place and prevent movement. For extra security against bleeding, especially on textured wood.
- Consider lightly spraying the back of your stencil with repositionable stencil adhesive and letting it become slightly tacky before positioning it.
- Or lightly dab a thin layer of Mod Podge (matte). Let it dry completely before painting.
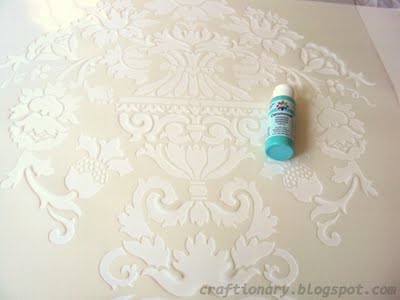
3. Load Your Brush (The Right Way!):
Dip your stencil brush or foam pouncer very lightly into your paint. You only need a tiny amount.
a) Offload Excess Paint:
This is crucial! Vigorously dab your brush/pouncer onto a paper towel until it looks and feels almost dry. You want the pigment, not a wet blob of paint.
b) Apply the Paint:
Using an up-and-down dabbing motion (stippling), apply the paint over the openings in the stencil. Avoid brushing or sweeping motions, as these are more likely to push paint under the stencil edges. Apply light, even pressure. You can build up the color with a few light layers rather than one thick one.
Tip: Less paint = better results. Build up the color with multiple light layers rather than using too much at once.

Paint the stencil
4. Remove the Stencil Carefully:
Wait about 1–2 minutes after painting. Don’t let the paint fully dry or it might peel. Once you’ve covered all the stencil openings, carefully peel off the painter’s tape. Gently lift the stencil straight up to avoid smudging your freshly painted design. If you used adhesive, peel slowly and evenly. Touch up any edges with a small detail brush if needed.

Seal the stencil
5. Dry and Seal:
Once fully dry, seal your design with a clear matte spray or Mod Podge for durability, especially on boards you plan to handle or display long-term.
Related: Make colorful large coir doormat for a welcoming entrance
Pro Tips for Flawless Stenciling:
- Practice First: If you’re new to stenciling, practice on a scrap piece of wood or cardboard to get a feel for the dry brush technique.
- Secure Every Edge: Make sure all edges of your stencil are lying flat against the wood. Tape down any areas that might lift. Use adhesive stencils or spray adhesive to reduce gaps and leaks.
- Less is More (Paint-Wise): Remember, the key to no bleeding is using very little paint. You can always add more layers, but it’s hard to fix bleeding.
- Clean Your Stencil: If you’re using the same stencil multiple times, wipe off any excess paint buildup to prevent it from smudging your next application.
- Consider the Wood Grain: On very porous wood, you might still experience a tiny bit of wicking. The dry brush method and stencil adhesive will significantly minimize this.
- Divide Sections: For large stencils, work in parts and re-secure as needed.
Great Stenciling Project Ideas
- DIY welcome signs or quote boards
- Painted foam board decor for events
- Personalized magnetic boards or message centers
- Customized kids’ name plaques
- Decorative holiday signs with seasonal phrases or shapes
- Stencil a decorative tray
- Stencil paint an accent wall
Stenciling is a simple, cost-effective way to create high-impact designs—if done right. By sealing stencil edges and using a dry brush technique, you’ll avoid bleeding and achieve professional-looking results on any board surface.
What amazing designs will you be stenciling onto your next wooden creation? Share your ideas in the comments below!
Written by: Hani Shabbir