This post may contain affiliate links. Please see our full Disclosure Policy for details.
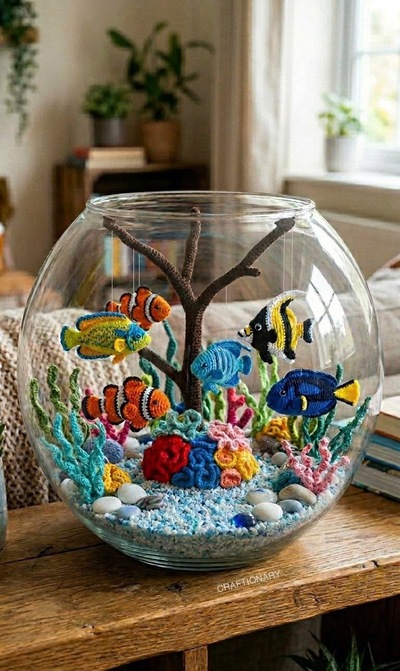
This crochet aquarium display features a glass bowl filled with a central crocheted driftwood branch (or real twig), hanging crocheted fish, colorful crocheted corals/seaweed/anemones, and a base of gravel/pebbles (real or crocheted accents).
Imagine an aquarium that never needs cleaning, requires no feeding, and brings a vibrant splash of the ocean into your living room. A crochet aquarium is a masterpiece of slow crafting that combines amigurumi techniques with creative home decor.
Whether you are looking for a unique nursery accent or a conversation starter for your bookshelf, we will walk you through creating your own underwater wonderland. Please note some basic knowledge is required to follow the instructions.
DIY Crochet Aquarium in a Fisbowl
The no-water aquarium is low-maintenance and sustainable decor. For fiber artists, this project is the ultimate way to use up yarn scraps while practicing various stitches—from the tight rounds of an amigurumi Clownfish to the wavy, organic textures of crochet kelp.
Materials Needed
To recreate the vibrant scene gather these supplies:
- Glass Vessel: A large round fishbowl or a repurposed glass terrarium.
- Yarn: Cotton or cotton-blend yarn in vibrant oranges, blues, yellows, and greens. Cotton provides the stitch definition needed for detailed fish.
- Crochet Hooks: 2.0mm to 3.0mm. A smaller hook is essential to ensure the stuffing doesn’t show through.
- Base Elements: Aquarium gravel or blue-tinted pebbles and smooth river stones.
- Structural Support: Brown yarn-wrapped wire or crocheted branch for the coral tree and clear fishing line for hanging the fish.
- Details: 4mm safety eyes or black embroidery thread for the fish eyes.
- Optional: Stuff lightly with polyester fiberfill where needed. Gauge isn’t critical for this decorative project.
Step-by-Step Instructions
The fish appear suspended from the branch with invisible thread or fishing line for a floating effect. Below are detailed instructions and adaptable patterns for each major crocheted element.
Common abbreviations:
- SC: Single crochet
- DC: Double crochet
- HDC: Half double crochet
- MR: Magic ring
Related: Amigurumi Fish Tank Pattern
1. Crochet Your Tropical Fish
Clownfish, Blue Tang/Dory, Moorish Idol, Yellow Tang, Other Fish
Iconic species like Clownfish and Blue Tangs.
- The Body: Most fish start with a Magic Ring and are worked in continuous rounds (spirals). Increase to widen the belly and decrease to taper to the tail. Use a stitch marker to keep track of your progress.
- Color Changes: To get those crisp stripes (like the Clownfish), use the jogless join technique when switching colors.
- Fins: These are usually worked flat and sewn onto the body afterward.
1) Clownfish (Nemo-style, orange with white/black stripes)
- Materials: Orange, white, black yarn; 3.5–4 mm hook; safety eyes or embroider; stuffing.
Basic Pattern:
- Body: Start with Orange. 6 SC in a Magic Ring.
- Increase: 2 SC in each stitch around (12).
- Growth: 1 SC, Inc around (18).
- Color Stripe: Switch to Black for 1 round, then White for 3 rounds, then Black for 1 round.
- Taper: Return to Orange. SC around for 4 rounds, then 1 SC, Dec around (12).
- Tail: Chain 8–10, work 2–3 rows sc or dc, attach or continue from body. Add forked shape with increases/decreases. Flatten the end and SC through both layers to close.
- Fins (orange with black edge): Crochet small triangles (Chain 4, turn, 3 SC, turn, 2 SC, turn, 1 SC) and sew to the sides.
- Eyes: Black safety eyes or embroider white/black dots.
- Assembly: Stuff body, sew parts, weave in ends. Size: 8–12 cm long.
- Variations: Multiple clownfish of slightly different sizes.
2) Blue Tang (Dory-style, blue with yellow tail)
- Colors: Royal blue, yellow, black yarn.
Basic Pattern:
- Body: Start with Blue. 6 SC in a Magic Ring for nose and head.
- Increase to wider body (taller/skinnier profile): Use hdc for dorsal area. Place markers for top/bottom. Body rounds with strategic increases/decreases for oval-tapered shape (30–36 sts max).
- Tail: Taper to tail base, switch to yellow for tail. Increases on sides for triangular/lunate shape, then flatten and close. Work 5 DC into the last stitch for a fan shape.
- Fins: Tall dorsal (blue), pectoral (yellow/black accents), small others.
- Details: Add black markings with surface crochet or embroidery.
3) Moorish Idol (black/yellow/white with long dorsal)
- Colors: White, yellow, black yarn.
Basic Pattern:
Similar to above but with a taller, more compressed body and very long dorsal fin extension. Long flowing top fin is key. Detailed pattern is linked above.
4) Other Fish (yellow/blue, striped blue)
Use the same oval body base. Change colors and fin shapes.
- General fish body tip: Work in continuous rounds. Use increases for head, decreases for tail. Flatten tail by working rows across the end.
- Hanging: Attach strong thread/fishing line to the top of each fish (sew securely). Tie to branch at varying heights/lengths for a mobile effect.
2. Creating the Coral Reef
Corals, Seaweed, and Anemones
The bottom of the bowl is filled with Hyperbolic Crochet—a technique that creates ruffles by increasing stitches rapidly.
- Use bright colors: greens, pinks, reds, blues, yellows. Vary textures.
- Kelp: Chain a length of green yarn, then work 3–4 SC in every chain. It will naturally twist into a spiral.
- Brain Coral: Crochet a long, thin tube, stuff it lightly, and then coil and sew it onto itself in a brain-like pattern.
1) Hyperbolic Coral (ruffled, brain-like or branching)
- Colors: Red/pink brain coral, blue/green branching.
Basic Pattern:
Excellent free technique for organic reef shapes:
- MR or chain ring.
- Round 1: Mix sc, hdc, dc.
- Subsequent rounds: 2 (or 3) dc in every stitch to create rapid ruffling (hyperbolic geometry).
- Vary hook size/yarn for different scales. Finish with edging (e.g., ch 3, sc picots).
2) Tube/Branching Coral
Chain a base, then work spirals or multiple fingers: e.g., ch 10–20, work sc or hdc along, then branch by working into side stitches.
For taller tubes: Work in rounds around a chain or wire.
3) Seaweed/Kelp (green/ teal, wavy)
- Base: Chain 20–40+ (length of frond).
- Fronds: Work back along chain: 2–3 sc in each ch for ruffling, or alternate sc/hdc/dc for varying width/waves.
- Add multiple fronds from one base chain. Curl with steam or fingers.
4) Anemones/Sea Flowers (pink, blue, red)
Base: MR 6–8 sc.
Petals/Tentacles: Work chains or loops outward (ch 5–10, sl st or sc back down, repeat around).
For puffier: Multiple layers or use picot edges.
5) Brain Coral (Pink/Yellow)
- Crochet a very long, thin tube (6 SC in a Magic Ring, SC around for 20+ inches).
- Lightly stuff the tube.
- Coil the tube tightly and use a tapestry needle to sew the coils together, creating a mounded “brain” texture.
3. The Coral Tree Centerpiece
To give the aquarium height, create a wire armature, crocheted branch or use a real cleaned driftwood branch for authenticity and hang crocheted elements from it.
1) Yarn wrapped wire:
- Bend heavy-gauge floral wire into a branch shape.
- Wrap the wire tightly with brown yarn, securing the ends with a dab of glue.
- Anchor this tree into the pebbles at the base of the bowl.
2) Simple Crochet Branch (or use a real twig):
- Use brown yarn (worsted weight) and a 4 mm hook.
- Make a long i-cord or thick chain-based structure for the main trunk, then branch off.
- I-cord trunk: Cast on 4–6 stitches. Work i-cord (knit in the round without turning) to desired length (e.g., 20–30 cm). Bend and stitch into shape.
- For branches: Chain 10–20, work 1–2 rows of single crochet (sc), attach to trunk with slip stitches (sl st) or sewing. Add smaller side branches similarly.
- For texture: Work in back loops only (BLO) or use a twig stitch (search for tutorials) for bark-like ridges.
- Stiffen with fabric stiffener or starch if needed. Insert a wire for posing.
- Attach to the bowl base with hot glue or by anchoring in the gravel.
4. Assembly and Suspension
This is where the magic happens.
- The Base: Fill the bottom of your glass bowl with 2 inches of aquarium gravel. Place a few larger feature stones in the center.
- Planting the Reef: Push the base of your Coral Tree into the gravel. Arrange your Brain Corals and Kelp around the base of the tree. Use a small dab of hot glue to secure them to the stones if they tip over.
- Suspending the Fish: Cut 10-inch lengths of clear fishing line. Thread the line through the top of a fish and tie a secure knot. Tie the other end of the line to the branches of the Coral Tree at varying heights.
- Scaling: Make fish 5–15 cm, corals varying heights. Test fit in your bowl.
- Finishing: Block pieces if needed. Use fabric glue or needle-felting for details. Add tiny crocheted bubbles (small circles) or beads.
- Customization: Adjust sizes. For beginners, start with seaweed and simple corals.
- Yarn and Safety: Acrylic or cotton yarn. If for kids/pets, secure everything well and avoid small parts.
Common Questions:
1. How do you make my crochet fish look realistic?
Use surface slip stitches to add detail to the fins and body. This adds a 3D texture that makes the scales and fin rays stand out.
2. Can you wash the aquarium components?
Since these are kept in a glass bowl, they stay relatively dust-free. If needed, you can use a can of compressed air to dust the interior without moving the delicate fish.
3. What is the best way to anchor the tree?
If the pebbles aren’t enough to hold the wire tree steady, use a small piece of floral foam or a glob of mounting putty at the bottom of the bowl before adding the gravel.
Crochet tips for best results:
- Tension is Everything: If your stitches are too loose, the poly-fill stuffing will be visible. Aim for a firm, tight fabric.
- Sustainability: Use recycled glass containers and leftover yarn from other projects to make this an eco-friendly craft.
By following this guide, you’ll create a vibrant, whimsical piece of art that brings the beauty of the sea to your home—no fish food required!
Share your finished projects with us on Facebook and get featured.
You will also like:
Crochet Realistic Hydrangea Bouquet: Free Pattern Instructions
Beginner Crochet Plant Free Pattern for First-time Crocheters