This post may contain affiliate links. Please see our full Disclosure Policy for details.
I am sharing a simple glitter pine cones tutorial that is fun and easy to make for any season and also a great school activity for kids at no cost. All you need is pinecones and glitter glue. Whether you are creating a rustic centerpiece, decorating a DIY Christmas tree, or sprucing up a table setting, these shimmering pine cones are the perfect touch.

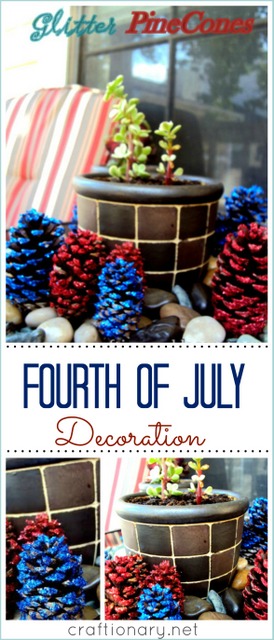
Pine Cones Centerpiece

Pine Cones Decor
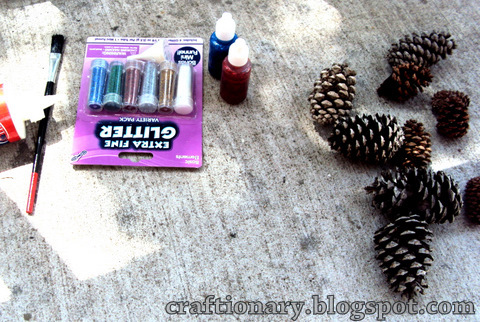
I made this simple planter arrangement with pinecones. Here’s how to make glitter pine cones step-by-step, starting with supplies you will need.
Materials:
- Pine cones
- Fine Glitter (any color)
- Glitter glue (optional)
- School glue or Mod Podge
- Paintbrush
- Newspaper or paper plate (to collect leftover glitter)
- Clear acrylic sealer spray (optional: to keep glitter intact)
- String or ribbon for hanging pine cones (optional)
Materials
Instructions to make Glitter Pine Cones:
1. Clean and Prepare the Pine Cones? for Craft:
You can also enjoy an activity of pine cone collection at the nearby park for this project.
Wash your pine cones with soapy water and let them dry. Now place them in a foil-lined baking tray and heat in the oven at 200°F (93°C) for about 30 minutes to fully open the scales and ensure there are no insects living in them.
Related: 62 Nature inspired outdoor projects
2. Apply the Glue? and Sprinkle Glitter
Using a paintbrush, lightly coat the edges or tips of the pine cone scales with glue. You can also brush the entire cone if you want full glitter coverage.
Hold the pine cone over a newspaper or tray and sprinkle glitter generously over the glued areas. Rotate the cone to cover all sides. Shake off the excess glitter.
Tip: Sprinkle glitter on a piece of newspaper to collect the spilled glitter for reuse. This way the glitter is not wasted.
3. Let It Dry
Place the glittered pine cone on a clean surface to dry for at least an hour. Make sure the glue is fully set before handling.
Sprinkle glitter on pine cones after applying glue with a brush
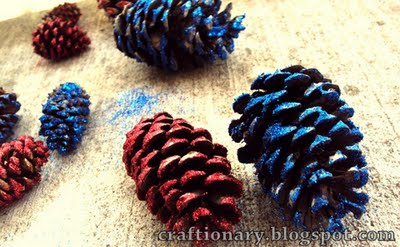
Here’s what the pine cones look like when the glue dries.
DIY pine cones
Related: 60 Pine Cone Crafts You Have Never Seen
4. Seal the Glitter (Optional)
To prevent glitter fallout, spray the dried pine cones with a clear acrylic sealer. This will keep the sparkle intact and add a professional finish.
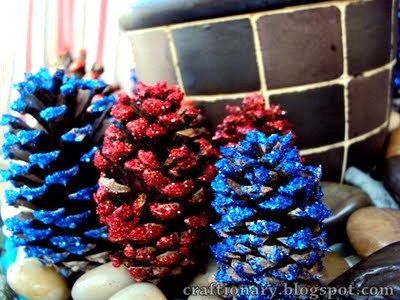
5. Display or Hang to Decorate
You can use your glitter pine cones in bowls, wreaths, garlands, or hang them with ribbon as festive ornaments.
Creative Ideas for Using Glitter Pine Cones
- Table Centerpieces: Combine them with candles and greenery.
- Tree Ornaments: Attach a loop of twine or ribbon to hang them.
- Gift Toppers: Add a unique touch to wrapped presents.
- Winter Decor: Use silver or white glitter for a snow-dusted look.
Tips for Best Results
- Use fine glitter for a more elegant sparkle.
- Mix glitter colors for a unique, multi-toned effect.
- Choose non-toxic glue and sealer if crafting with kids.
Making glitter pine cones is a fun and easy DIY project for crafters of all levels. With just a few materials, you can turn nature’s treasures into sparkling decor that brightens up any space. Whether for the holidays or everyday charm, this simple craft adds a little magic to your home.
You will also like:


this was a real cute idea, great for the 4th and showing patriot pride. by the way, i'm a new follower of your blog found you on a linky party
I was so excited to see this project. I painted pinecones red white and blue and my husband made fun of them (he says they are a winter decoration but I love them out year round). I'm glad someone else thinks this is a cute idea.Jessica
its realy nice! easy to make and lovly to decorate.
Super cute and easy! I went to follow you back, and I already was! So yeah, I'm super excited to meet another local blogger who loves crafts! Of course I'd love to stay in touch too! I'm adding you on Twitter, I'm @coffeenkisses. Have a great day!!
how nice..this is really cute & creative..colorful & lovely..
Lots Of Love
Very Interesting, Love it! Nice site, I will be sure to come back to visit!Rachel
I should do this we have so many pine cones here.I am just reminding everyone about tonights link party that runs Friday evening through Mondays!I also have an ongoing give away link party now too.Hope to see you soon.
This is really kewl idea for the 4th…Do not forget to add our linking it this party here
These look great!I am having a Red, White and Blue Linky Party and hope you will join in on the fun!
CUTE!! What a fun idea! I'm visiting from HoH.
Thank you so much for linking up to my Red, White and Blue Linky Party!