This post may contain affiliate links. Please see our full Disclosure Policy for details.
Looking for a creative and meaningful art project? A silhouette project on canvas is an easy and beautiful way to create personalized artwork. Whether you are painting a family silhouette, pet portrait, or a favorite landscape, this DIY silhouette project brings simple shapes to life with striking contrast and style.
Related: Best ideas to display kids art at home
You will learn how to create a silhouette project on canvas and add your creative touch with patterns and paints. To help you get best results, also take advantage of the materials, techniques, and design ideas with common questions answered at the end.
What is a Silhouette Project?
A shadow silhouette art project typically involves painting or transferring the outline of an object, person, or scene in solid black (or any other opaque color) against a contrasting background. It’s a timeless art form that’s simple, yet powerful — perfect for home decor, gifts, or personal keepsakes.
Silhouette Project
Painted Canvas Silhouette Materials:
Gather the following supplies to make silhouette canvas painting:
- Blank Canvas (any size)
- Black cardstock (for silhouette cutouts)
- Cardboard (to make stencils)
- X-Acto knife and self healing mat (for cutting silhouettes and cardboard)
- Paintbrush or foam brush
- Acrylic paints (background color and black/desired silhouette color if painting)
- Pencil and scissors
- Painter’s tape (optional)
Materials and Supplies
How to DIY a Silhouette Project on Canvas?
1. Choose Your Silhouette Image
Start by selecting an image or photograph you want to turn into a silhouette. Good choices include:
- A side profile portrait
- Tree outlines
- Animals (dogs, birds, horses)
- City skylines
- Nature scenes
Keep it simple! High-contrast images with clear edges work best for silhouettes.
2. Paint The Canvas
Paint the entire canvas with your chosen background color. Lighter shades like white, light blue, or pastel tones work beautifully to make the dark silhouette pop. Allow the canvas to dry completely before moving to the next step.
Chevron cutout for painting
You can Download and Print it for your personal artwork. You can transfer your design to freezer paper, vinyl, or transparency sheet for making a stencil. Use painter’s tape to make patterns on canvas alternatively.
Painted Chevron Canvas
Chevron Canvas Painting
3. Print and Cutout Silhouette Template
When printing a silhouette image keep in mind that it aligns with the canvas size. Outline the details with a pencil and use it as guide to cut out the silhouette carefully with a cutter on black cardstock.
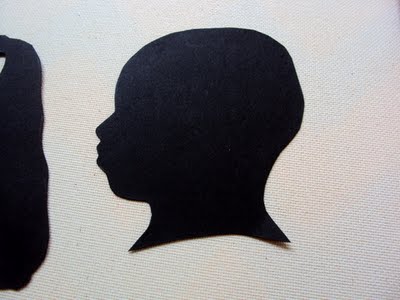
Silhouette cutout
Arrange silhouettes on canvas till you are satisfied with the look.
Arrange silhouettes on canvas
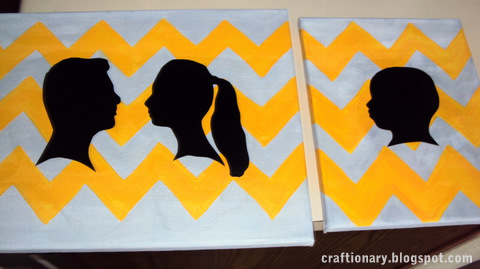
DIY Silhouette Project
4. Decoupage the Silhouettes
Apply a layer of Mod Podge underneath the silhouette and use an old credit card to firmly press and set the silhouettes on the painted canvas and you are done.
See a detailed tutorial on how to decoupage paper onto any surface?
Silhouette Canvas Painting
Related: 30 ways to make Abstract Art projects
Other Methods to Transfer the Silhouettes
There are a few ways to transfer the silhouette onto your canvas:
- Tracing Method: Place the cut-out on the dry canvas, tape it lightly, and trace around the edges with a pencil.
- Stencil Method: Tape down the stencil and paint directly inside the shape.
- Graphite Transfer Method: Shade the back of your template with pencil graphite, place it graphite-side-down on the canvas, and trace over the image to leave an outline.
Paint the Silhouette
Fill in the traced shape carefully with black acrylic paint (or silhouette color of your choice). Make an outline with fine-detailed paintbrush first and then paint inside with foam brush or large paintbrush.
Allow the silhouette to dry fully. If needed, touch up the edges with a fine brush for cleaner lines. For extra protection, you can seal your finished silhouette canvas with a layer of clear acrylic sealer or Mod Podge.
Common Questions About Making a Silhouette Project
What is the best paint to use for a silhouette project?
Acrylic paint is the best choice because it dries quickly, has great coverage, and works well on canvas.
How do you make your own silhouette picture?
You can take a side-profile photo against a light background, convert it to black and white using photo editing apps (like Canva, Photoshop, or free apps like Silhouette Maker), and print it as your template.
Can you make a silhouette without a stencil?
Yes! If you’re comfortable freehand drawing, lightly sketch your design onto the canvas first and then paint it in.
Should I paint the background first or the silhouette?
Always paint the background first, allow it to dry, and then add the silhouette on top. This ensures clean, crisp edges for your design.
What are good silhouette project ideas for beginners?
- Family side profiles
- Custom Wall Art – Use your family’s or pet’s outline for a personal touch
- Architecture – Make unique artwork with mountain landscapes or tree branches
- Imaginative – Make balloon silhouettes
- Favorite quotes with silhouetted images
- Couple’s Silhouette – Capture a romantic moment in shadow form
- Kids’ Growth Memories – Paint children’s profiles year by year
- Seasonal Decor – Create Halloween trees or Christmas village scenes
A DIY silhouette project on canvas is an affordable, fun, and meaningful craft. With just a few basic supplies and a little creativity, you can create beautiful art that tells your story in bold, graphic style. Whether you’re a beginner or experienced artist, a silhouette canvas painting makes for timeless and striking decor.
So, grab your brushes and start your silhouette project today!
You will also like:
You will also enjoy Home DIY Projects and creative craft ideas on our Pinterest.


lovely wall hanging specially images are beautiful
I love how this turned out! Looks great!
Hi dear Hani,its really smart 🙂
Love the color scheming,very well
Best wishes
~ Khadija ~
Such a creative idea! The color scheme looks great!
Very cool Hani!! It creates an interesting family “picture” of sorts! I like it.
OH I LOVE LOVE LOVE THIS!
Saw it over at the Look What I Made Linky Party! Super awesome!
Very cute idea! Love the chevron. Decorations are best when they are personal like this.
Adorable craft! I am definately doing this!
Very cute idea! Thanks for linking up to this week's Catch a Glimpse party.
I am in love. Seriously these are so cute, original and personalized. Love love. I found your cute canvas idea through the Paisley passions linky party and just had to stop by. I am your newest follower and cant wait to check more of your blog out. Come and visit me and say hi and please follow back :)A mommy's life…with a touch of YELLOW
Great tutorial, thanks for sharing, now following, please pop by, Karima x
Thanks for sharing @ catch as catch can. I would appreciate a link back.
great tutorial!
gail
I never would have thought to do a silhouette on a chevron. You are so clever. It looks great!
<3
Risa
Thanks for linking up to my blog hop – this is an exciting and creative blog. Love your creations. Shah
Hi Hani. Thanks for linking this up for Friday Favorites. I'm featuring you this week!
Hey Hani! I'm your newest follower! I love your canvases! I just mades some chevron canvases of my own but I love the silhouettes. Would love for you to come check out my blog at brandenjessicakeck.blogspot.com
This is great – I love the color yellow! Thanks for sharing at Fantastic Friday!
Really awesome post! Thanks for linking it up at the Creative Bloggers' Party & Hop 🙂
Really awesome post Hani! Thanks for linking it up at the Creative Bloggers' Party & Hop 🙂
Love this idea! You have such a cute blog. I get so much inspiration from your blog.Your newest follower,Abby(come check it out?)
Love, love, love this! The combination of the silhouettes and the chevrons is just perfect! Thanks so mych for sharing with the Pink Hippo Party.. and I am your newest follower!
That is so cute!! We would LOVE to have you link this up to our giveaway and party!
This is a great idea! i DEFINITELY want to make one of these!
This is so cute! I can't wait to be able to make one of these when my son is born!
Love, love, love these!!! Great job and super creativity inspiring. I made a chevron bow/ruffly wreath a while back using some interesting colors. I'd love for you to check it out sometime:
Hey! Stopping by to let you know I featured this on my blog tonight! Thanks for linking up to Delicately Constructed Friday and I hope to see you around tomorrow!! Michelle
What a fantastic idea! I love chevron and you have used it in such a creative way. Thank you for the tutorial!I found you from the Creation Corner link up party.
I love this! I've seen this on quite a few blog parties, and it always jumps out at me, great work! I would love for you to link it up at my weekend Link Party, Once Upon a Weekend. Today is my first-ever party, and I am so hoping someone will participate! 🙂
I love this! Thanks for sharing!!
LOVE the silhouette's! Thank you for linking up to Sew Woodsy last week!
These are adorable! I love the contrast of the yellow and black!
Thank you for the chevron printable! I've been searching for one!
Great project – love the final pieces.
I love silhouettes! Cute idea!