This post may contain affiliate links. Please see our full Disclosure Policy for details.
A plain white taper candle costs a couple of dollars. With a pressed pansy, a metal spoon and about ten minutes, it looks like something from a boutique gift shop.
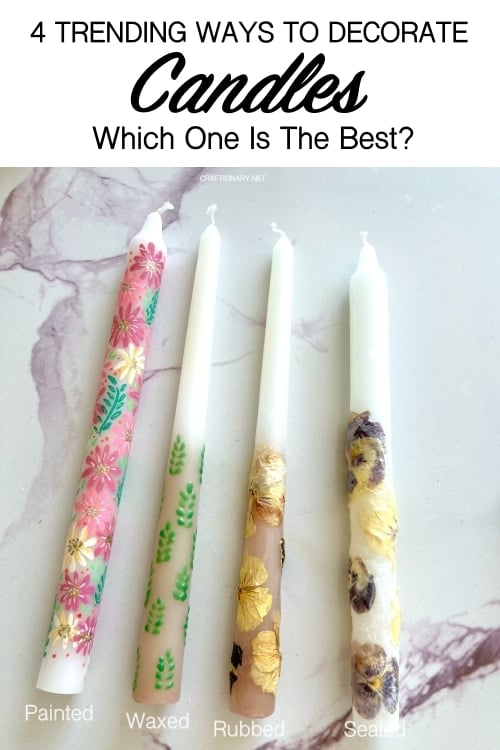
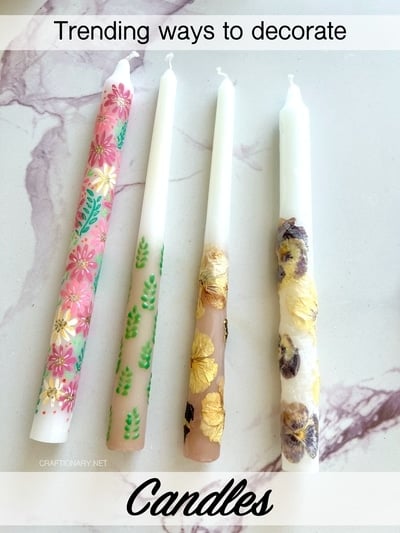
I’ve spent a lot of time decorating candles at my craft table, and I tested four different methods on the same style of taper candle so I could tell you what actually works, what goes wrong, and which one I’d reach for first. Pressed flowers sealed with wax, hand-painted wax designs, the warm spoon method, and acrylic paint markers all made it here. I’ve also added eight more ideas that are popular right now, so you’ve got plenty to pick from.
Everything here is beginner friendly. You don’t need a candle-making kit, and most of it can be done with things you may already have at home.
Related: I Tried To Make Easy Gel Wax Candle This Tutorial Is The Result
Which candle decorating method should you pick?
| Method | Difficulty | Time | Neat finish? | Best for |
| 1. Pressed flowers and wax | Medium | 30-40 min | Good, but wax layer shows | Rustic, cottage-style candles |
| 2. Wax painting with colored tealights | Easy | 20-30 min | Hand-painted look | Holiday designs, simple motifs |
| 3. Pressed flowers and warm spoon | Easy | 10-15 min | Excellent, no visible wax layer | Gifts, weddings, display candles |
| 4. Acrylic paint markers | Easiest | 15-45 mins | Excellent, most control | Detailed designs, lettering patterns |
If you only try one, start with paint markers for control or the warm spoon for pressed flowers. Both are forgiving.
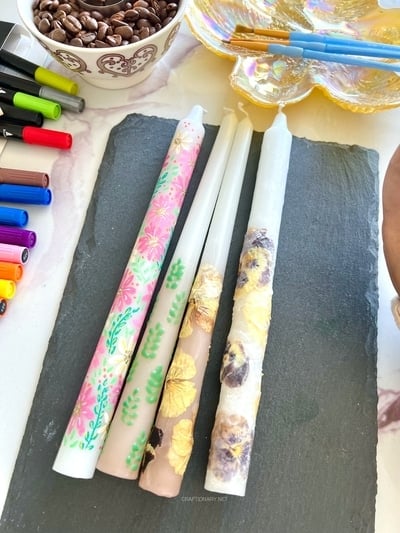
Basic supplies for all four methods:
Choose the right candle: A smooth, unscented taper candle in white or ivory is the easiest surface to decorate. Light colors make flowers and paint pop, and unscented candles won’t clash with the colors of your design. Avoid heavily textured or glittery candles for your first project because pressed flowers and wax need a smooth surface to grip.
- taper candle (smooth, unscented)
- Tealight candles in clear and in colors (these are your free wax supply)
- Pressed dried flowers (pansies, violas, ferns, small daisies and larkspur press beautifully) or press your own flowers
- Small paintbrush you don’t mind ruining
- Metal spoon
- Acrylic paint markers
- Paper towels
- Tweezers for placing delicate petals
- Optional: Mod Podge for sealing
Candle decorating safety: read this first
Dried flowers, paper and ribbon burn. Wax-based decorations and paint are different from flammable decor, but every decorated candle still needs some common sense. These are the rules I follow:
- Keep flowers and any paper or fabric decoration on the bottom half of the candle only. The flame sits at the top, so your decoration stays well below it.
- Treat pressed flower candles as display candles. Don’t burn the candle down to where the flowers are.
- Never leave a burning candle unattended, and keep burning candles at least 12 inches from anything that can catch fire, which is the guidance fire safety organizations give.
- Use a heat-safe holder or plate under a taper candle, and trim the wick to about a quarter inch before lighting.
- Hold the spoon with care. The metal gets hot fast. Use a long-handled spoon and an oven mitt or pliers if your fingers are close to the flame.
- Let wax and paint set fully before lighting a decorated candle.
- Test on the bottom of the candle or an old candle first if you’re unsure how a product will behave.
Method 1: Pressed flower candle sealed with melted wax
This is the first method I tried, and it taught me a lot about how quickly wax sets.
What you need:
Clear tealight wax, a paintbrush, pressed flowers (or press your own flowers), and paper towels.
Instructions:
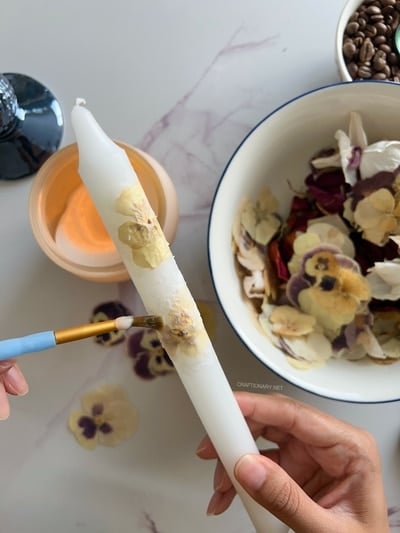
- Melt the wax. I burned a clear tealight until a pool of melted wax formed. Clear tealight wax works best because it dries almost invisible over the flowers.
- Brush on a thin layer. Dip the paintbrush into the melted wax and paint a thin patch onto the candle where you want the first flower.
- Place the flower right away. Press the pressed flower onto the wet wax with your fingers or tweezers before the wax hardens. You have just a few seconds.
- Seal it in. Keep dipping the brush in melted wax and brush over the flower, working from the center outward, until the petals are sealed into the candle.
- Repeat with more flowers, keeping everything in the lower half of the taper.
Related: Dried Flower Mason Jar Luminaries: The Cozy DIY Light Project
Tips:
- Speed matters: Wax cools almost instantly on a room-temperature candle, so only brush as much area as you can cover with a flower in a few seconds.
- Wipe the brush often: Wax hardens on the bristles and starts dragging. I wiped mine on a paper towel between dips. When wax builds up on the brush, it leaves a powdery white film over the candle and flowers, which looks dull.
- Cloudy patches can happen: If a thin layer cools too fast, it turns frosty. A quick, careful pass with a hair dryer on low is worth trying to smooth it out, or simply re-brush with hotter wax.
- The finish has a visible wax layer: The result was fine, with a white-ish seal, but it made me look for a neater way to do it. That’s where the spoon method came in.
Method 2: Paint on a candle with colored tealight wax
This one is a lot of fun, and it uses the same wax as the candle itself.
Instructions:
- Melt a green tealight (or any color) the same way, by letting a pool of wax form around the wick.
- Dip the tip of the paintbrush in the melted wax.
- Paint your design on the taper. I made tiny evergreen trees all the way around the candle, using short upward strokes that get wider toward the bottom.
- Wipe the brush on a paper towel when wax builds up.
- Re-coat your design to make the color vibrant.
- The finished candle has a raised, slightly textured look that you can’t get with paint. Because the design is made of wax, it’s also safe to burn the candle once the wax has set, since the painted wax melts the same way the candle does.
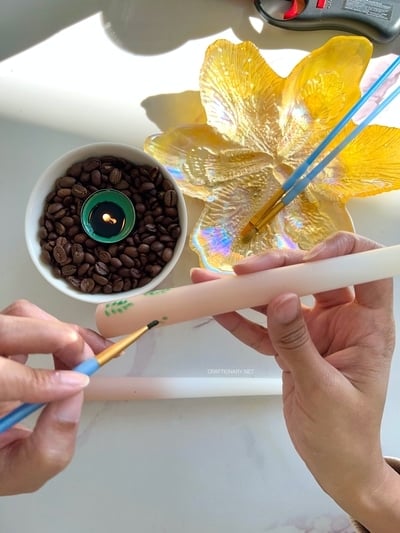
Ideas to try with wax painting:
- Red dots as holly berries on a green tree
- Tiny snowflakes in white wax on a dark candle
- Little hearts or flowers for Mother’s Day or a spring table
- Stripes or wavy lines in two or three colors
- Dots made with the tip of a toothpick dipped in melted wax
A tip for steadier lines: warm the candle slightly by holding it in your hands for a minute before painting. Wax sticks better to a candle that isn’t cold.
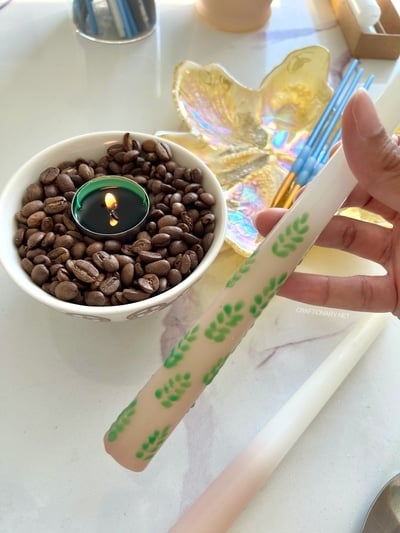
Method 3: Pressed flowers with the warm spoon method
This is the one I now use over brushed wax, because the result looks neat and professional, and there’s no extra wax layer on top of the flowers.
Instructions:
- Lay a pressed flower on the candle exactly where you want it. Use tweezers for tiny petals.
- Hold a metal spoon by the handle and warm the back of the spoon over a lit candle flame for a few seconds. Don’t let it get so hot that it smokes, since you just need it warm enough to soften wax.
- Press the warm back of the spoon gently over the flower. The wax underneath melts slightly, and the flower sinks into the surface and sticks.
- Lift the spoon straight up, then rewarm and press the next section if the flower is larger.
- You may gently move it around the flower surface for even melted wax on the back of the flower so that it sets smoothly without any uneven bumps on the candle’s surface.
- Repeat with the rest of your flowers and let everything cool for a few minutes.
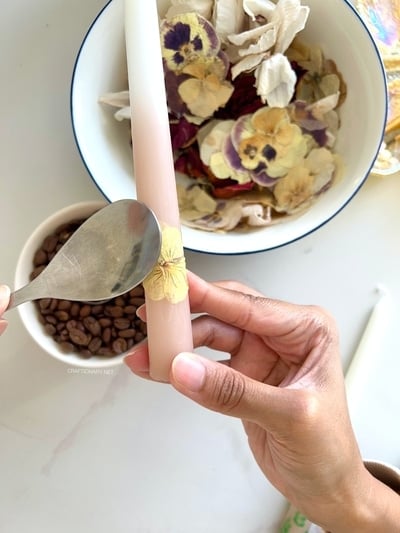
Why I prefer it:
- No visible wax layer on top of the flower
- Colors stay vivid
- Fast, and easy to fix. If a petal lifts, warm the spoon and press it again
- Works on curved surfaces if you press a little at a time
Sealing it (optional)
If you’re worried about the pressed flowers lasting, brush a thin coat of Mod Podge over the top. This helps protect the petals from handling and dust. Keep in mind that it makes it a decorative candle, so it’s meant to be displayed. Don’t burn the candle down to where the flowers or Mod Podge are, and keep the flowers on the lower half only.
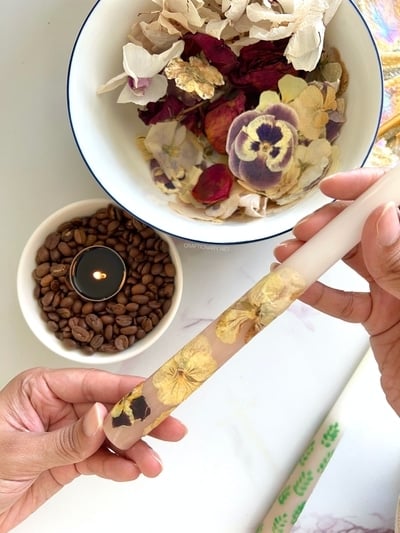
Pressed flower tips:
- Thin flowers like pansies, violas, ferns and larkspur lay flat and press neatly. Thick flowers like roses need to be pressed longer or you’ll get bumps.
- Make sure flowers are completely dry. Any moisture can cause browning or mold over time.
- Group flowers in odd numbers, like three or five, for a natural look.
- Add tiny leaves or fern fronds around flowers to make a small bouquet on the candle.
Related: Nine Proven Methods to Dry Flowers
Method 4: Acrylic paint marker candles (my favorite overall)
Out of all four, this is the one I’d recommend first. The marker gives you the most control, so any design you can draw on paper can go on a candle.
Instructions:
- Wipe the candle with a dry, lint-free cloth to remove dust and oils from your hands.
- Shake the paint marker and press the tip on scrap paper until the paint flows.
- Draw your design lightly and in thin layers. Let each layer dry before adding another so colors don’t smear.
- Let the candle sit for at least an hour before handling it much.
Related: DIY Hand Painted Candles: Design Ideas to Decorate Candles
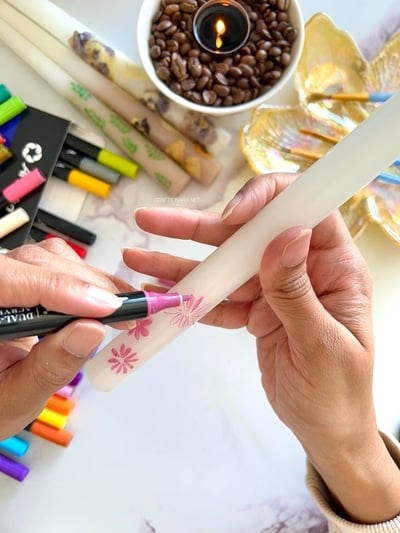
I used two shades of pink and cream along with two shades of green to complete the pattern. I added some gold for richness.
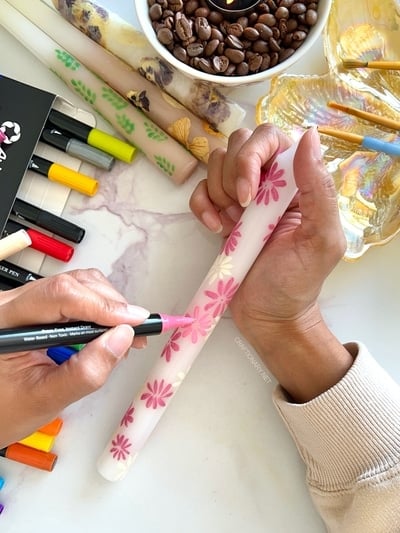
Paint marker design ideas:
- Botanical line art: leaves, ferns, wildflowers
- Autumn leaves: orange, mustard and burgundy on ivory
- Gold or white on a black candle for a moody, elegant look
- Dot patterns and mandalas
- Boho rainbows, suns and moons
- Names, initials or short words for gifts and weddings
- Zodiac constellations in metallic ink
- Halloween or Christmas motifs, like ghosts, bats, snowflakes and holly
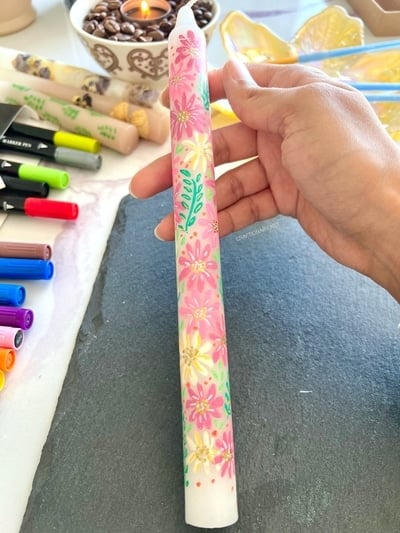
Paint marker tips
- Water-based acrylic can bead up on very glossy candles. If that happens, try a candle with a matte finish or test a lighter touch with the marker.
- Keep painted designs on the outer surface and away from the wick.
- Paint isn’t the same as candle wax, so treat a paint marker candle as a mostly decorative piece. Keep it in a holder and don’t burn it down into the painted section.
- Metallic markers show best on dark candles. Pastel and white markers look best on deeper colors.
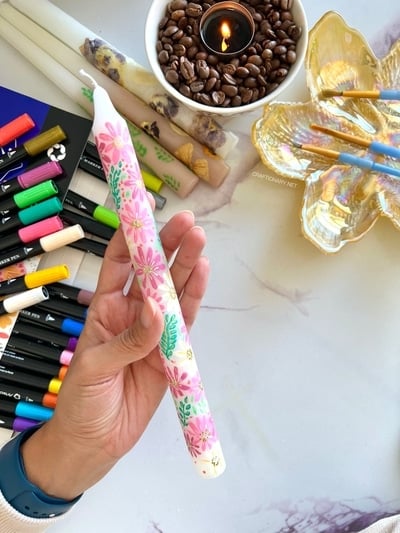
Popular candle decorating ideas to try
These are popular ideas people search for that go beyond the four methods I tested. Check any product on the bottom of your candle first.
5. Napkin decoupage candles
Separate the top printed layer of a paper napkin, cut out a design, and wrap it around the candle. Cover it with parchment paper and warm it with a hair dryer on medium for about 20–30 seconds. The wax softens, the paper turns translucent and fuses into the surface. Keep the design low on the candle, and treat it as display only.

6. Beeswax sheet cutouts
Craft stores sell thin, pliable sheets of colored beeswax made for candle decorating. Cut stars, hearts, leaves or letters with a craft knife or mini cookie cutters, warm them in your hands and press them on. They stick without any adhesive, and since it’s wax, it’s a classic and low-fuss way to decorate.
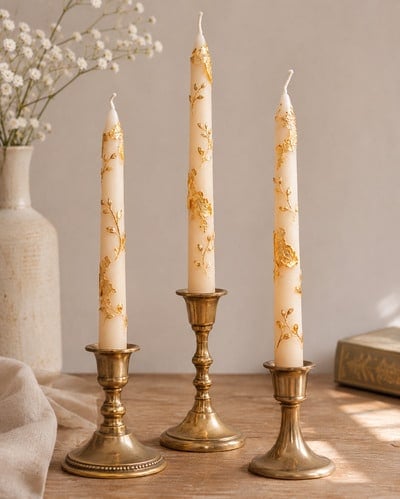
7. Gold leaf and metallic accents
Gold leaf flakes make a plain candle look luxurious. Warm the candle surface gently with a hair dryer on low, then press flakes on with a soft, dry brush. Rub-on metallic wax can also be used for gilded edges and details.
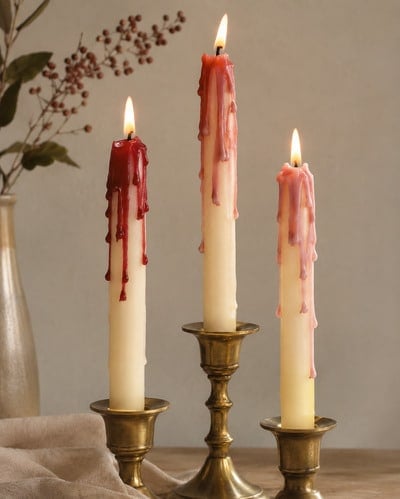
8. Wax drip candles
Chill a taper candle in the fridge for ten minutes, then drip melted colored wax from the top with a spoon so it runs down the sides and sets quickly. Use leftover candle wax rather than crayon, since it’s designed to burn. The more you vary drip lengths, the more natural it looks.
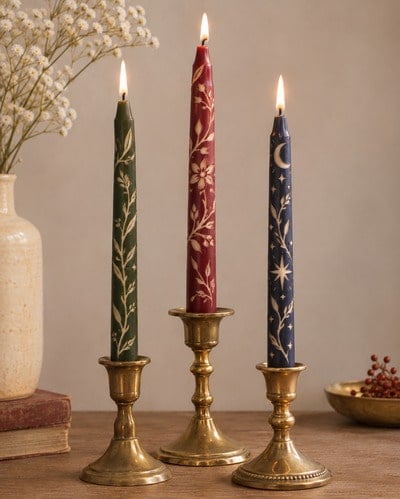
9. Scratch-art (carved) candles
Paint a thick coat of colored wax over a taper candle with a brush, let it set, then scratch a design through the top layer with a toothpick or loop tool so the candle color shows through. Simple lines, patterns and botanical shapes work well.
10. Ribbon and greenery wrap
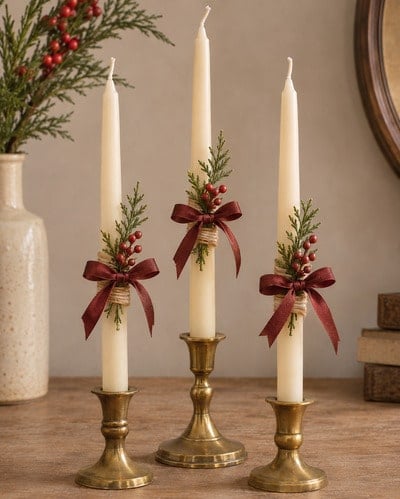
A satin ribbon, a bit of twine and a small sprig of faux greenery change a candle’s look in under a minute. It’s a great last-minute gift. Remove it before lighting.
Match your design to the occasion
- Weddings: white pressed flowers or a monogram with a gold paint marker
- Christmas: wax-painted evergreen trees, beeswax stars, cinnamon wraps
- Fall: autumn leaves in paint marker, dried citrus
- Mother’s Day or spring: pressed pansies and ferns with the warm spoon method
- Halloween: white and gold on black candles
- Gifts: wrap a decorated candle in tissue and tie with twine, with a tag that says it’s for display
Common mistakes and how to fix them?
| Problem | Why it happens | Fix |
| Cloudy or powdery wax | Wax cooled before brushing, or brush is clogged | Wipe the brush often and keep the wax hot |
| Flower lifts at the edges | Not enough wax underneath | Warm the spoon and press again |
| Paint beads up | Glossy surface or oily fingers | Wipe the candle and use thinner layers |
| Flowers turn brown | Moisture in the petals | Use fully dry, pressed flowers |
| Wax cracks | Candle surface was too cold | Hold the candle in your hands to warm slightly |
| Wax is too thick | Overheated or starting to set | Reheat gently and work in small sections |
Frequently asked questions about decorating candles
Painting on candles:
- Can you paint on candles?
- Yes. Acrylic paint markers and acrylic paint work on taper candles, and so does melted wax applied with a brush. Wax painting is the most burn-friendly since it’s made of the same material as the candle.
- What paint is best for candles?
- Acrylic paint markers give the most control and cleanest lines. Melted colored wax makes a raised design that’s safe to burn.
- How do you make candle wax paint?
- Burn or melt a colored tealight until the wax pools, then dip a small brush into it and paint quickly before it sets.
- How long does paint marker take to dry on a candle?
- Usually 15 to 30 minutes to the touch, and about an hour before heavy handling.
- What can you use instead of a metal spoon?
- A small metal craft tool, like a wax seal spoon or the flat side of a butter knife, can work. A heat gun on low can also soften the wax slightly.
Pressed flowers on candles:
- Can you burn a candle that has pressed flowers on it?
- I recommend not burning it down to the flowers. Dried flowers can catch fire, so keep them on the bottom half and treat the candle as decorative.
- How do you stick pressed flowers on a candle?
- Use melted wax and a brush, or warm the back of a metal spoon and press the flower into the surface. I prefer the spoon because it looks neater.
- Are dried flowers flammable?
- Yes, they are. That’s why they should never be near the flame or in the top half of a candle.
- Can you use Mod Podge on a candle?
- You can brush a thin layer over pressed flowers to protect them. It makes the candle decorative, so don’t burn it near the sealed area.
General:
- What kind of candle is best for decorating?
- A smooth, unscented taper candle in white or ivory is easiest. Soy candles can be softer and show fingerprints, so handle them gently.
- Can you decorate jar candles?
- Yes. Paint markers and stickers work well on the outside of the jar, and you can decoupage the glass with napkins or dried flowers using Mod Podge. Keep decorations off any area near the flame.
- How to store and display decorated candles?
- Keep them out of direct sunlight, since pressed flowers and paint can fade. Store them in a cool place so the wax doesn’t soften, and keep dust off by wrapping them in tissue. A glass cloche or a pretty dish makes a nice display.
Decorating candles is one of those crafts where a small amount of effort makes something that looks expensive. My own favorites are the warm spoon method for flowers and paint markers for everything else, but wax painting is the one I’d give to kids and beginners first because it’s so forgiving.
Pick one method, make a test candle, then try your own twist. Once you’ve seen how fast a plain taper can be transformed, it’s hard to stop at one. If you try any of these, I’d love to see how yours turns out.
Written by: Hani Shabbir
You will also like:
DIY Decorative Candle Ideas with Easy Tutorials for Every Style