This post may contain affiliate links. Please see our full Disclosure Policy for details.
Hand Painted Wood Slices: Transforming a simple piece of nature into a vibrant piece of art is one of the most rewarding ways to spend an afternoon.
This guide is designed especially for beginners who want beautiful, precise results, while also using painting as a form of mindfulness and creative meditation. Many artists—including myself—use a scrapbook collection of flower references to inspire designs, improve skills, and enjoy the process without pressure.
By focusing strictly on wood slices, acrylic paints, and brushes, you can achieve professional-looking results without a cluttered workspace.
Related: Cute Owl Rock Painting Wood Slice Craft
Why Paint Flowers on Wood?
Natural wood provides a unique, rustic canvas that paper simply can’t match. The grain of the wood adds texture to your floral designs, making each ornament a one-of-a-kind masterpiece. It’s a tactile experience that grounds you, making it a favorite for those practicing mindful art.
Related: 50 Easy Acrylic Paintings of Flowers for Beginners
Preparing Your Mind and Inspiration Before Painting
Before painting, I often open my scrapbook collection filled with flowers, sketches, and ideas. This practice helps in two important ways:
- Reduces pressure to create something perfect
- Helps your mind enter a calm, focused state
This transforms painting into a meditative experience, not just a craft. You don’t need to copy exactly. Simply use inspiration to guide your brush naturally.
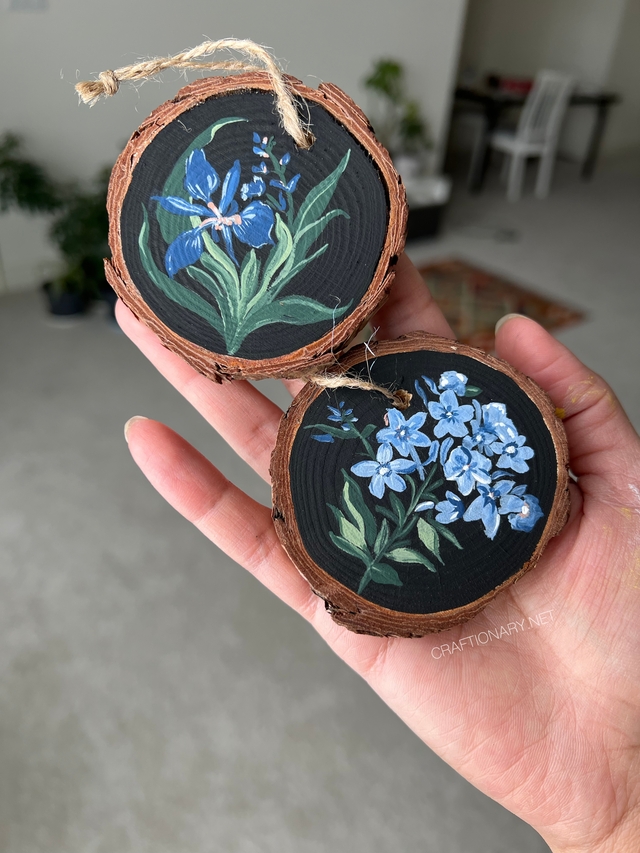
Hand Painted Flowers Wood Slices
Step-by-Step Instructions: Painted Wood Slices
1. Prepare Your Surface
Even if your wood slices come pre-sanded, give them a quick wipe with a dry cloth to remove dust. This ensures your acrylic paint adheres smoothly to the grain.
You can either paint your art directly on the surface or give a background color to make the artwork pop. I painted the base black first.
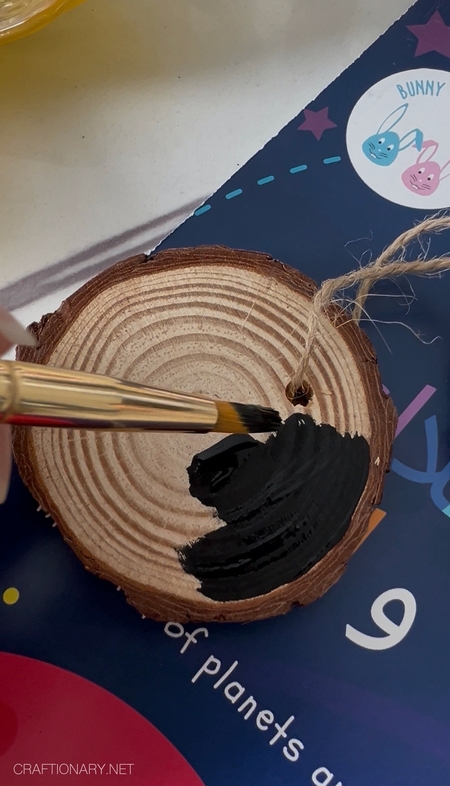
Paint the base of wood slice
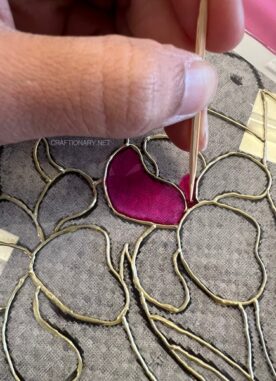
2. Sketch Your Layout (Optional)
If you aren’t ready to freehand-paint, use a light pencil to sketch your artwork. Think of your wood slice as a clock face to help with symmetry.
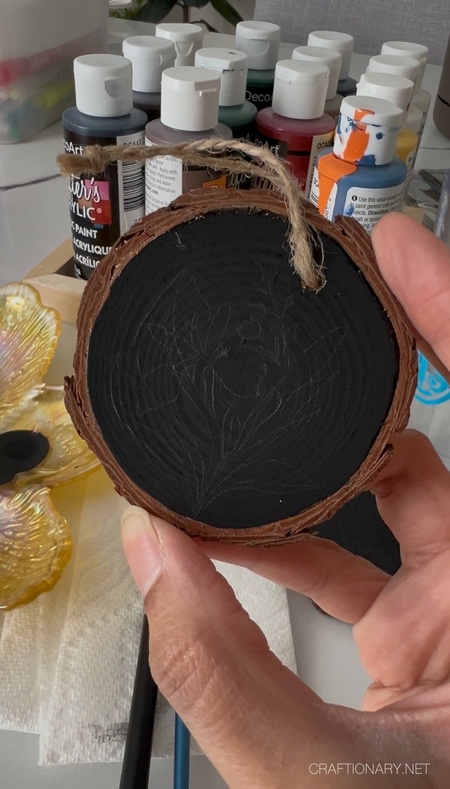
Sketch your design on wood slice
3. The Base Layer Technique
- The Center: Start by painting a small circle in the middle if you haven’t sketched your drawing.
- The Petals: Using a medium round brush, press the bristles down and pull toward the center. This press and pull motion naturally creates a petal shape. You can visualize this technique here.
- Pro Tip: Don’t worry about full coverage on the first pass; acrylics are best applied in thin layers.
4. Adding Depth and Detail
Once the base is dry (which takes about 10 minutes), use a smaller detail brush to add tiny dots of a contrasting color to the center of the flower. This mimics pollen and adds a 3D effect that makes the ornament pop.
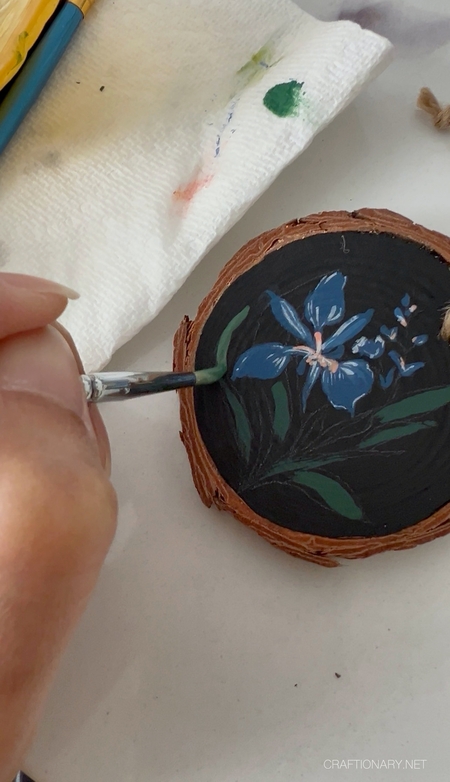
Painting flowers on wood slice
5. Finishing Touches
Paint small green teardrop shapes around the edges of your flowers to represent leaves. The contrast between the organic wood background and the vivid acrylic colors is what makes these ornaments so appealing.
Related: Best Sealer: How to Waterproof Acrylic Paint on Rocks, Wood, Glass Crafts
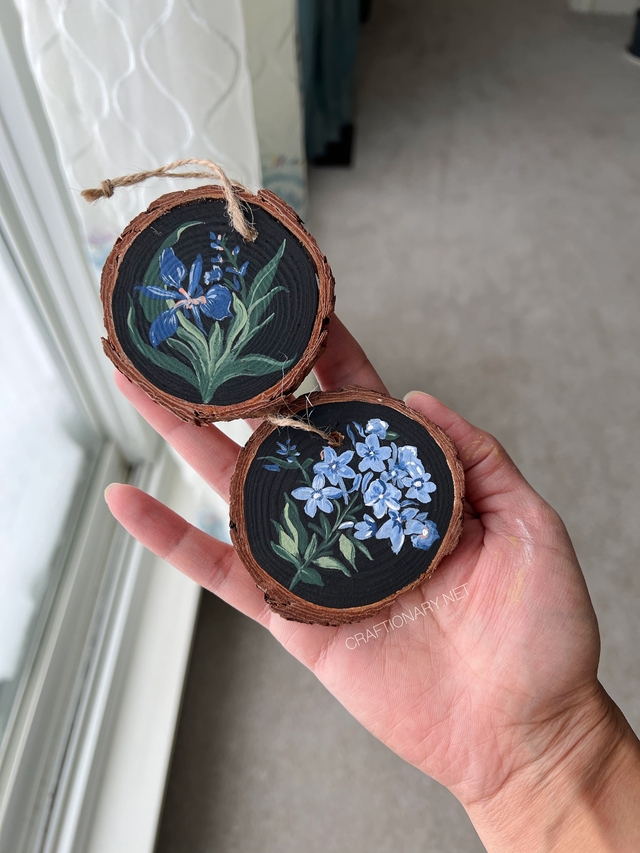
Beautiful flower wooden slices
Tips for Precision and Professional Results
- Mind the Moisture: Acrylics dry fast. Keep your brush damp, but not dripping wet. Too much water can cause the paint to bleed into the wood grain.
- If your color bleeds, simply wipe with a dry tissue paper and redo that spot. Acrylic paints are very forgiving.
- The Spin Trick: Instead of moving your hand at awkward angles to paint petals, rotate the wood slice itself. This keeps your brush strokes consistent.
- Embrace Imperfection: In nature, no two flowers are identical. If a petal is slightly larger than the others, leave it! It adds to the authentic, handcrafted feel.
- Shade Variation: Use 2-3 color variations of the focal color to bring details to life. For instance, I have used two shades of blue and green along with pink and white to bring this artwork to life.
Summary: Tools and Use
| TOOL | PURPOSE | MINDFUL BENEFIT |
| Wood Slices | Natural canvas | Connects you to nature’s textures. |
| Acrylic Paint | Bold, fast-drying color | Allows for quick layering and flow. |
| Paint brushes | Precision and detail | Encourages focus and steady breathing. |
Beginner-Friendly Flower Ideas That Always Look Beautiful
Start with these easy flowers:
- Daisy flowers
- Lavender stems
- Wildflowers
- Minimalist roses
- Tiny scattered flowers
These designs are forgiving and relaxing to paint.
Brush Control Tips for Precision and Clean Results
These tips make a huge difference:
- Hold brush gently, not tightly: This improves smooth strokes.
- Use brush tip, not full brush: This improves precision.
- Paint slowly: Speed causes mistakes.
- Rest your hand: Prevents shaking.
How to Make Your Painted Ornaments Look Professional
Follow these expert tips:
- Use minimal paint layers
- Keep designs simple
- Allow drying between layers
- Work slowly and mindfully
- Embrace natural wood texture
Less is more. Simple designs often look most elegant.
Mindfulness Benefits of Painting Wooden Slice Flowers
This craft helps with:
- Reducing stress
- Improving focus
- Relaxing the mind
- Encouraging creativity
Using your scrapbook as inspiration removes pressure and supports a calm creative flow. Painting becomes a peaceful experience, not just a task.
Common Mistakes Beginners Should Avoid
- Using too much paint: Causes messy results.
- Trying complex flowers too early: Start simple.
- Holding brush too tightly: Reduces control.
- Rushing: Leads to uneven designs.
Common Questions
1. What brushes work best?
Small round brushes work best for precision.
2. Why does acrylic paint work well on wood?
Wood absorbs acrylic slightly, helping paint adhere naturally.
3. How do you improve flower painting skills?
Practice regularly and use inspiration references like your scrapbook.
4. What is the best paint for wood slices?
Acrylic paint is the gold standard. It is opaque, dries quickly, and stays vibrant on porous surfaces like wood.
5. Do you need to prime the wood first?
For a rustic look, you don’t have to. Painting directly on the wood allows the grain to show through. However, if you want neon brightness, a thin layer of white acrylic first will make colors stand out.
6. How do you stop acrylic paint from cracking on wood?
Cracking usually happens if the wood is damp. Ensure your wood slices are fully dry before you begin your mindful painting session.
7. Should you seal the wood slices after painting?
Sealer will prevent the colors from fading overtime and also prevent damage to your piece. You can apply a coat of mod dodge or acrylic spray sealer.
Written by: Hani Shabbir
You will also like:
Cute Owl Rock Painting Wood Slice Craft
Blooming Walls: Creating A Home Art Gallery with Acrylic Paints
DIY Hand-Painted Kitchen Wood Sign Using Printer Paper Transfer