This post may contain affiliate links. Please see our full Disclosure Policy for details.
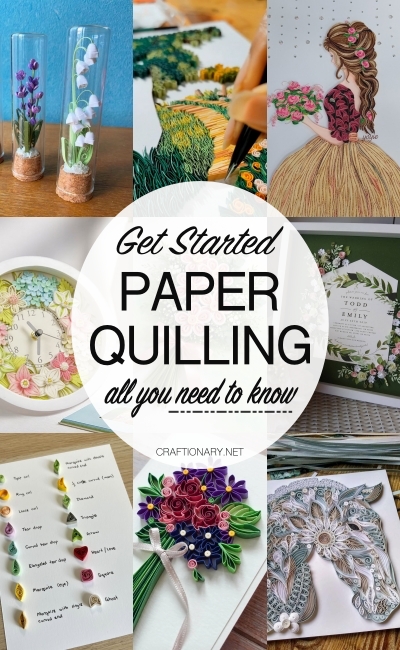
Paper quilling, also called paper filigree, is a beautiful paper art technique where thin strips of paper are rolled, shaped, and glued to create intricate dimensional designs. From elegant wall art to greeting cards or framed wall art, quilling is affordable, beginner-friendly, and endlessly creative.
This complete paper quilling guide walks you through tools, techniques, beginner mistakes, project ideas, and expert tips—so you can start confidently and create stunning designs from day one.
What Is Paper Quilling?
Paper quilling is the art of rolling narrow paper strips into coils and shaping them into patterns. These shapes are then glued together to form flowers, mandalas, letters, animals, and intricate designs. Even detailed designs start from simple coils.
A Brief History: During the Renaissance, European nuns and monks used paper trims from books to decorate religious items, rolling strips around feather quills — which is how the craft got its name.
Why Is It Called Paper Filigree? Finished quilling designs look like delicate metal coils placed, but they’re made from paper instead of wire.
Traditional vs Modern Quilling Traditional quilling focused on borders and floral patterns. Modern styles include names, quotes, abstract art, 3D figures, shadow boxes, and mixed-media decor.
Why Do People Love It? Quilling blends creativity with relaxation. It’s affordable, versatile, and satisfying to watch simple paper turn into elegant art.
Essential Paper Quilling Supplies
You don’t need much to begin, just the basics:
- Quilling Paper Strips: Pre-cut strips for making coils and shapes available in different widths commonly 3mm, 5mm, or 10mm. Pre-cut quilling paper is easier than cutting your own at first.
- Quilling Tool: Slotted Tool for rolling and curling paper easily and Needle Tool for tighter coils and neat glue work. You can also get a Paper Rolling Electric Pen for rolling paper strips into coil faster and it works great for wider paper strips.
- Tweezers: Place small pieces without crushing with precision
- Curling Coach: A guide to assist you with coiling paper.
- Quilling Tools Set: Get all the tools in a set conveniently with curcling coach, the indentation pens, slotted pens, bone folder tool, awl, and tweezers in this complete tool set.
- Paper Craft Glue: Clear glue to hold designs intact for paper crafting, scrapbooking, and card making.
- Work Board: Self-healing cutting mat or foam board to keep shapes even and steady.
- Ruler and scissors for measuring and trimming
- Toothpicks or pins for shaping.
- Crimper Tool (Optional): Wave shaper brings patterns by crimping to add zigzag texture to paper.
- Paper Fringer (Optional): Quilling tool is designed to make precise and even fringe cuts each time.
Handy Resources:
- Quilling shape chart
- Free beginner quilling project templates: Best way to turn any image into quilling is to print and take each distinct “shape” between the dark lines individually, then layer your rolls accordingly.
- Coil size guide
- Color palette planner
- Beautiful Quilling Step By Step
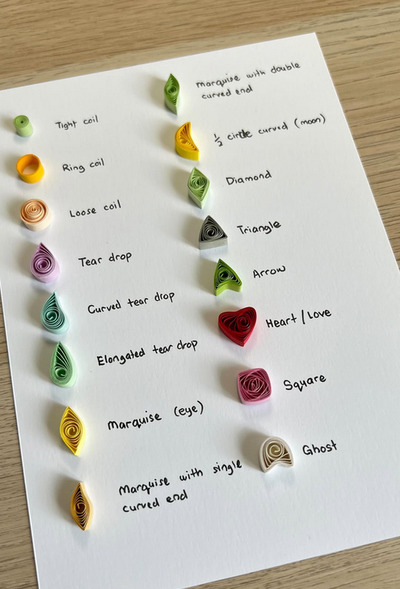
Paper Quilling: Shapes and Techniques
Basic Shapes
These foundational techniques appear in almost every quilling project.
- Tight Coil: A firmly rolled coil used for solid centers and small details.
- Loose Coil: Roll, release slightly, then glue. Base shape for most designs.
- Teardrop: Pinch one side of a loose coil often used for petals.
- Marquise (Eye): Pinch on both ends to create leaf, feather, or eye shapes.
- Square and Rectangle: A coil shaped into four corners for geometric designs.
- Triangle: A coil pressed into three points for structured activity patterns.
- Scrolls: Loose curls that form decorative swirls and flowing lines that are great for borders.
Yang Art Space
Advanced Shapes
- Husking: Paper wrapped around pins to create lace-like patterns.
- Fringe Flowers: Fringed strips rolled to form fluffy, realistic flowers.
- Comb Quilling: Paper looped over a comb to make repeating patterns.
- Beehive Coils: Layered coils shaped to create raised 3D effects.
- Onion Dome: Rounded layered coils that add depth and dimension.
How to Get Started Quilling Paper?
Core Techniques
The beauty of quilling is that complex designs are simply combinations of basic shapes. Here is the step-by-step process:
- The Roll: Insert one end of a paper strip into the slot of your tool. Turn the tool steadily until the entire strip is rolled into a tight coil.
- The Release: Carefully slide the coil off the tool. If you want a Tight Coil, glue the end immediately. For Loose Coils, let the paper expand on your quilling board before gluing.
- The Pinch: Once you have a loose coil, you can pinch and press it to create shapes:
- Shape: Adjust coils into curves, angles, or custom forms.
- Layer: Stack coils to build height and dimension.
- Fringe: Cut fine strips to add texture or petals.
- Glue: Use small amounts of glue to hold shapes together.
- Coil on Pins: Use pins as guides for intricate open designs.
Step-by-Step: Your First Design
Quilling may feel tricky at first, but it quickly becomes a relaxing activity. Before working on a project, practice making basic shapes. Then test the technique on a sample project:
- Choose a simple design like a flower or a heart.
- Prepare your strips in the chosen colors and insert paper into the quilling tool.
- Roll evenly and gently. Slide off tool.
- Make basic shapes such as coils and teardrops using fingers on the board.
- Arrange everything before gluing to visualize positioning.
- Glue end carefully using small amounts and assemble the design.
- Let it dry fully before moving.
Tip: Let it dry 15–20 minutes; a light sealer can protect the design.
Paper Quilling Projects for Beginners
If you’re looking for your first project, try these high-success ideas:
1. Quilled Greeting cards
A simple quilled flower (5 teardrop petals) on a cardstock base looks professional and elegant.
Shop: Quilling Card US
2. Jewelry
Use narrow strips to create tight coil earrings, hair pins or a bracelet. Coat them with a paper sealant or clear nail polish for durability.
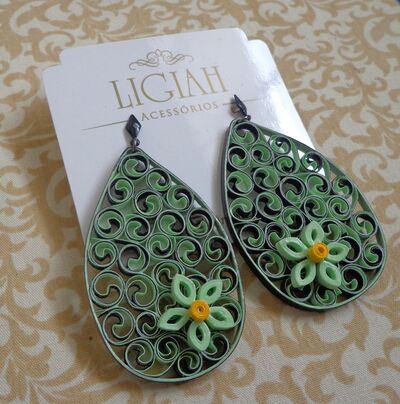
Lígia Alves Rocha
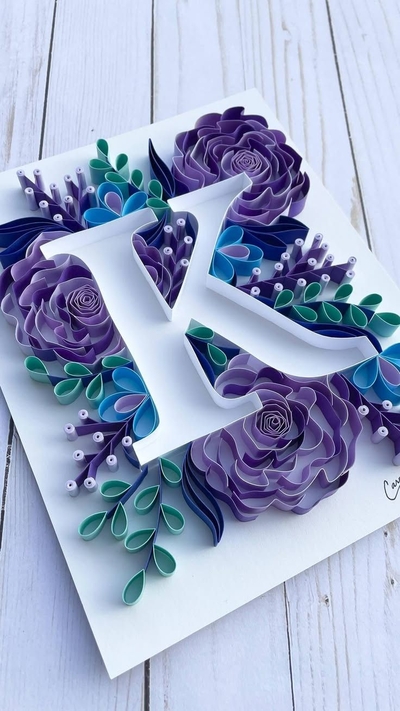
3. Monogram Art
Print a large letter and fill the interior with colorful tight coils and teardrops or shape the letter or a main design with quilling paper and create swirls.

4. Mosaic Bookmarks
Arrange small coils and shapes in a pattern to make colorful, lightweight bookmarks.
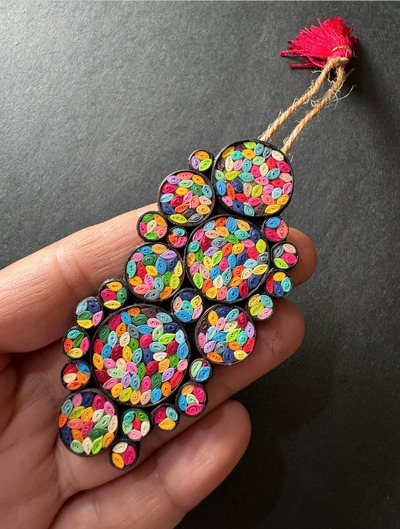
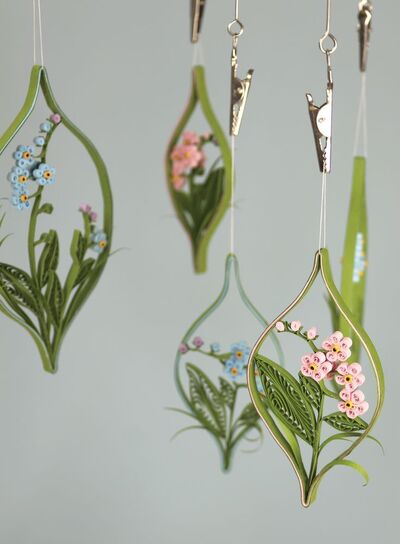
5. Forget-Me-Not Mobile
Seal tight coils with glue, attach a small loop, and turn mini designs into cute hanging ornaments.
Karen-Marie Klip & Papir
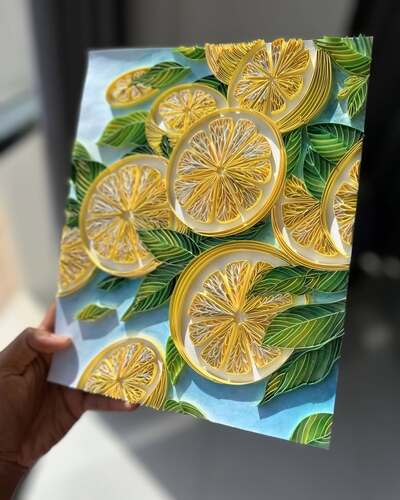
6. Lemon Slice Wall Art
Layer yellow and white coils in desired shapes to build realistic citrus slices with leafy details.
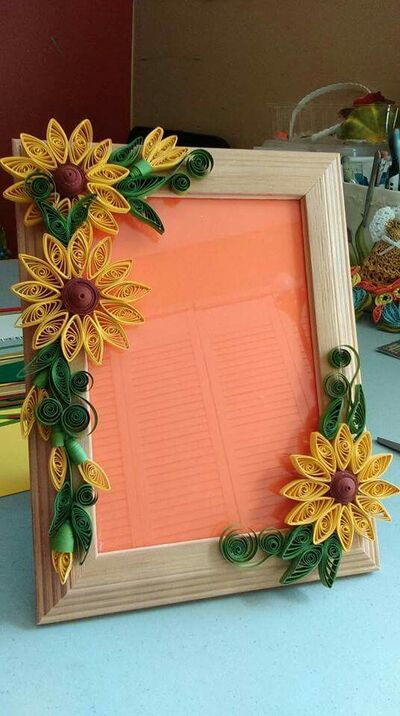
7. Photo Frames
Decorate plain frames by adding quilled sunflowers, vines, or borders around the edges.
Brunny Cancel
8. Gift Tags
Add a small quilled heart, flower, or swirl to tags to make gifts feel more personal.
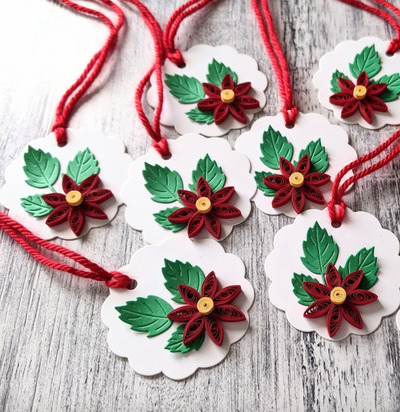
Shop: Chedee Gifts
Creative and Modern Paper Quilling Ideas
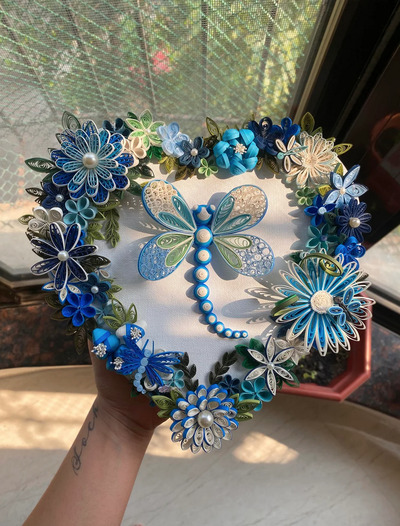
9. Mandala Art
Build circular patterns using repeated shapes to create detailed mandala designs.
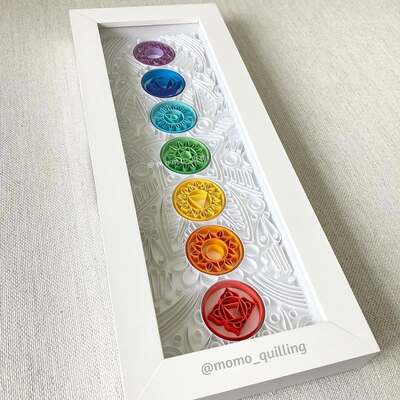
Momo Quilling
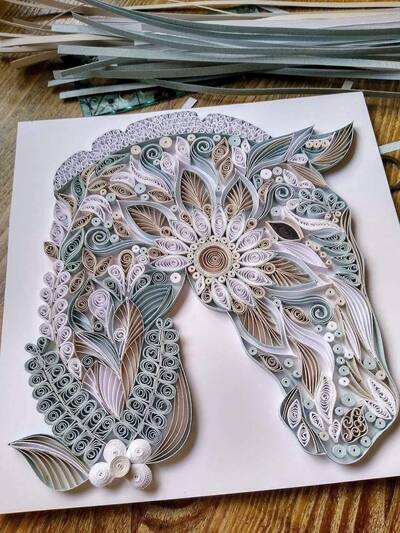
10. 3D Animals
Stack and shape coils into raised forms to create dimensional animal figures.
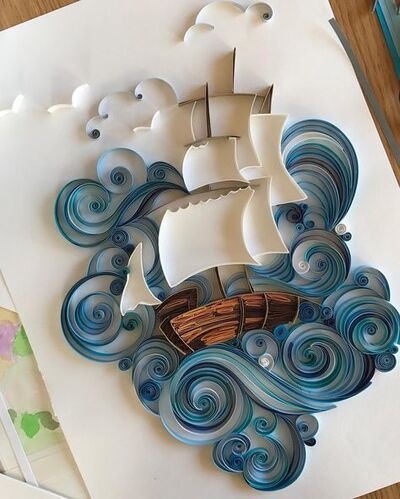
11. Meaningful Art
Outline letters and add quotes with paper strips and fill them with coils, scrolls, and themed shapes like a ship sailing through tides and waves.
12. Wedding Shadow Box Keepsake
Turn wedding invites into quilled keepsakes by adding florals, names, or dates and framing them as lasting, textured memories. Layer quilled elements inside a frame to create depth and a 3D scene.
Related: 40 Meaningful Memory Keepsake Ideas to Treasure Life
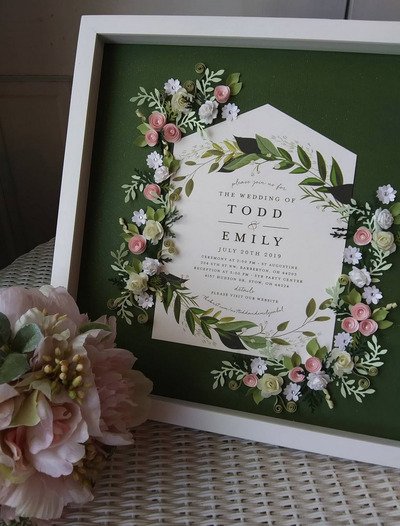
Shop: Paper Vine Designs
13. Portrait Art
Shape coils carefully to form facial features and layered hair for artistic portraits.
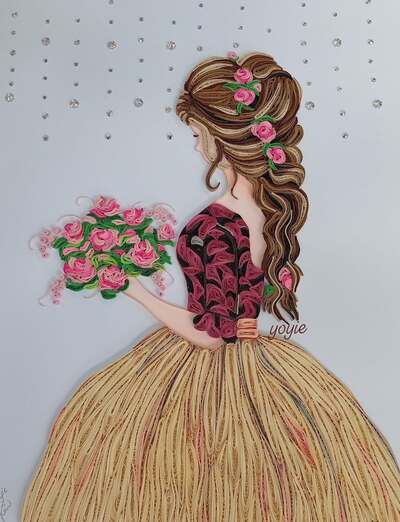
Yoyie
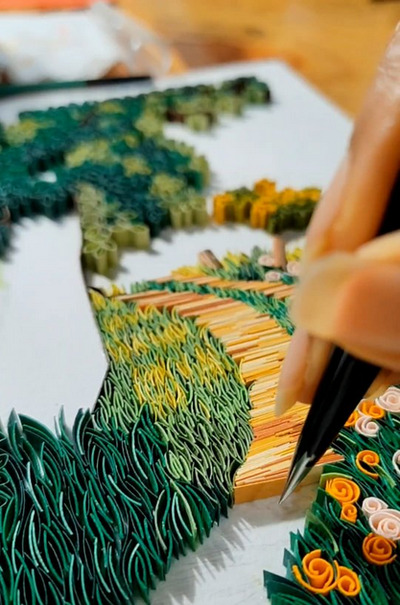
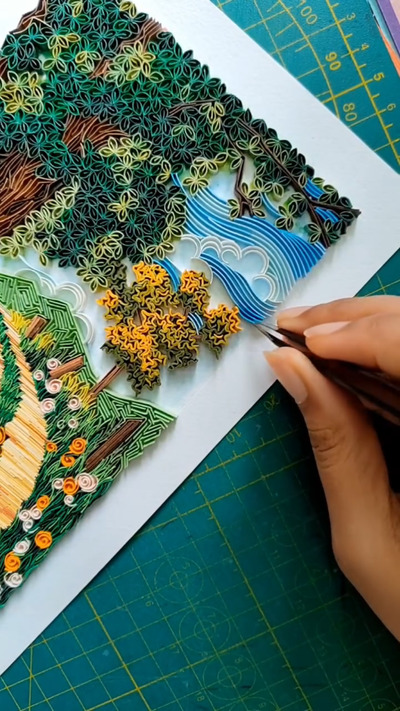
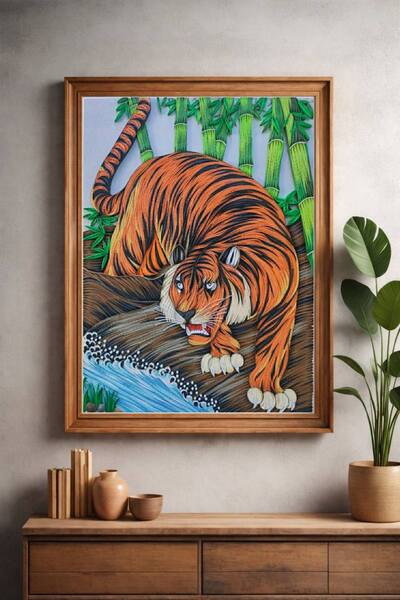
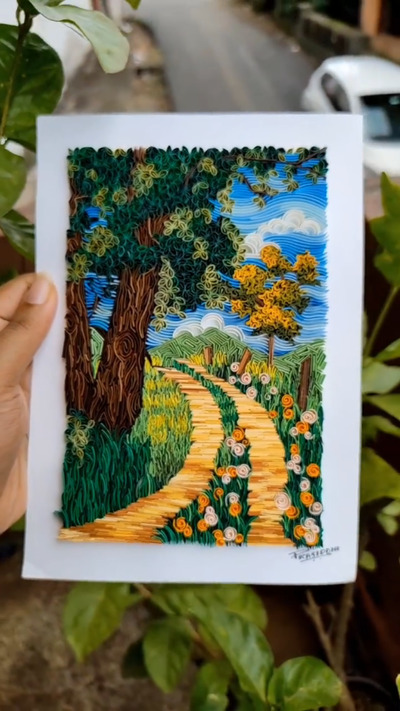
14. Intricate Landscapes
Arrange coils into trees, hills, and skies to build scenic paper artwork.
15. Exquisite Blossoming Canvas
Glue quilled designs onto painted/ blank canvas backgrounds for mixed-media wall art.
Paper Quilling for Home Decor
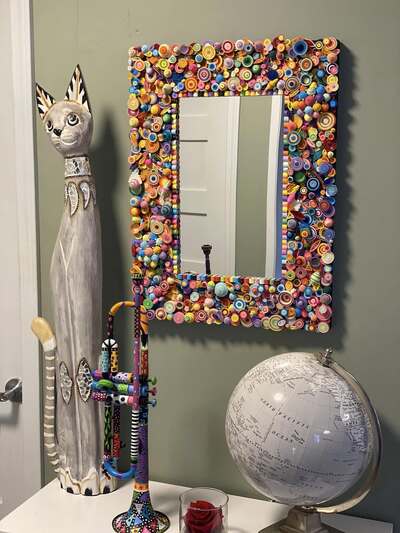
16. Mirrors
Add quilled borders around mirror frames for decorative detail.
17. Clay Quilling Lampshades
Attach sealed quilled shapes to lamp surfaces or a mold covered with plastic for textured lighting decor.
18. Wall Clock
Decorate clock borders with quilled florals or patterns.
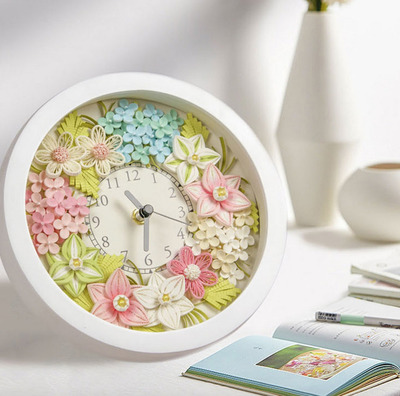
Shop: Paper Art juan
19. Quilled Terrariums
Arrange tight coils in patterns and seal well for decorative plants in a miniature greenhouse.
Talia Lamb
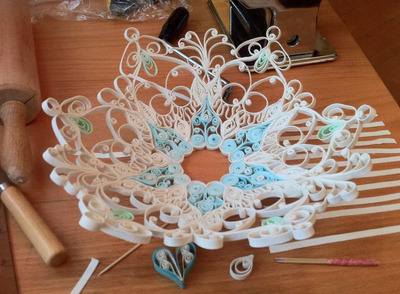
20. Quilled Decorative Bowls
Layer glued coils over molds to form sturdy decorative bowls.
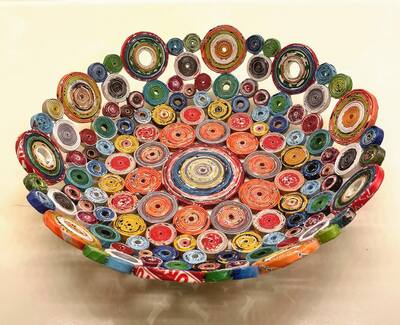
Teraphim Rehe
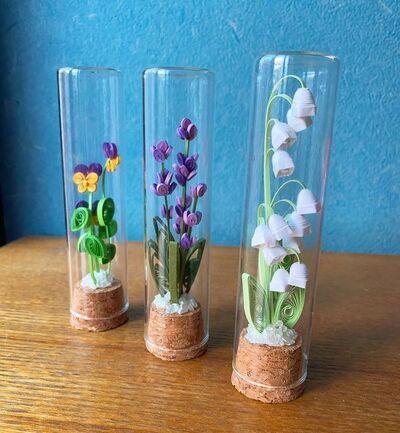
21. Delicate Windchimes
Fill small jars with delicate quilled flowers and leaves to create pretty, long-lasting decorative pieces for shelves or desks. Take this inspiration to make windchimes and suncatchers.
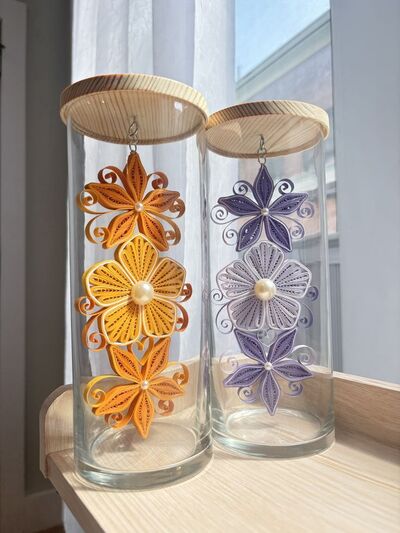
Handmade Happiness
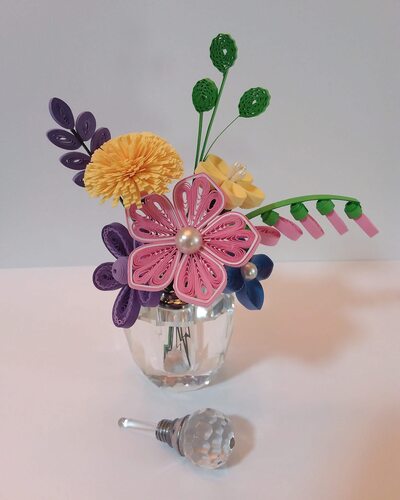
22. Quilled Flowers in a Vase
Arrange handmade quilled flowers inside a vase as a long-lasting, artistic alternative to real or artificial floral arrangements.
23. Succulent Garden
Shape thick coils into leaves and arrange them like small potted succulents with pebbles in a container.
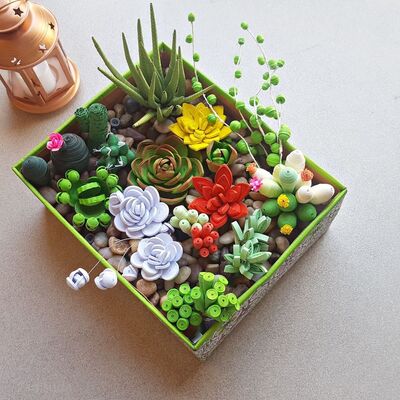
Instructables
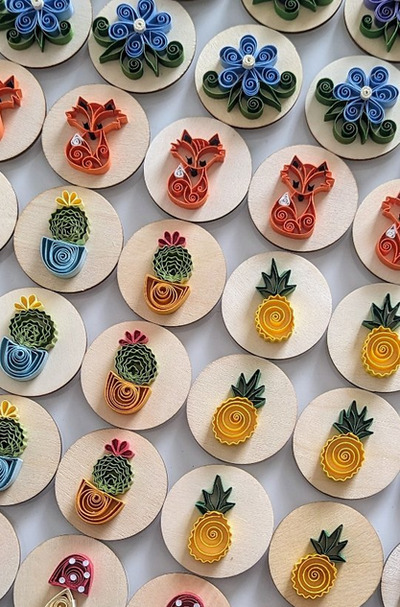
24. Paper Quilling Magnets
Glue mini quilled shapes onto magnet backs for fridge decor.
Paper Quilling for Gifts
25. Personalized Frames
Spell out names in quilling and frame them as custom keepsakes.
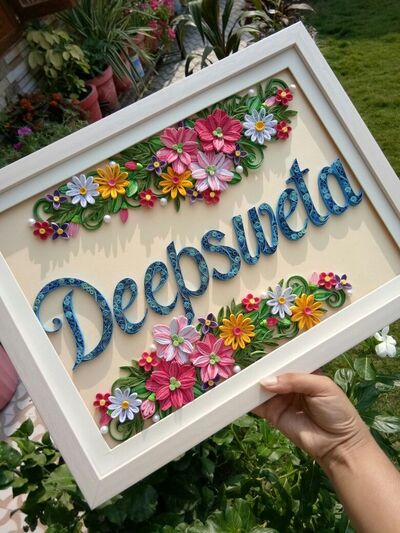
Dola Quilling
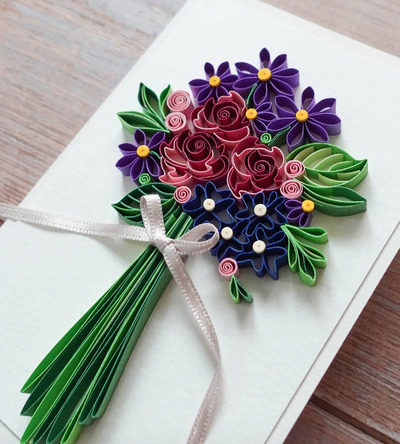
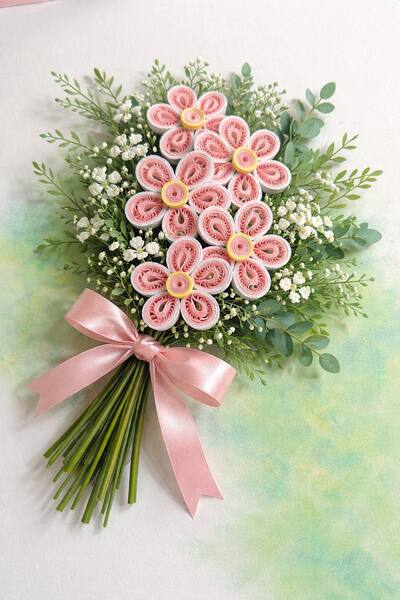
26. Bouquet Greeting Card
Arrange quilled flowers on stems to create long-lasting paper bouquets.
27. Journaling Art
Turn quilling projects into a scrapbooking or paper journal project or make unique enchanted designs with hobby items such as books and plants for friends and family.
Related: Beginner’s Guide: Embroidery Journaling Your Threaded Story
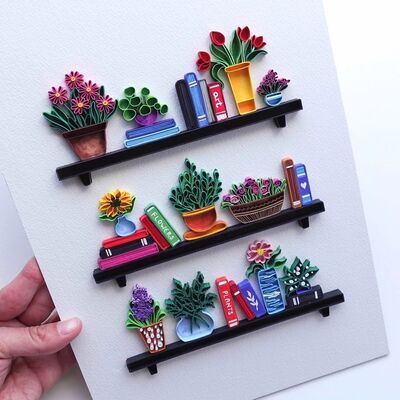
Miriam’s Quilling
Color Theory for Paper Quilling
The right colors can make even simple quilling designs look professional.
- Color Palette: Use 2–4 matching colors to keep designs balanced.
- Ombre: Light-to-dark shades of one color create a soft effect.
- Gradients: Blend colors gradually (like blue to purple) for smooth flow.
- Metallic Touch: Gold or silver accents add elegance.
- Pastel vs Bold: Pastels feel soft; bold colors make designs stand out.
Common Paper Quilling Mistakes and Fixes
Quilling rewards patience:
- Too Much Glue – Makes work messy. Use just a tiny dot with toothpick for precision.
- Uneven Coils – Happens with uneven pressure. Roll slowly and steadily.
- Loose Shapes – Coils too open loose form. Adjust before gluing.
- Paper Tearing – Strips tear if pulled hard. Be gentle while rolling.
- Pieces Coming Off – Glue hasn’t dried fully. Let it sit before moving.
How to Preserve and Frame Quilling Art
- Seal It – Light sealer protects from dust and moisture. Mod podge, paper sealer, and even spray adhesives are good choices. For more check out Best Sealer: How to Waterproof Craft Surfaces.
- Use Shadow Frames – Extra depth keeps the design from getting crushed and protects from dust.
- Add Glass Cover – Shields from dirt and damage.
- Avoid Humidity and Sunlight – Moisture and intense heat can loosen shapes.
- Store Flat – Keep in a dry place if not framing.
Paper Quilling Trends
Quilling isn’t just florals anymore — modern styles are taking over.
- Typography Art – Quilled names, quotes, and monograms are very popular.
- Botanical Designs – Leaves, wildflowers, and nature-inspired art are trending in home decor.
- Minimalist Quilling – Simple shapes with lots of empty space for a clean look.
- Sustainable Crafting – Using recycled or eco-friendly paper strips.
- Mixed Media – Combining quilling with painting, embroidery, or resin art.
Paper Quilling Common Questions:
- Can you cut your own paper strips? Yes! While pre-cut strips are more uniform, you can use a paper shredder or a craft knife and ruler to cut your own from 80gsm to 120gsm paper.
- How long does a quilling project take? Small projects take 30–60 minutes; detailed art can take several hours.
- What is the best glue for paper quilling? Most experts recommend a clear-drying PVA glue (like Elmer’s or Aleene’s Tacky Glue). Use a needle-tip applicator to avoid blobs that can warp the paper.
- Can you do quilling without a tool? Yes—use a toothpick, needle, or skewer.
- How do you make 3D quilling? Use tighter coils and layer shapes to build height and dimension.
- Is paper quilling expensive? Not at all. A basic starter kit (tool, paper, and glue) usually costs less than $20, making it one of the most budget-friendly crafts available.
- Why do your coils keep unravelling? Check your tension. If you roll too tightly, the paper might spring back too fast. If too loose, it won’t hold its shape. Practice finding a middle-ground tension where the paper feels snug but not stretched.
Paper quilling is a quiet reminder that beautiful things don’t have to be complicated — just a strip of paper, your hands, and a little patience. With every coil you roll, you’re not just making art, you’re slowing down and creating something meaningful from scratch. Keep practicing, trust your hands, and let your creativity take shape one strip at a time.
Start simple, experiment often, and enjoy the process—your skills will grow naturally.
Written by: Hani Shabbir
Drafted by: Sabah Waqas
You will also like:
Paper Woven Art: How to Create Strip Weaving from Two Artworks
Inkjet Printing on Fabric using Freezer Paper (Easy Instructions)