This post may contain affiliate links. Please see our full Disclosure Policy for details.
Did you know you can print stunning images, labels, or even watercolor art directly onto fabric using just a household printer and freezer paper? As a lifelong crafter and fabric DIY enthusiast, I’ve tested many methods, but freezer paper printing stands out for its simplicity, affordability, and gorgeous results.
In this tutorial, I’ll walk you through:
- How to print on fabric using freezer paper?
- What Type of images to print?
- How to turn your prints into beautiful crafts—like pillows, tote bags, or quilt blocks.
- Troubleshooting printer tips
- Compare fabric printing methods and share why freezer paper is my best choice
- Cleaning tips for lasting colors
Why Print on Fabric?
Printing on fabric lets you:
- Customize projects with photos or art
- Create personalized gifts and decor
- Save time compared to embroidery or iron-on transfers
- Maintain the natural feel of fabric (no plastic-y overlays)
Materials
| ITEM | WHY IT’S NEEDED? |
| Freezer Paper | Backing to stiffen fabric for printing |
| 100% Cotton Fabric | Absorbs ink best |
| Inkjet Printer | Ink bonds better to fabric |
| Iron and Cutting Tools | For prepping and sealing the fabric |
| Scissors or Rotary | Cutter To cut sheets to size |
Optional: Heat press or iron for setting ink.

Inkjet Printing on Fabric
How to print on fabric using printer and freezer paper?
1. Cut the Fabric and Freezer Paper
- Cut both fabric and freezer paper to 8.5×11” (standard printer size).
- Use sharp scissors or a rotary cutter for clean edges.
2. Iron Freezer Paper to Fabric
- Place the shiny side of freezer paper on the back of the fabric. Such that the working side is facing the ironing board, and the dull side of freezer paper is on the top facing you.
- Iron the dull side of freezer paper on medium-high for 10–15 seconds to bond.
- Let it cool and trim any frayed edges.
- The fabric and freezer paper will become one.
3. Load into Printer
- Insert the fabric-paper sheet into your inkjet printer with the fabric side down (print side) just like any normal paper.
- Set your printer to “Best Quality” and use plain paper or photo paper setting.
4. Print Your Design
- Print like you would on normal paper. Avoid high-contrast dark images for best fabric results.
5. Peel and Heat-Set (Optional but Recommended)
- Let the ink dry, then gently peel off the freezer paper.
- Heat-set the ink by ironing the fabric print on high heat (cotton setting) for 2–3 minutes using parchment paper in between.
FAQs About Freezer Paper Fabric Printing
Can you use a laser printer?
No. Only use inkjet printers, as laser printers heat up and can melt freezer paper inside the machine.
Is the print washable?
Light handwashing is best. For longer durability, use pigment ink or fabric-specific inkjet cartridges and heat-set thoroughly.
Can you reuse freezer paper?
Yes! You can often reuse a sheet 1–2 times before it loses its sticking ability.
What Type of Images Can You Print on Fabric Using Freezer Paper?
Here are some ideal types of images that work well with this method:
1. Watercolor Paintings or Illustrations
- Soft gradients and artistic details transfer beautifully.
- Great for pillows, wall hangings, or fabric art.

Printing art on fabric
Related: Make Fabric Paper for Journal and Artwork
2. Photographs
- Family portraits, pets, or travel snapshots.
- Ideal for quilt blocks, keepsakes, or gifts.

Printing images on fabric
3. Vintage Graphics and Ephemera
- Old postcards, stamps, book pages, or botanical prints.
- Use for journals, mixed media art, or sachets.
4. Typography and Labels
- Quotes, affirmations, or custom logos.
- Excellent for handmade product labels or gift tags.
5. Kids’ Drawings or Handwritten Notes
- Scan and print their original artwork or letters.
- Make memory pillows or custom aprons.
6. Seasonal and Holiday Designs
- Snowflakes, fall leaves, hearts, or spooky silhouettes.
- Great for seasonal banners, placemats, or stockings.
7. Travel and Keepsakes
- Photos from your trips, family tree
- Memory keepsake images that you want to cherish or gift!
What Projects Can You Make Using Fabric Prints?
Here are popular projects that work beautifully with fabric printing using freezer paper:
- Decorative Throw Pillows: Print watercolor landscapes or personal designs to sew into accent pillows.
- Quilt Blocks or Memory Quilts: Print photos, handwriting, or dates for heirloom-quality quilts.
- Tote Bags and Zipper Pouches: Add artistic prints or meaningful quotes to functional items.
- Custom Clothing Labels: Print your brand logo or care instructions and sew into handmade garments.
- Fabric Wall Hanging or Poster: Frame a printed piece of fabric as a rustic or modern decor statement.
- Soft Fabric Books or Quiet Books: Use for storytelling, sensory play, or teaching aids for children.
- Handmade Gifts and Keepsakes: Printed sachets, bookmarks, napkins, or aprons personalized with photos or text.
Bonus Tip:
- Use light-colored, tightly woven cotton fabric for the sharpest, most vibrant results.
- Pre-wash the fabric before printing to prevent shrinkage and blotting
- Heat-set the ink before making your projects to improve washability.

How to make picture pillow?
Make Picture Pillow
MATERIAL:
- Printed fabric
- Sewing machine
- polyfill or polyester stuffing
INSTRUCTIONS:
To make the pillow, I put the two right sides together and sew around the outside. Leaving about a 3 inch gap to turn the pillow right side out. Next stuff your pillow will polyfill. Hand sew to close the pillow.
You can also instead sew an insert and fill it with polyfill and use your printed pillow as pillow cover on top. It will make it easier to wash and maintain the pillow for long term.
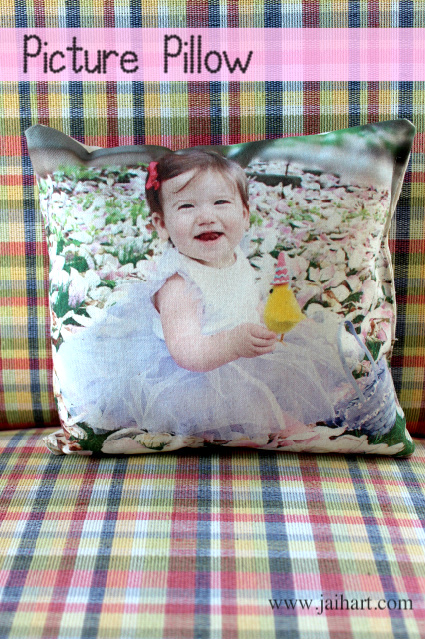
This will make a great Father’s day gift. I was so happy with the way this picture turned out. I knew I had to do something special with it.
Troubleshooting Freezer Paper Fabric Printing
Even with a solid method, hiccups can happen. Here are the most common issues and how to fix them:
1. Fabric Won’t Feed Through Printer
- Make sure freezer paper is ironed evenly with no bubbles.
- Trim to perfect 8.5”x11” (or A4) size with straight edges.
- Try a rear paper feed slot if your printer has one.
2. Ink Smudges or Bleeds
- Use tightly woven cotton (like poplin or muslin).
- Let ink dry completely before peeling off freezer paper.
- Iron with parchment paper for 2–3 minutes to heat-set ink.
3. Image Looks Faded or Washed Out
- Use high-resolution images and best print quality settings.
- Try pigment-based ink instead of dye-based for deeper color.
- Print on bright white or cream fabric for color accuracy.
4. Freezer Paper Doesn’t Stick
- Use medium-high heat with no steam.
- Replace sheet if it’s been reused too many times.
Comparison: Freezer Paper vs. Other Fabric Printing Methods
Not sure which fabric printing method is best for your project? Here’s how freezer paper compares to others:
| METHOD | COST | WASHABILITY | PROS | BEST FOR |
| Freezer Paper Printing | Low | Medium | Uses household printer, cheap, versatile | Pillows, labels, beginner projects |
| Iron-On Transfer Paper | Medium | Low | Easy to apply, but stiff feel and can crack | T-shirts, temporary decor |
| Printable Fabric Sheets | High | High | Professional results, no backing needed | Photo quilts, archival crafts |
| Sublimation Printing | High | High | Long-lasting and vibrant but needs special printer | T-shirts, mugs, polyester fabric |
| Fabric Markers/Stamps | Low | High | Great for kids or text-based designs | Custom patterns, small-scale detail |
Verdict: Freezer paper printing is perfect for crafters who want a budget-friendly, creative method for making custom fabric pieces without special equipment.
Tested Fabric and Ink Combinations
From experience, not all fabrics and inks give the same results. Here’s what works best:
1. Best Fabrics for Freezer Paper Printing
- Cotton Poplin or Muslin – Tight weave, smooth surface, absorbs ink well.
- Linen-Blend Fabrics – Great texture but avoid loose weaves.
- Canvas or Duck Cloth – Good for bags or wall art, though stiffer.
2. Avoid These Fabrics:
- Stretchy knits or jersey – May jam printer or distort image.
- Fuzzy textures like flannel or fleece – Blur details.
- Polyester – Needs sublimation or special coatings.
3. Ink Recommendations
| INK TYPE | PROS | BEST FOR |
| Pigment Ink | Water-resistant, fade-proof | Long-term prints, washable items |
| Dye Ink | Brighter colors, lower cost | Decorative or non-washable items |
Pro Tip: Check your ink cartridge type—most Epson and Canon models use pigment ink, which bonds better to fabric.
Fabric Care Tips for Printed Projects
To preserve your design and extend the life of your printed fabric, follow these care guidelines:
1. Washing:
- Wait at least 24 hours after printing before washing.
- Hand wash gently in cold water with mild detergent.
- Do not scrub the printed area or twist the fabric.
- For machine-washable prints, use a delicate cycle inside a mesh bag.
2. Drying:
- Lay flat or hang to dry; avoid tumble drying unless tested.
- Keep out of direct sunlight to prevent fading.
3. Ironing:
- Always place parchment paper over the print before ironing.
- Use medium heat with no steam.
4. Storage:
- Store folded prints with acid-free tissue to prevent yellowing.
- Keep away from moisture or excessive heat.
Fabric printing with freezer paper is one of the most magical crafts I’ve ever tried—it blends creativity with DIY ingenuity, and it opens the door to endless customization. Whether you’re making gifts or designing decor for your home, this method will quickly become a favorite.
You can print a wide variety of images on fabric using freezer paper, and this technique opens up endless possibilities for creative, personalized projects.
You will also like:
Easy Decorative pillow tutorials


Yay! Thanks Hani! I feel so honored to be a guest designer! You're the BEST!
LOVE the pillow and the cute little girl in the picture!! What a sweet gift for moms!!
Hugs,
Michelle
Hi Jill!
Your pillow looks great and the photo you chose is adorable! I sometimes wish I could rock all the fun tulle skirts that the little girls I teach wear these days. Where were they when we were little? 🙂
Congrats on being a Guest Designer!
– Claire
What kind of fabric do you recommend for a clearer image printout? thank you!! fab DIY…I'll see if i can find freezer paper here in Mexico City and try this for a great GrandMother's day gift
“not sure what the name of the fabric is but it was a little thicker material more canvas like. That fabric is all I've used. But I'm sure you could use any white or light colored fabric. Try a scrap piece and see if you like it.” said Jill
Thanks for hosting, Hani!
Also, you can add embroidery to your pillow to give it depth 🙂
HI
Where can i do the printing….
In photo studios and all ,they will print ?
Or any specific machines are there in chennai?
can u pls give me details….
Hi, you can use any basic home printer for making this project.
Does the fabric have to be 8 1/2 x 11 as well? Your pillow looks larger. Just trying to figure out how it will pass through my printer without jamming it. 🙂
Thanks!
You can make a smaller size pillow it’s up to you. I hope this helps!
Can you wash these without the print washing out?
Hi, hand wash only to keep it looking pretty for long.
going to try but will the fabric get stuck in printer? just nervous but will try thank you
Yes nervous for sure! I haven’t tried it personally but my guest blogger has shared her experience about the concern you have!