This post may contain affiliate links. Please see our full Disclosure Policy for details.
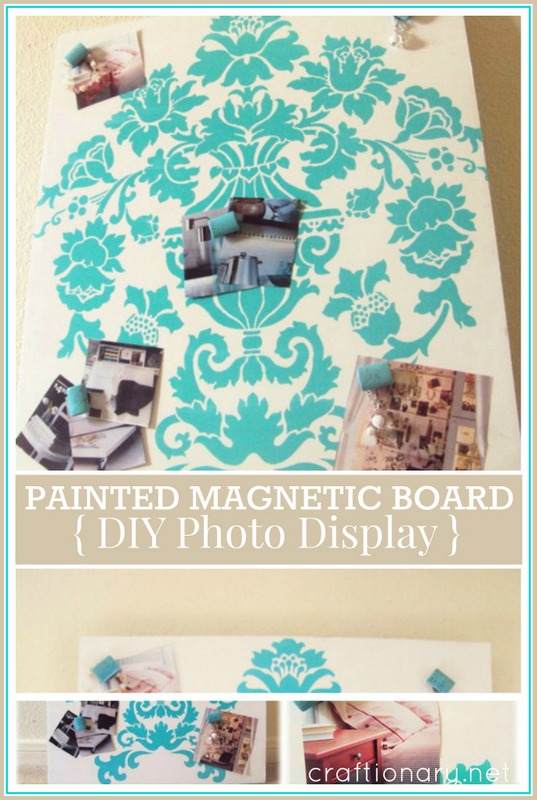
Need a creative solution for organizing notes, photos, or to-do lists without sacrificing style? A painted magnetic board is the perfect DIY project that combines function with flair. Whether you’re setting up a home office, a command center in the kitchen, or a kids’ art corner, a custom-painted magnetic board adds personality while keeping things tidy.
You’ll learn how to make a painted magnetic board from scratch, plus inspiring ideas to customize it for your space.

Why Make a Painted Magnetic Board?
- Organizational tool: Keep reminders, appointments, and ideas in one easy-to-see spot.
- Home décor upgrade: Add color and character to any room.
- Kid-friendly fun: Use for alphabet magnets, art displays, or activity charts.
- Customizable: Paint it to match your style or seasonal themes.
- Creative Outlet: A fun and rewarding DIY project.
- Custom Size: You can make it as large or small as you need.
Materials
- Foam board
- A Metal Sheet: This is your magnetic surface. You can often find these at hardware stores (look for thin sheet metal or even a metal baking sheet for a smaller project). Important Note: Ensure a magnet sticks to it before you begin!
- E6000
- Turquoise beads and magnets (glue the beads to make decorative magnets for the board)
- Scissors or craft knife
- Ruler and pencil
- Primer (Optional but Recommended): A metal primer will help your paint adhere better and prevent rust.
- Paint: Choose your favorite color(s)! Acrylic, enamel, or even spray paint designed for metal will work.
- Paint Rollers or Brushes: Depending on the size of your board and your preferred application.
- Sandpaper (Fine-grit, Optional): To lightly sand the metal surface for better paint adhesion.
- Clean Cloth: To wipe down the metal sheet.
- Protective Covering: Newspaper or a drop cloth to protect your work surface.
- Strong Adhesive or Mounting Hardware
Step-by-Step Instructions:
1. Prepare Your Frame and Metal Sheet
Pick a frame size that suits your space. Remove the glass and backing. Cut a galvanized steel sheet to fit inside (hardware stores can often do this for you). Wipe the metal sheet clean. If needed, lightly sand the surface to help paint adhere better.
2. Apply Painter’s Tape and Paint
Use painter’s tape to create borders, geometric designs, or color-block patterns. This step is key if you want a clean, professional finish. Spray or brush on your chosen paint. Let dry thoroughly, then apply a second coat if needed. Use chalkboard or dry erase paint for added functionality!
- Stencils: You can use stencils for decorative touches. to add patterns or designs to your board. Secure the stencil with tape and paint over it.
- Ombre: For a more artistic look, try sponge-painting or blending two colors for an ombré effect.
- Freehand Painting: If you’re feeling artistic, go ahead and paint a design freehand!
Related: How to Use a Stencil to Paint on a Board (Without Bleeding)
3. Assemble the Board
Once dry, insert the painted metal sheet into the frame. If there’s no backing, secure it with foam board or MDF using strong glue ((like E6000) or clips. If needed, use a craft knife and ruler to cut it to the perfect dimensions. A thicker foam board (at least 3/8”) offers more stability.
Make or buy magnets to match your theme. For lighter metal sheets, strong adhesive strips designed for walls might work. For heavier pieces, use appropriate mounting hardware (screws and anchors) that can support the weight.
Stick the ribbon on the sides to give it a more complete look.

Tips for Magnetism:
- Test your paint: Make sure it sticks well to metal before committing.
- Use strong magnets: Not all magnets work well on painted surfaces. Neodymium magnets are best.
- Keep it lightweight: Choose a thin metal sheet and light frame to ensure easy hanging.
- Experiment with finishes: Glossy, matte, and textured paints each offer a unique look.

Tips for a Perfect Painted Magnetic Board:
- Ventilation is Key: Always paint in a well-ventilated area, especially when using spray paint or enamel paints.
- Thin Coats are Better: Apply multiple thin coats of paint rather than one thick coat to avoid drips and ensure even coverage.
- Patience is a Virtue: Allow each layer of primer and paint to dry completely before moving on to the next step.
- Test Your Magnets: Once finished, ensure your magnets adhere well to the painted surface. Some very thick layers of paint might slightly reduce magnetic strength.

Easy Magnetic Frame
Add a sheet of metal into a frame and voila! Magnetic board is ready. You can also cover it will fabric or burlap. Looks decorative and complete. If you have old baking trays they are also good to use.

Magnetic Frame
Related: Best DIY Magnetic Boards tutorials of all time
Project Ideas to Spark Your Imagination:
1. Kitchen Command Center: Paint it a bright, cheerful color and use it for coupons, grocery lists, meal plans, and family reminders.
2. Home Office Organizer: A sleek, solid color board for to-do lists, inspiration clippings, and important documents.
3. Kids’ Art Display: Let your little ones help paint it with fun colors and use it to showcase their masterpieces.
Related: Best ideas to display kids art at home
4. Kids’ Activity Board: Paint it with bright colors or characters. Use it for magnetic letters/numbers or reward charts.
5. Gallery Wall Addition: A smaller, uniquely designed magnetic board to display photos and small decorative items amongst framed art.
6. Entryway Catch-All: A stylish board near the door for keys, notes, and outgoing mail (using magnetic clips).
7. Photo Collage Display: Paint the metal sheet white or neutral. Use mini magnet clips to showcase polaroids, postcards and notes from friends.
8. Seasonal Decor Swap Board: Customize with stencils or vinyl decals. Update your board seasonally with holiday magnets, seasonal messages, and special occasions lists.
9. Mini Boards: Cut foam board into smaller pieces to create personal boards for kids’ desks or lockers.
10. Chalk and Magnet Combo: Paint part of the board with chalkboard paint for a dual-use surface.
11. Magnetic Calendar: Divide the board into sections for a reusable monthly planner.
Tried to create magnetic field on foam boards:
Paint the foam board with nice two to three coats of magnetic paint or use roller to paint. The coats determine the strength of the magnetic field. You will need to check the strength you require, before moving to the next step. Let it dry and then spray it with two-three coats of white paint. When finished arrange the stencil on the board to paint your design.
Results: The magnetic field was temporarily developed but failed to work after few days.
A DIY painted magnetic board is more than just a practical accessory—it’s a stylish, personalized feature that can transform any wall into an organized, creative space. With endless possibilities for customization, it’s the perfect weekend project for crafters of all skill levels.
What color or design are you envisioning for your magnetic board? Share your ideas in the comments below!
You will also like:
20 Decorative pillow tutorials


Hey, I love our magnet board! Awesome! And who knew there was such a thing as magnetic spray paint? I sure didn't know. I think your board looks good with the white frame.
LOVE this!!! 🙂 I definitely need one of these for my craft room/office space! Off to pin it now!!
BEAUTIFULLY done! What a pretty colour too.Deborah
Great idea! I can't believe that is made from foam board & magnetic paint! I am definitely going to have to try that!
I love this. Anything with a damask print is fantastic in my book, but this one takes the cake. Love it. Thanks so much for linking up!
new follower!
This is so pretty! I love the damask print & the color is fantastic! Great job & so creative!I would love to have you share this project
Love the color and the print!! SO CUTE!
I guess you'll want to place a facebook button to your site. Just marked down this article, although I must complete it by hand. Simply my $.02 🙂
My site:
comparatif rachat credit Rachat de Credit
I love the stencil you used! It's so pretty and perfect and I love magnet boards! This turned out awesome!~Jessa
Oh my goodness!! How GORGEOUS!!! Would LOVE for you to link this up at my brand new turquoise lovin' party!! 😉 I want to learn this so I will be marking for pinterest!
beautiful stencil and colour choice. I love damask.
loving the magnetic board…great idea and sooo pretty with the choice of stencil….nice to meet you…come on over and visit me too…following now…Mariaelena
I like the white frame best. Great job!
I love the white frame best. Great job! Inspirational.
love this magnetic stencil board-I'm your newest follower!
wow I love that stencil and it looks so beautiful on that bored. Thank you so much for sharing and for linking up to Show and Share #2. I hope you are having fun at the party 🙂 A mommy's life…with a touch of YELLOW
Gorgeous. I can't believe it started as foam board.
That turned out beautiful! I love the stencil! Thanks for linking up at Show and Share!
Marie
mylilpinkpocket.blogspot.com
What a fabolously unqique photo frame! You also stenciled it in one of my favorites colors!
This is great! What a cool idea. I'd love if you stopped by my blog and checked out the giveaway I'm having for a Dremel Trio!
I love what you did with the Encantada Damask Stencil Hani! Thanks for creating such a great project with it. As for the frame-it's hard to say because they all look good! Best-Melanie
Love this! I alwasy forget about magnetic paint! Genius Your board turned out beautifullly! Thanks for the inspiration and the tips about the spray adhedsive!
Your magnetic boards look great!
I love that stencil.
gail
this is so pretty! I love the blue color! thanks so much for linking to handmade tuesdays
You've been featured 🙂
I love damask anything!! Your bulletin board is wonderful and I love the color you picked! I have used many of Royal Design stencils and love to just look at their web site imagining new projects to take on. Here is a stencil project I did on some outdoor fabric
SO happy you linked this up at my turquoise lovin' party!! Hope to have you back again soon!
This is SO cute! wow! I love it!I would love it if you would share this and/or any other projects you have been up to at Tuesday Talent Show at Chef In Training Tomorrow! Plus there is going to be a fun giveaway too! Thanks so much and I hope to see you there!
Cool project and great tutorial! I linked this to my Damask post today, for inspiration!
love the stencil you used!!! greetings, angie
What a pretty stencil! And it's Turquoise! Love it. It looks easy enough for me to try. It would look perfect in a little girl's room
It's beautiful. The choice of color is very good. I like the way you created those magnets.If you ask me, I like it the way it is- frameless!Thanks for linking up at Tea Time Thursdays @ Kreative Korner and adding to the fun. The party for this week is going on… hope to see you there again 🙂
So cool! I am hoping to mash this tute up with a Better Homes & Garden (I think)tute using acrylic panels and transparent photos… What an awesome idea and beatuiful, beautiful product. I think it looks grand without a boarder. I think it would look awesome in a dorm. My cousins would die for one. Thanks for posting such a great project.
Well magnetic photo frame is a right name that suits this texture must say, it looks amazing.
Oh Wow, that looks so stylish, what a great job you did, Karima
What a great idea! Who knew you could make foam board magnetic 🙂 LOVE the stencil!
I love red with this color. I am going to search for the magnetic paint, how neat!
Do you make a custom board with a magnetic surface, frame and a painted initial? I’m looking for a large size such as 30×40
You can go to home depot and get a steel sheet and have one of the workers cut it to your custom dimensions. You can then spray paint it and put inside of any frame. I made one for my crafts room, it works perfectly. Hope this helps!