This post may contain affiliate links. Please see our full Disclosure Policy for details.
Use embroidery hoop and fabric cutout flowers to create a beautiful DIY flower chandelier for floral decor.
A flower chandelier is a beautiful and whimsical way to add elegance to any space. Whether for a baby nursery, wedding, baby shower, birthday party, or home decor, this DIY floral chandelier is a fun and creative project. Using fabric cutout flowers, a flower die, and embroidery hoops, you can craft a lightweight, long-lasting floral piece that looks stunning in any setting.
In this step-by-step guide, we’ll show you how to make a fabric flower chandelier using simple materials, so you can create a statement piece for your event or home.
Why Make a Fabric Flower Chandelier?
Unlike real flower chandeliers, a fabric flower chandelier is:
Durable and long-lasting: No wilting or drying out
Budget-friendly: Uses scrap fabric for a sustainable decor option
Lightweight and easy to hang: No heavy floral foam or water needed
Customizable: Choose fabrics that match your decor style

Flower chandelier tutorial
Materials and Supplies:
- Fabric of your choice (cotton, felt, chiffon, or tulle)
- Flower die and die-cutting machine (or fabric scissors for hand-cut flowers)
- Embroidery hoops (various sizes for layered effects)
- Fishing line or clear thread
- Glue gun or needle and thread
- Beads, pearls, or buttons (optional for flower centers)
- Ribbon or chain (to hang the chandelier)
- LED fairy lights (optional for extra glow)
Instructions to Make Flower Chandelier
Cut the Fabric Flowers
I raided my stash of fabric for all the white ones and found some plain and some patterned fabrics. I cut them into roughly 3 inch squares. Then I used a flower die on the squares and proceeded to cut a ton of flowers out. It was not that hard actually, as I used 6-8 pieces at a time. And my little girl wanted to help. I ended up cutting about 300 fabric flowers.
If you have a flower die or die-cutting machine, place your fabric inside the machine and press to cut multiple flowers at once. If cutting by hand, use a flower template and sharp fabric scissors for clean edges.
For a realistic look, cut flowers in different sizes and layer them for depth.
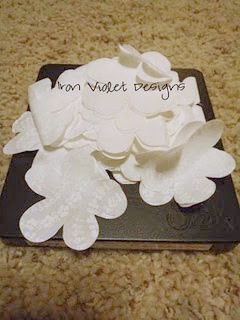
Fabric cut flowers
Assemble the Flowers
- Add small beads or pearls to the center for extra detail to felt or cotton fabric.
- Lightly singe the edges with a candle or lighter to prevent fraying to chiffon or tulle.
- You may layer flowers together and attach them with hot glue or a few stitches (optional).
Prepare the Embroidery Hoops
Decide whether you want a single-tier or multi-tier chandelier. If layering multiple hoops:
- Use the largest hoop as the base and smaller hoops above for cascading flowers.
- Wrap the hoops with ribbon or fabric for a polished look.
Cut varying lengths of fishing line or thread to create a floating effect. I took three embroidery hoops all different sizes, painted them white and tied them together. This part of actually the hardest of the entire project.
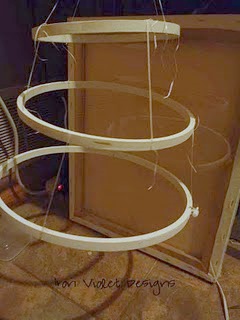
Embroidery hoops chandelier
Attach the Flowers
Sew all the flowers together into one long row with a needle, sewing machine, or glue. Now glue the strand of flowers to the top, middle, and last hoop as you go down. Cut them to the desired length as you go. Continue till the entire chandelier is covered.
Make sure to tie or glue each strand to the embroidery hoop, spacing them evenly.

DIY Flower Chandelier
Assemble and Hang the Chandelier
- Attach 3-4 ribbons or chains to the embroidery hoop and gather them at the top to form a hanging loop.
- Secure the chandelier to a hook, ceiling mount, or event stand.
- If adding LED fairy lights, wrap them around the embroidery hoop or intertwine them with the flowers for a magical glow.
Styling and Usage Ideas
- Wedding Decor: Hang above tables or as a ceremony backdrop.
- Nursery or Kids’ Room: A whimsical hanging floral piece.
- Outdoor Garden Party: Create a dreamy atmosphere with pastel flowers.
- Home Decor: Place in a cozy corner for a touch of nature indoors.
Making a DIY flower chandelier with fabric cutout flowers, a flower die, and embroidery hoops is a creative and budget-friendly way to decorate your space. Whether you’re crafting for a special event or simply enhancing your home’s aesthetic, this project allows you to customize colors, textures, and styles to fit any theme.
You May Also Like:
60 Best Balloon decoration ideas for any party


I love the chandelier! So neat!
Me too! Loving the chandelier.
So pretty!!! I always LOVE the projects Jen links up at Fancy This Fridays!! 🙂 Great guest post!
thanks for sharing this lovely creation !
I love this. It looks expensive but it seems like a very budget friendly and doable project! Putting on my “to-do” list.
Thanks so much for the feature Hani!
Wow this is an excellent example of “beauty in simlicity”. Keep up the good work, thanks a lot for sharing
wooooooowwwwwwww… i think i'm gonna try that 🙂
Regards for all your efforts that you have put in this.
I like your article.Thanks for this post.
I like your all designs. Thanks for this post.
I think you’re doing a fantastic job. I appreciate your article. Thank you very much for provide good information.
Great designs. I like all the designs. Thanks
I really like the way you have written this article for us. I would greatly appreciate your writing skills and can expect few more article in near future.
I like your post. The flower quilt look great.
=I am glad to find your distinguished way of writing the post. Thanks