This post may contain affiliate links. Please see our full Disclosure Policy for details.
Crochet has evolved. Today, it isn’t just about making things—it’s about mindful creation, sustainable fashion, and 3D texture. Whether you’re a complete beginner or an intermediate crafter looking to level up, this guide provides creative inspiration you need to start making your own unique projects.
Getting Started with the Essential Supplies
To create high-quality crochet projects that last, you must start with the right materials. Avoid the beginner’s trap of buying low-quality yarn that splits.
- The Golden Standard Hook: For beginners, an H/8 (5.0mm) ergonomic hook is the most versatile. Look for hooks with a soft grip to prevent hand fatigue during longer sessions.
- The Right Yarn: Start with a Worsted Weight (#4) cotton or acrylic blend in a light, solid color. Pro-tip: Avoid dark or variegated yarns for your first project, as it makes seeing your stitches nearly impossible.
- Modern Essentials: You’ll also need a tapestry needle, sharp snips, and—most importantly—stitch markers. Markers are non-negotiable for keeping track of your rows in complex textures.
Learn from my mistakes and start right: Beginner Crochet Plant Free Pattern for First-time Crocheters
Mastering the Foundation: Key Stitches and Techniques
Before diving into a pattern, you must master the Big Three. These stitches form the DNA of almost every crochet project.
- The Chain (ch): The foundation of most flat projects. The key here is tension. If your chain is too tight, your project will bow at the bottom.
- Single Crochet (sc): The workhorse of the crochet world. It creates a dense, sturdy fabric—ideal for amigurumi (plushies) and home decor.
- Double Crochet (dc): Faster and more flexible. This is the go-to stitch for blankets, scarves, and the trending oversized silhouettes seen in fashion.
Expert Tip: If your edges look wobbly, you are likely missing the last stitch of the row or accidentally adding one in the turning chain. Always count your stitches at the end of every row!
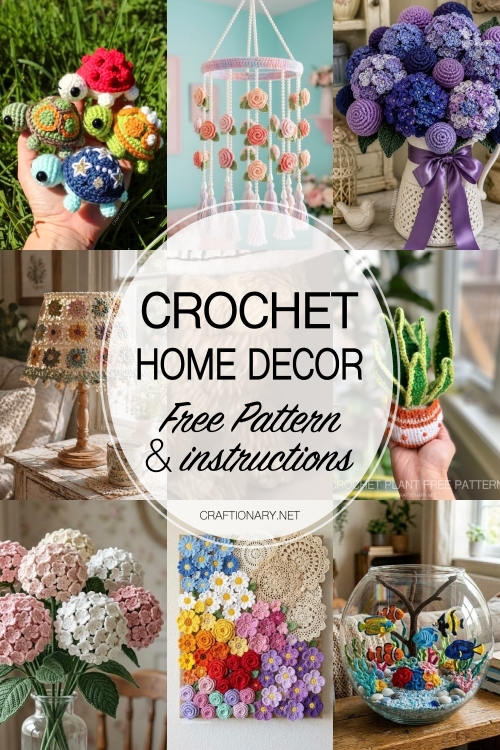
Extraordinary Crochet Project Ideas:
What should you make first? Based on current trends, these projects offer the best balance of ease of make and style.
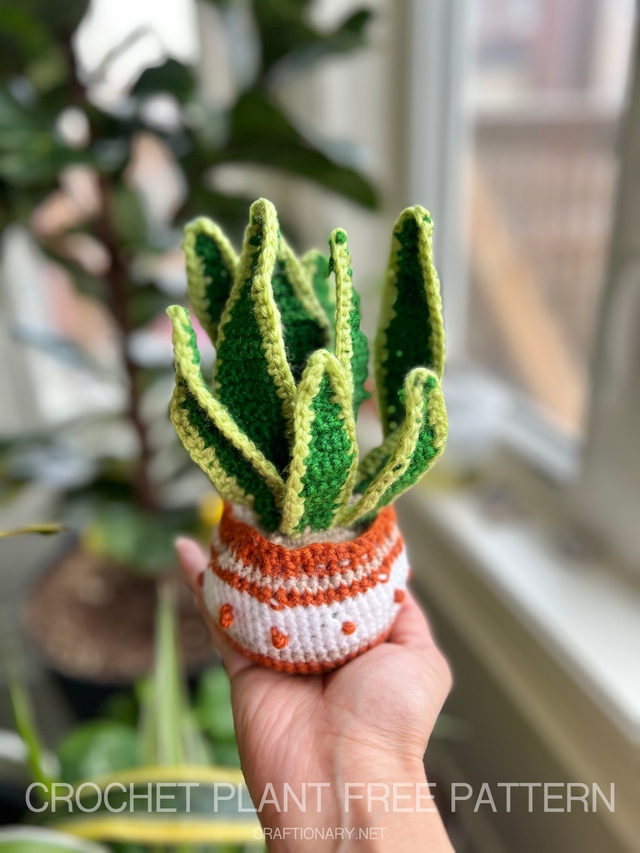
1. Crochet Snake Plant Free Pattern:
The 3D Snake Plant (Intermediate): Houseplant crochet is a massive trend. This project uses simple stitches but require reinforcement techniques (like using cardboard or pebbles in the base) to stand upright.
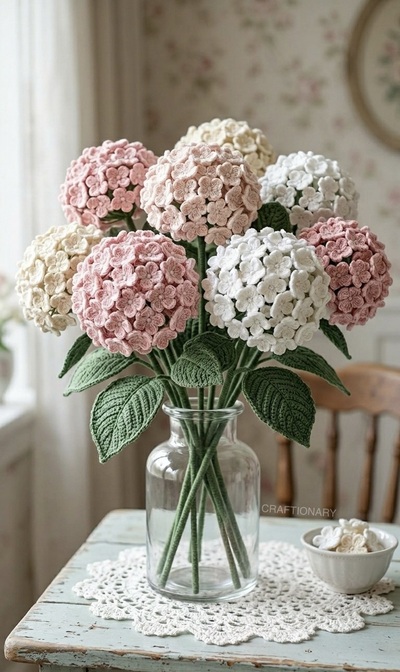
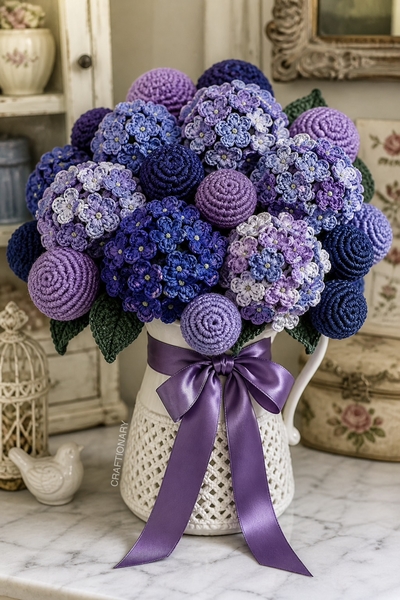
2. Crochet Hydrangea Bouquet Free Pattern:
Crochet Realistic Hydrangea Bouquet (Intermediate): Find instructions and free pattern to make individual florets, leaves, and assemble the project using styrofoam or bunching technique.
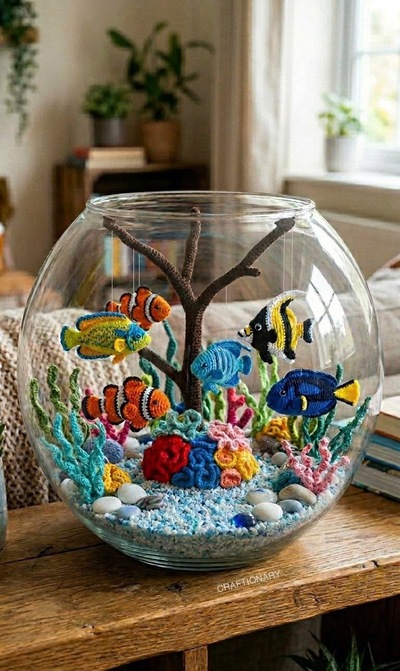
3. Crochet Aquarium in a Fishbowl Free Pattern:
Learn how to make a stunning DIY crochet aquarium. This complete beginner’s guide covers amigurumi fish, crochet coral reefs, and assembly tips to create a water-free masterpiece.
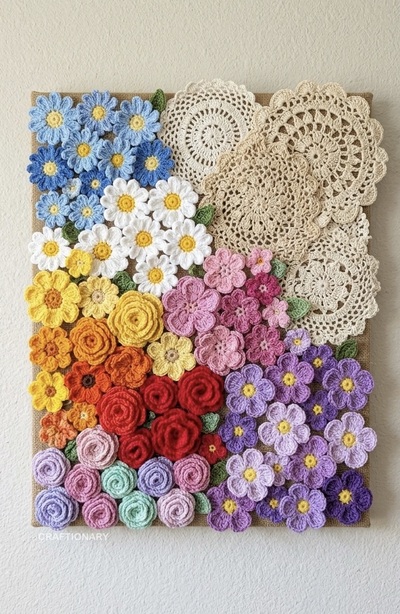
4. DIY Crochet Flower Wall Art
Creating a vibrant, three-dimensional masterpiece like the one in image.png is a rewarding way to blend needlework with home styling. This floral collage style, often called dopamine decor, uses a variety of textures and colors to transform a plain canvas into a stunning focal point.
You will need:
- Yarn: DK or worsted weight cotton yarn (it holds its shape better and doesn’t fuzz like acrylic).
- Crochet Hooks: 3.5mm or 4.0mm.
- Canvas: A burlap-covered or plain 12 x 16 stretched canvas.
- Vintage Accents: Assorted crochet doilies (upcycled from thrift stores or heirlooms).
- Adhesive: A high-temp hot glue gun or fabric glue.
- Optional: Scrabble tiles for personalization.
Step-by-Step Instructions:
1. Crochet Your Flowers
The beauty is in the variety. You don’t need to be an expert; you just need a few basic shapes:
- Simple 5-Petal Daisy: Magic ring, chain 2, 2 DC, chain 2, slip stitch into ring. Repeat 5 times.
- Layered Roses: Crochet a long chain, work one row of 3-DC clusters in every other stitch, then roll it into a spiral and sew the base.
- Vibrant Pansies: Use two colors—one for the center and one for the outer wing petals.
2. Prepare the Anchor Pieces
Vintage doilies provide the lacy backdrop.
- Cleaning: Gently hand-wash vintage doilies in lukewarm water with mild detergent and lay flat to dry before mounting.
- Layout: Place the largest doilies first. They act as the foundation for your floral growth.
3. The Flow Arrangement
Don’t glue anything yet! Follow this professional layout strategy:
- The Diagonal Rule: The flowers flow from the bottom-left to the center.
- Color Blocking: Group similar hues (blues together, reds together) to create a rainbow or ombre effect.
- Height and Depth: Overlap flowers and tuck small green leaves underneath to hide any gaps and add realism.
4. Mounting and Securing
- Use a small dab of hot glue on the center of each flower first. This allows you to tuck leaves or smaller blooms around the edges later.
- For doilies, use a tape runner or small glue dots if you ever want to remove them without damaging the lace.
- How do you stop my crochet flowers from sagging on the wall? If your flowers feel too heavy, use a smaller hook size than recommended for your yarn. This creates a stiff stitch that holds its shape without extra support.
- Whip Stitch: A simple sewing stitch used to join crochet pieces together.
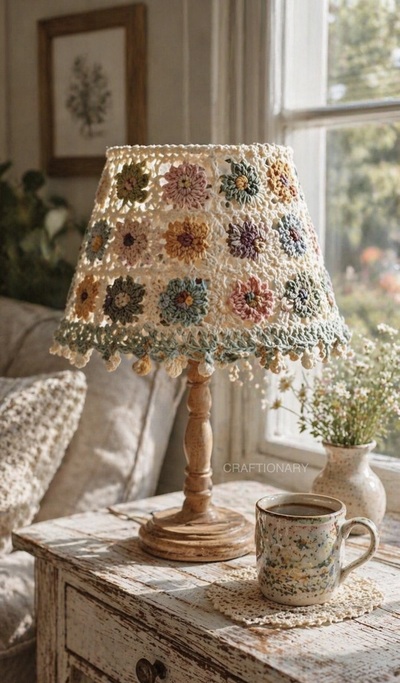
5. DIY Crochet Lampshade Cover:
Transforming a basic lamp into a stunning statement piece is one of the most rewarding ways to personalize your home. You can repurpose crochet doilies, crochet coasters, or make granny squares from scratch to make a lampshade like this.
You will need:
- Yarn: Fine weight (Level 2) or DK weight cotton yarn. Cotton is preferred over acrylic because it is more heat-resistant and has better stitch definition. You will need an off-white/cream base and various muted pastels (dusty rose, sage, mustard, lavender) for the flowers.
- Crochet Hook: 3.0mm or 3.5mm.
- Lampshade: A plain, tapered, or drum-style lampshade to use as a frame.
- Extras: Stitch markers, tapestry needle, and a strand of elastic cord (optional for securing the bottom).
Step-by-Step Instructions
1. The Floral Motif (Make 12-18 depending on shade size)
The cover is made of individual squares joined together.
- Round 1 (Center): With a flower color, 6 Single Crochet (SC) in a Magic Ring. Join with a slip stitch.
- Round 2 (Petals): Chain 3, 2 Double Crochet (DC) in the same stitch, Chain 3, Slip Stitch in the same stitch. Repeat in each of the 6 stitches to create 6 petals. Fasten off.
- Round 3 (Squaring): Join the cream yarn in any petal space. Work a series of SC and Chain spaces around the flower to create a square frame.
2. Measuring for the Taper
Most lampshades are wider at the bottom than the top.
- The Top Row: Join your motifs together in a circle that fits snugly around the top rim.
- The Middle Rows: As you move down, you may need to add filler stitches or chains between motifs to accommodate the increasing circumference of the shade.
3. The Edging and Tassels
The bottom of the cover in the image features a beautiful picot edge and small dangles.
- Edging: Work a row of SC around the bottom. In the next row, SC in 3 stitches, Chain 3, Slip Stitch in the first chain (this creates a picot), SC in next 3.
- Tassels/Dangles: Chain 5, work a 3-DC cluster in the 3rd chain from the hook, Chain 2, and Slip Stitch back into the base. This creates the bobble effect seen hanging from the fringe.
4. Assembly
- Block your motifs before joining to ensure they are all the same size. Blocking: Pinning your crochet pieces to a board and steaming them so they lay perfectly flat.
- Whip-stitch the motifs together using the cream yarn and a tapestry needle.
- Slide the finished cover over your lampshade. If it feels loose, thread a thin elastic cord through the top and bottom rows and tie it hidden on the inside.
Is a crochet lampshade a fire hazard?
Safety first! Always use LED bulbs with crochet covers. LED bulbs generate very little heat compared to traditional incandescent bulbs, making them safe to use with fiber arts. Additionally, ensure the crochet cover is not directly touching the bulb.
How do you clean my crochet lampshade cover?
Because the cover is removable, you can gently hand-wash it in cool water with a mild detergent. Lay it flat to dry to maintain its shape.
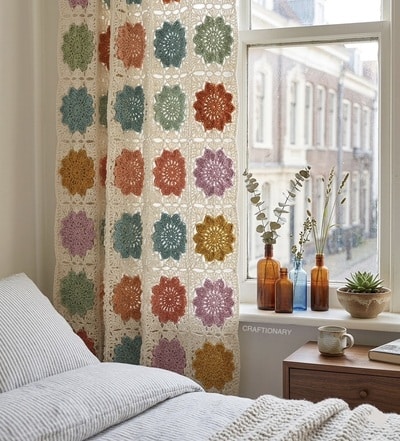
Similarly, you can make a curtain.
6. How to Crochet a Mini Turtle:
A turtle is the ideal starter project because it uses basic shapes and foundational stitches. Turtles are essentially a collection of spheres and semi-spheres. By making one, you will learn the three golden rules of amigurumi:
- The Magic Ring: Starting a project without a hole in the center.
- Continuous Rounds: Creating seamless 3D shapes.
- Invisible Decreasing: Reducing your stitch count without leaving unsightly gaps.
You will need:
- Yarn: Cotton or cotton-blend yarn (Weight 4/Medium) works best because it doesn’t fuzz and shows off stitch detail.
- Crochet Hook: 3.25mm (D) or 3.5mm (E). Using a hook slightly smaller than the yarn recommends ensures your stitches are tight enough to keep the stuffing inside.
- Eyes: 6mm or 8mm plastic safety eyes.
- Stuffing: High-quality polyester fiberfill.
- Extras: Stitch markers, a tapestry needle, and embroidery thread for shell details (like the stars seen on the blue turtle).
Step-by-Step Instructions:
1. The Head (Make 1):
- Round 1: 6 Single Crochet (SC) in a Magic Ring. (6)
- Round 2: 2 SC in each stitch around. (12)
- Round 3: 1 SC, 2 SC in next stitch. Repeat around. (18)
- Round 4-6: SC in each stitch around. (18)
- Round 7: 1 SC, Decrease (dec). Repeat around. (12)
- Eyes: Insert safety eyes between rounds 5 and 6.
- Round 8: Dec around. (6) Fasten off and leave a tail for sewing.
2. The Shell (Top):
This is where you can get creative with colors!
- Round 1: 6 SC in a Magic Ring. (6)
- Round 2: 2 SC in each stitch around. (12)
- Round 3: 1 SC, 2 SC in next. Repeat around. (18)
- Round 4: 2 SC, 2 SC in next. Repeat around. (24)
- Round 5-7: SC around. (24)
- Note: For the bumpy red shell in the image, substitute every 3rd stitch with a Popcorn Stitch or Bobble Stitch.
3. The Belly (Bottom)
- Repeat Rounds 1-4 of the Shell pattern. Fasten off.
4. The Flippers (Make 4)
- Round 1: 4 SC in a Magic Ring. (4)
- Round 2: 2 SC in each stitch around. (8)
- Round 3: SC around. (8) Fasten off.
5. Assembly: Bringing Your Turtle to Life
- Embroider the Shell: Before stuffing, add your details. You can sew on stars, French knots, or contrasting lines as seen on the turtles in the image.
- Join the Shell: Place the top shell over the belly. Use a tapestry needle to whip-stitch the two pieces together, stuffing firmly with fiberfill before you close the final gap.
- Attach the Head: Sew the head to the front of the shell where the top and bottom meet.
- Attach Flippers: Sew two flippers near the head and two near the back for balance.

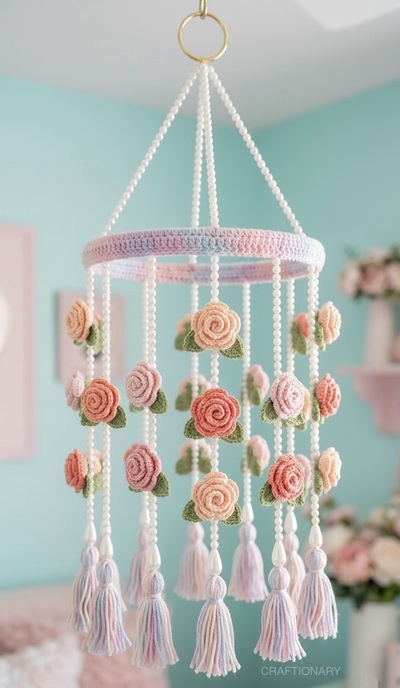
7. DIY Crochet Flower Mobile:
Creating a handmade nursery or room decor piece adds a personal touch that store-bought items simply cannot match. This DIY crochet flower mobile combines delicate textures, soft colors, and the timeless art of crochet to create a whimsical focal point for any space.
You will need:
- Yarn: Light-weight (DK) cotton or acrylic yarn in peach, pink, soft coral, sage green, and a variegated pastel for the hoop.
- Crochet Hook: 3.0mm or 3.5mm (depending on your tension).
- Hoop: A 10-inch bamboo or metal floral hoop.
- Beads: White or cream pearl-style beads (various sizes).
- Extras: Fiberfill (optional for 3D flowers), tapestry needle, scissors, and a metal ring for hanging.
Step-by-Step Instructions
1. The Crochet Roses (Make 12-15)
These roses are worked in a flat strip and then rolled to create the 3D effect.
- Row 1: Chain 31.
- Row 2: 2 DC in the 4th chain from the hook. Skip 1 ch, 3 DC in next ch. Repeat across.
- Row 3: 5 DC in the center of the 3-DC cluster, slip stitch in the space between clusters. Repeat to the end.
- Assembly: Roll the strip tightly to form a rose and sew the base with a tapestry needle to secure.
2. The Sage Green Leaves
- Chain 8. Slip stitch in 2nd ch from hook, SC in next, HDC in next, DC in next 2, HDC in next, (SC, ch 2, SC) in the last chain to turn.
- Work back down the other side of the chain: HDC, DC in next 2, HDC, SC, slip stitch to join.
3. Covering the Hoop
- Using the variegated yarn, join with a slip stitch to the hoop. Work Single Crochet (SC) stitches closely together all the way around the hoop until the metal/wood is completely covered. Fasten off and weave in ends.
- You may use a decorative lace and glue it to the embroidery hoop as well.
4. Creating the Beaded Strands
- Cut several lengths of sturdy thread or thin yarn.
- Thread your needle with a mix of pearl beads.
- At intervals, sew through a crochet rose and a leaf.
- Pro Tip: Tie a small knot under each bead or flower to keep them from sliding down the string.
- Finish the bottom of each strand with a handmade yarn tassel.
5. Assembly
Tie four equal lengths of beaded string from the hoop to the top metal ring to create the hanging structure. Then, space your flower strands evenly around the hoop.
How do you make the tassels look professional?
Wrap your yarn around a piece of cardboard about 4 inches wide at least 20 times. Tie the top, cut the bottom, and wrap a contrasting yarn around the neck of the tassel about an inch down from the top. Trim the ends for a clean, blunt edge.
Important tips:
- Tension Matters: Keep your stitches consistent so the flowers are uniform in size.
- Color Theory: Use a mix of warm (pink/peach) and cool (green) tones to create visual balance.
- Weight Balance: When hanging your strands, place them opposite each other (12 o’clock, 6 o’clock, 3 o’clock, 9 o’clock) to ensure the hoop hangs level.
Common Questions:
1. Is crochet easier than knitting?
Most beginners find crochet easier because you only deal with one active loop at a time. If you make a mistake, frogging (ripping out) your work is much simpler in crochet.
2. How do you fix uneven edges?
Uneven edges are almost always a result of tension control or stitch counting. Use a stitch marker in the very first and very last stitch of every row to ensure you never miss your mark.
3. What does Gauge mean and do you really need it?
Gauge is the number of stitches per inch. For a blanket, it matters less. For a sweater or hat, it is vital. If your gauge doesn’t match the pattern, your project won’t fit!
Crochet is a form of slow crafting—a way to disconnect from the digital world and connect with something tactile. Don’t rush. If a project takes three days to master a single chain, that’s okay. The beauty of crochet is in the rhythm of the hook and the satisfaction of a finished piece made by hand.
You will also like:
50 Free Amigurumi Crochet Patterns that are love
Free Crochet Dollhouse Pattern: Suitcase Style Playhouse
Beginner Crochet Plant Free Pattern for First-time Crocheters