This post may contain affiliate links. Please see our full Disclosure Policy for details.
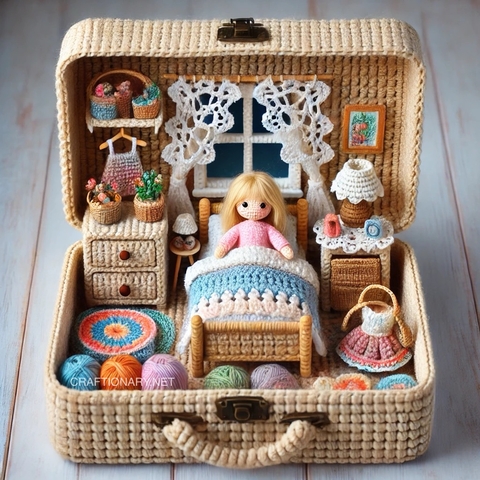
This crochet dollhouse free pattern is inspired by the beautiful vintage suitcase-style crochet dollhouse. This cozy miniature bedroom inside a suitcase features a crochet-covered case, a bed with blankets, furniture, decorative details, and a crochet doll.
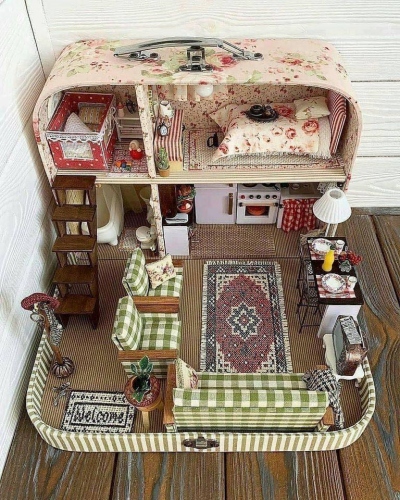
Vintage suitcase dollhouse
Inspired by this beautiful vintage suitcase dollhouse, I imagined what a crochet dollhouse in a box, container or even an old repurposed luggage bag look like! Learning how to make a crochet dollhouse is a fantastic way to craft a unique, handmade toy or display piece. Whether you’re making one for a child, as a collector’s item, or as a personalized gift, this guide will walk you through the process of creating a beautiful crochet dollhouse from scratch.
Why Make a Crochet Dollhouse?
- Handmade and Customizable: A crochet dollhouse is completely customizable-you can choose the colors, patterns, and furniture to match your vision.
- A Unique Gift or Heirloom: Handmade crochet projects make great gifts that can be treasured for years, passed down as a special keepsake.
- A Fun and Relaxing Craft: Crocheting is known for being a stress-relieving hobby, and making a crochet dollhouse allows you to enjoy both creativity and relaxation.
Free Crochet Dollhouse Pattern
Materials:
Before you start, gather the following supplies:
- Yarn (cotton or acrylic, various colors)
- Crochet hooks: 2.5 mm or 3 mm (sizes depending on yarn thickness)
- Stuffing (polyester fiberfill for furniture and soft walls)
- Plastic canvas or cardboard (for structural support)
- Tapestry needle (for weaving in ends)
- Scissors
- Fabric glue or stitch markers (optional)
- Small wooden beads or buttons (for drawer knobs and accessories)
- Air dry clay for forming decoration structures
Related: 30 Mini Clay Art Ideas for Tiny DIY Projects
Pattern Instructions: How to Make a Crochet Dollhouse?
1. Create the Base Structure
The foundation of your crochet dollhouse is the walls and floor. You can make this in two ways:
1: Soft Structure
- Use single crochet (SC) stitches to create rectangular panels for the walls and floor.
- Sew or slip stitch the panels together to form a house shape.
- Use polyester stuffing inside to make it plush and soft.
2: Sturdy Structure
- Crochet rectangular panels just like in Option 1.
- Cut plastic canvas or cardboard to the same size as the panels or use an old box or suitcase.
- Crochet around the edges of the panels, inserting the stiff support inside before closing the seams.
3: Old Suitcase
The suitcase structure is covered in tight crochet stitches to give it a woven, textured look.
Base and Lid:
- Using beige yarn, chain the width of the suitcase.
- Work in single crochet (SC) rows until you have a rectangular piece large enough to wrap around the suitcase.
- Repeat for the inside lining.
- Attach the two layers by sewing or gluing them onto the plastic or cardboard frame.
Suitcase Sides: Work SC stitches in the round to form the edges.
Handle: For the handle, crochet a short SC strap, fold it, and sew it onto the front.
Suitcase Closure and Detailing: You can use a real metal clasp or crochet a small button loop closure to keep it shut.
2. Crochet the Roof
- Make a triangle or sloped rectangle using single or double crochet stitches.
- Attach it to the top of your dollhouse with slip stitches or sewing.
- For a removable roof, use buttons or Velcro to attach it.
3. Design the Interior
Now it’s time to decorate the inside of your crochet dollhouse!
1. Crochet the Walls and Flooring
- Use different crochet stitch patterns to mimic brick walls, wallpaper, or wooden floors.
- Striped or granny square patterns work great for rugs and carpets.
- Crochet flat rectangular panels in beige for the walls.
- The window frame is crocheted separately in white or blue and sewn onto the wall.
2. Add Crochet Furniture
Create mini crochet furniture such as:
- Chairs and tables: Small cylinders or rectangles stitched together.
- Beds and sofas: Crochet rectangles stuffed with fiberfill.
- Curtains and rugs: Use lace or shell stitches for a decorative touch.
- Nightstand: Crochet small cube panels and stitch them together to form drawers.
- Lamp: Crochet cylinder with a cone-shaped top. You may use clay for structure and cover with crochet.
- Wardrobe: Crochet a box-like wardrobe structure using Single Stitch (SC) panels.
- Clothes: Crochet tiny hangers and mini clothes (like the dress hanging inside
- Tiny baskets: Single Stitch (SC) in the round and can hold mini crochet flowers.
3. Windows and Doors
- Crochet small rectangles for windows and stitch them onto the walls.
- Use contrasting yarn colors to create a cute front door.
- The lace curtains are made with a delicate chain stitch and picot pattern.
4. Bed and Mattress
Bed Frame:
- Chain the desired width of the bed.
- Work in SC to create two long panels for the headboard and footboard.
- Crochet side rails and sew all parts together.
- You can insert a small wire frame inside for sturdiness.
Mattress and Bedding:
- Crochet a soft rectangle for the mattress in light blue or white.
- Stuff it lightly and close the edges.
- Crochet a lacy blanket using shell stitch for texture.
Pillows
- Crochet a small square in SC, stuff with fiberfill, and sew shut.
- You can add a scalloped edging or embroidery for extra charm.
4. Crochet the Doll
- Head and Body: Start with a magic ring and work Single Stitch (SC) in the round for the head. Use peach yarn for skin tone. Continue working downward for the body, adding arms and legs separately.
- Hair and Face: Attach strands of yarn for hair, styled as needed. Sew black bead eyes and embroider a smile.
- Clothes: Make a tiny dress using Single Stitch (SC) and shell stitches.
5. Add Finishing Touches
Now that the structure is complete, add charming details:
- Embroider flowers, vines, or bricks onto the walls.
- Attach mini crochet plants, pillows, or dolls inside.
- Add LED fairy lights inside for a magical glow.
- Make intricate clay miniatures to decorate your dollhouse.

Free Pattern Crochet Dollhouse
Tips for Making a Crochet Dollhouse
- Use a sturdy yarn: Cotton yarn holds its shape well for structured designs.
- Stick to simple stitches: Single and double crochet stitches work best for firm panels.
- Make it modular: If gifting the dollhouse, consider making removable pieces so the recipient can rearrange furniture and rooms.
- Experiment with colors: Bright pastels or neutral shades can give your crochet dollhouse different aesthetics.
Frequently Asked Questions (FAQs)
1. How long does it take to make a crochet dollhouse?
It depends on the complexity, but a basic crochet dollhouse can take 10-20 hours to complete.
2. Can I wash a crochet dollhouse?
If it’s made entirely of yarn, you can spot-clean it with a damp cloth. If it has a plastic or cardboard base, avoid getting it wet.
3. What’s the best yarn for a crochet dollhouse?
Cotton yarn is ideal because it holds its shape and is durable. Acrylic yarn works well for soft dollhouses.
4. Can beginners make a crochet dollhouse?
Yes! If you know basic crochet stitches (single crochet, double crochet, slip stitch), you can follow this guide to create a simple dollhouse.
This crochet dollhouse with free pattern is a perfect handmade gift or keepsake that can be treasured for years. It’s a mix of crochet and crafting, giving a cozy and realistic miniature world inside a suitcase.
Written by: Hani Shabbir
You will also like:
70 DIY Dollhouse Ideas for all age enthusiasts
30 Mini Clay Art Ideas for Tiny DIY Projects
Please note: This is an inspirational project, with instructions and AI image generation to guide crafting original pieces for enthusiasts.