This post may contain affiliate links. Please see our full Disclosure Policy for details.
If you’re looking for an affordable, lightweight, and creative way to add a custom chalkboard to your home, office, classroom, or event setup—foam board is a brilliant alternative to heavy wood or slate chalkboards. It’s easy to cut, paint, and hang, making it perfect for beginners and seasoned DIY crafters alike.
You will find step-by-step process of making your own foam board chalkboard, share expert tips, and explain how to maintain it for long-term use.
Why Make DIY Chalkboard using foam boards?
It is a great substitute to wooden board, as it is light weight, eco-friendly, and recyclable.
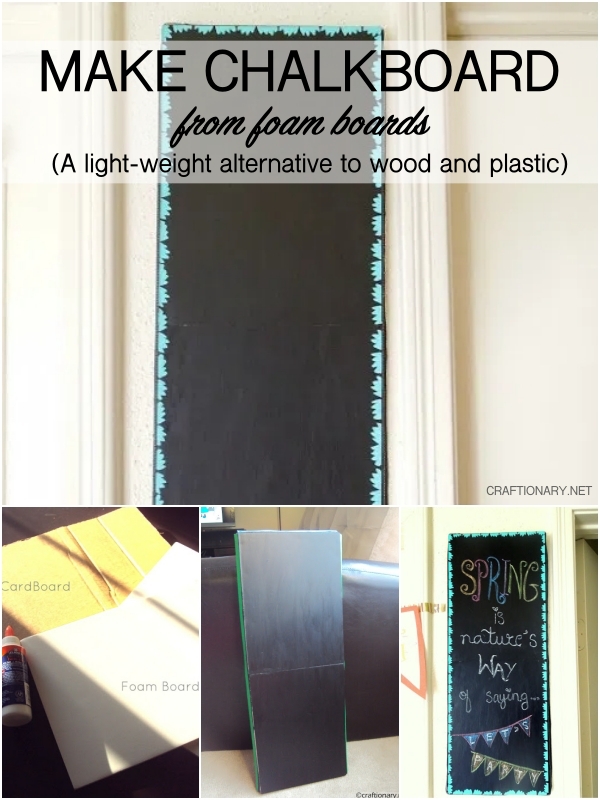
DIY Chalkboard
I actually came up with this idea because it’s light weighted.
- If a wooden chalkboard happens to fall on my toddler anyway, it can hurt him. But a foam board is safe to have around a house with kids.
- Now this board is so easy to move around. If sometimes my son wants to keep it in his lap, and draw. I can just simply take it of the wall.
- It is great for traveling as well. I do not have to care about it hurting my son.
- I also enjoy writing beautiful quotes on it. So, it can also be used as a decorative board.
- It is handy for writing lists and notes for organization purposes.
I love how it doesn’t look cheap. You can not tell it’s foam boards and it’s pretty neat on the sides too.
Benefits of Foam Board Chalkboards
- Budget-friendly: Cheaper than wood or traditional chalkboards
- Lightweight: Easy to move and hang
- Customizable: Choose your size, shape, and border
- No power tools needed: Safe for DIYers of all ages
- Eco-friendly option: Can be reused and repainted


Foam Boards to DIY Chalkboard tutorial
Materials:
- Foam Boards
- Cardboard (cut according to the width and length you want)
- Good strength glue, Tacky Glue will do
- Cardstock and scissors
- Chalkboard paint
- Paintbrush, foam roller, or sponge brush
- (Optional) Ribbon or lace of your choice to decorate
- (Optional) Stencil and acrylic paint to decorate
- Strong Glue like E-6000 and ring hangers (to mount the board)
- Liquid chalk markers recommended for erasable and mess-free writing on foam board without indenting it.

How to Make DIY Chalkboard? Instructions:
Step-by-Step Instructions:
1. Choose and Prep Your Foam Board
- Mark and cut the cardboard (I actually used the pampers box which was about to be thrown in the garbage) to the board’s size you have in mind using a craft knife or utility blade. I wanted it to be lean to fit in my intended space.
- Make sure your foam boards are the same size as well.
- Now glue two sheets of cardboard and foam boards together using tacky glue.
- (Optional) While it dries cut strips of cardstock to hide the sides. Measure the strips to the length and width of the board. Fold the strips using the bone for neatness and glue it on the board using the tacky glue.
Tip: Use black foam board for fewer paint coats and a more uniform finish.
You wouldn’t believe yourself that it’s foam board and not a wooden board when you are done.

Foam Board Chalkboard Fail:
Now after the above was done and everything was going perfectly as planned. A disaster happened! That was sticking the cardstock on the board and applying chalkboard paint on it.
Which actually made it all wavy because of uneven layer of glue underneath the cardstock. It looked ugly. I shared this just in case someone comes up with this idea. So they know it’s not going to work.

2. Paint with Chalkboard Paint
I decided to glued foam boards using tacky glue on top.
Using a foam roller or paintbrush, apply 2–3 even coats of chalkboard paint. Let each coat dry fully before adding the next one (check label instructions—usually 1 hour between coats). I left it overnight to dry.
Tip: Spray chalkboard paint gives a smoother finish but requires ventilation and masking.

This is what I got in the morning. So far so good.

3. Decorate your Chalkboard (Optional):
I used the flower stencil and turquoise paint to make a border on my board. So, finally it matches my turquoise living room decor. You can see my gallery wall reveal.

I thought that stenciling such a small design will be hard and untidy.
So, I traced the design all around and free hand painted it with a brush.

4. Neat sides of the board
Finally, stick the ribbon around the sides. Do not cut it at the edges, instead continue with one piece all around.

The sides look neat and decent with a ribbon.

5. Cure the Chalkboard Surface
Allow the painted foam board to cure for at least 24–48 hours. Then, “season” the surface by rubbing the side of a piece of chalk over the entire board and wiping it off with a dry cloth. This prevents ghosting from the first words you write.
6. Display Your Foam Board Chalkboard
Use adhesive strips, command hooks, or a decorative frame to hang your chalkboard. Alternatively, mount it on an easel or prop it up on a shelf.
I glued Ring Hanger using E-6000. I did not screw it in, the glue is tough enough to take care.

Foam boards chalkboard
The chalkboard is such a fun feature at home. I love to write sayings and quotes on it. It’s fun and inspirational and my son loves to doddle on it too.

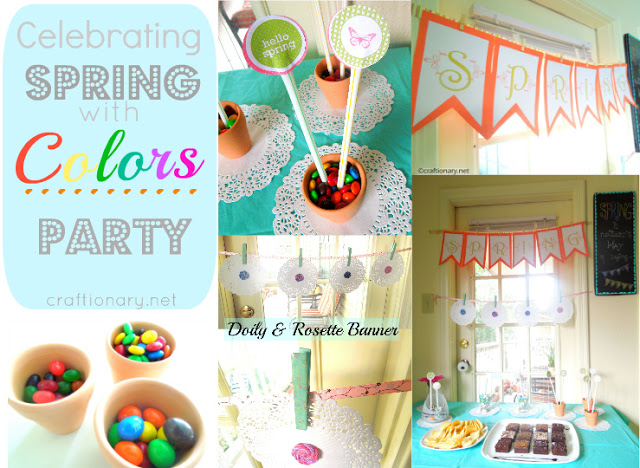
I love this saying “Spring is Nature’s Way of Saying Let’s Party” by Robin Williams.
Find the SPRING Party ideas with Free Printables.
Maintenance and Chalkboard Care Tips
- Wipe clean with a dry or slightly damp cloth (avoid soaking the board)
- Use chalk markers for crisp writing, but test a corner first
- Repaint when the surface becomes hard to erase
- Store in a dry area to avoid warping or delamination
Troubleshooting Foam Board Chalkboards
- Board warping: Use primer before painting; don’t oversaturate
- Paint peeling or cracking: Let layers dry completely; use foam-safe paint
- Chalk won’t erase properly: Season the board before first use
- Uneven finish: Sand lightly between coats if needed
DIY Chalkboard FAQs
1. Creative Uses for DIY Foam Board Chalkboards
- Back-to-school photo props
- Home organization boards
- Craft fair signage
- Kitchen menus or meal planners
- Wedding or party welcome signs
- Inspirational quote boards for your wall
Related: How to Use Chalkboard Wall to Spark Off-Screen Connection
2. What Surfaces Can You Paint with Chalkboard Paint?
Chalkboard paint is more versatile than most people realize. You can apply it to:
- Wood: Sand first for smooth application
- Foam board: Use light coats to avoid warping
- Glass or mirrors: Use primer first; great for repurposed frames
- Metal: Ideal for magnetic chalkboards
- Wallboard/drywall: Perfect for home or classroom walls
- Cardboard Works for temporary signs; may need sealing
- Ceramic or pots: Great for labeling containers
Tips:
- Always clean the surface thoroughly before applying paint
- Use a primer when needed to ensure adhesion
- Spray chalkboard paint for smoother results on glass or plastic
3. Can I reuse foam board chalkboards for multiple projects?
Yes! Simply clean the surface well and repaint if needed.
4. Can you use regular chalk on foam board?
Only after applying chalkboard paint. Foam board alone won’t accept chalk.
5. Will spray chalkboard paint melt foam board?
Most modern brands are foam-safe, but always check the label and test a small area first.
6. How to Use Liquid Chalk on DIY Chalkboard Signs?
Liquid chalk markers offer bold, smudge-resistant lines—great for events and signage that needs to pop:
1. How to Use:
- Shake the marker well before use
- Test on a corner to ensure it erases cleanly
- Prime the tip by pressing it on paper until the ink flows
- Apply to your chalkboard surface
- Let dry for a few seconds before touching
2. Compatible Surfaces:
- Chalkboard-painted foam board
- Non-porous chalkboard vinyl
- Porcelain chalkboards
- Sealed chalkboard paint on glass or acrylic
Avoid using liquid chalk on unsealed porous surfaces (like raw wood or low-quality chalkboard paint), as it can stain permanently.
3. How to Erase:
- Use a damp cloth or magic eraser
- For stubborn marks, use a chalkboard cleaner spray or vinegar-water mix
Creating a chalkboard from foam board is an easy, affordable, and fun DIY project that can be personalized to fit any space or occasion. With the right prep and materials, you’ll have a professional-looking chalkboard that’s lightweight and reusable.
You will also like:
How to Use Chalkboard Wall to Spark Off-Screen Connection
Make Fabric Paper for Journal and Artwork
You will also enjoy the We love Organizing board on Pinterest.
This article was written by Hani Shabbir, a seasoned DIY and craft blogger specializing in home decor and upcycled crafts. With over a decade of hands-on experience and thousands of satisfied readers, she brings trustworthy, step-by-step guides to your crafting journey.


Hi Hani, just wanted to let you know that we are featuring this brilliant idea of yours over at Dollar Store Crafts this evening! http://dollarstorecrafts.com/2012/05/make-a-chalkboard-from-foam-core/
I love this! 1) Super economical 2)Great way to incorporate function into your decor and 3)No bruised toddlers! Yay! What's not to love? :~)
I've been trying to convince hubbs that we should paint a couple of the raised panels on our pantry door with chalkboard paint (it's a pocket door) and he just thinks I'm nuts! I'm working on him… LOL
Really nice job, Hani! I can't wait to see the big living room reveal! ~Mary
This is such a great idea!!! I love how it turned out!!! Thanks for sharing.. I am posting to facebook and pinterest now!
Love this chalkboard. I never would have thought of using foam board. I'm visiting from Truly Lovely's Fancy This Friday and am now following you.
http://www.laurieslittlebitsofcreativity.com/
wow! I love this! very good use of the Dollar stores!!!
thank you for the great idea!
I am your newest follower..pls follow back if you can.
That is a pretty chalk board.
AEWSOME! I like the boarder very much.
This is a great project! Would you consider linking this up at my Pinworthy Projects Party?
This is such a great idea, looks awesome!
What a fantastic idea! I love the use of foam board here. Megan
Smart idea! That's the wonderful thing about chalkboard paint..absolutely anything can become a chalkboard. Thanks for linking up at Etcetorize~
I love the stencil you did around the edge. Thanks for sharing at Terrific Tuesdays.
Rachel
adventuresofadiymom.blogspot.com
SO smart to use foam board Hani! Thanks for sharing at oopsey daisy!
Nice job! It's really frugal and awesome that you used foam boards. I don't have a chalkboard in my house yet. Maybe I can now!! Thanks for this inspiring idea.
I'm glad you linked this up at Romance on a Dime. I already pinned this!
Thanks for linking up! I love this idea!
You can't even tell that it is foam board. Thanks so much for sharing with us at Toot Your Horn Tuesday. Hope you have a great weekend friend!
I love chalkboards and am addicted to chalkboard paint! Thanks so much for sharing at Fabulous Friday.
what a pretty project. thanks for sharing. we are featuring it today. drop by the blog to grab your featured button (if you fancy so ^^) have a fab weekend!
hugs,
Lelanie
In Reply to Shiloh's Query: Yes, it's lightweight but like I said you don't feel any difference writing on it. It's tough and sturdy.. I love writing on it. 🙂
What a fantastic lightweight chalkboard! Do you think that it feels the same when you write on it? Or does the foam board get a little squishy?
Love the way your stenciled chalkboard turned out. Thank you for sharing all the “party goods” at Project Queen's Link Party.
Hani!! This is GREAT!!!! I love that you also mention what ''failed''.
Thanks so much for sharing at The DIY Dreamer.. From Dream To Reality!
Awesome.. I need to get me so chalkboard paint.. 🙂
Thanks for sharing at Create & Inspire, Hani!
Angie
Nice tutorial! I love any kind of chalkboard. Yours turned out very pretty. I like the ribbon on the sides. 🙂
visiting from the weekend wrapup party.
gail
turned out great! Thanks for the idea!
Can anyone help me?? I tried to make a chalkboard out of foam board but it didn’t really turn out… 🙁 I used an all-purpose primer my foam board, then used 3 coats of chalkboard spray paint (maybe they weren’t thick enough?) and then “primed” my chalkboard using the side of a piece of chalk. The problems began when I went to write on it for the first time… The chalk barely showed up, I had to write over and over to get the letters to faintly show : / the worst part is that it seems to have indented my foam board a bit… I bought pretty cheap chalk from Meijer so maybe that’s part of the problem? Did I not get a good enough coat of chalkboard paint on my foam board?? If anyone has any suggestions I would be very grateful!!
Thanks!
Ashly
Hi Ashley, you did everything perfectly fine except for using the good quality chalks. The cheap ones don’t have a good result on most of the surfaces, and are ideal for use on roadside for kids to play with! I find crayola chalks the best. I hope that helps.
Hi Ashly, use chalk markers to write on the foam boards to get bright results without indenting the board. Since the foam is soft and the cheap chalks are meant to write on rough surfaces like chalkboards and driveways. I hope this helps!
Such a great idea! I have a small obsession with chalkboard paint 🙂
I am thinking about using your idea for wedding decor. Am I understanding correctly that you applied the chalkboard paint to the foam core and not the cardboard?
Yes that’s right! I used foam board and applied chalkboard paint to it. If instead of using chalks you use chalk pens then you will not end up with pressed foam in long term. This is great for budget-management for events.
Thanks for getting back to me. I used black foam board and chalk markers for a sign at my wedding. It turned out beautifully.