This post may contain affiliate links. Please see our full Disclosure Policy for details.
Tired of generic frames and expensive custom framing services? You’re in the right place! Creating DIY custom frames at home is an incredibly rewarding and budget-friendly way to display your cherished photos, favorite magazine art, or personal prints.
Learn how to leverage readily available materials like existing photo frames, magazine cutouts, photo mats, and colorful cardstock to achieve a high-end, personalized look without breaking the bank. This project is:
- Cost-Effective: Skip expensive custom framing services.
- Personalized Style: Choose magazine images, artwork, or prints that reflect your personality.
- Creative Flexibility: Mix and match mats, cardstock, and colors.
- Eco-Friendly: Repurpose old frames and recycle magazines or prints.

How to make DIY custom frames?
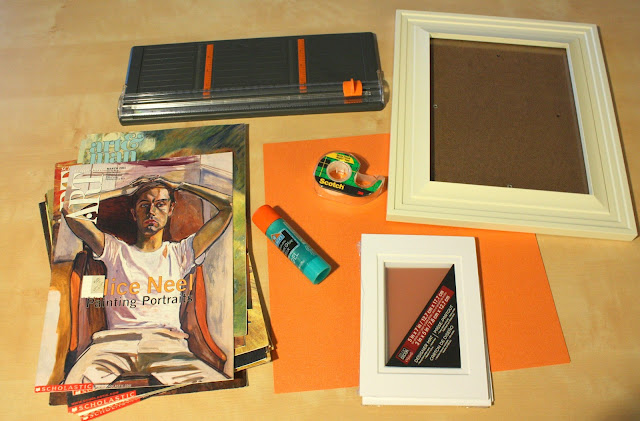
Materials:
The beauty of this project is its flexibility. You can mix and match based on what you have!
- Magazine Images or Printed Art: High-quality magazine spreads, old calendars, music sheets, art prints from old books, printed digital art, or even your own photographs. I chose a couple of small Toulouse-Lautrec prints.
- Photo Mats: Pre-cut mats are available at craft or dollar stores. These instantly elevate the look. You can also make your own. Choose the standard size that best fits the object you are trying to frame.
- Existing Photo Frames: Scour thrift stores, dollar stores, or use frames you already own. Look for sturdy frames with glass. Don’t worry about the current finish – we can change it! A photo frame that is much larger than your mat. For example, use 5×7 inches mats with 3×5 inches inner cutouts with an 8×10 inches frame to put it all in. The empty space in between is where you get creative!
- Colorful Cardstock: A variety of colors, shimmers, and textures will give you endless possibilities for frame inserts and decorative accents. Scrapbooking card-stock paper that compliments the object you are framing.
- Tape: Preferably acid-free (to not wear away at your pictures/cutouts over the years).
- Glue-stick preferably acid-free.
- Cutting mat and Scissors, paper cutter or X-Acto knife.
Instructions to make DIY custom frames
1. Choose and Prepare Your Frame
Select a photo frame. If it’s an old frame, consider giving it a fresh look by cleaning or painting.
- Clean: Wipe down the frame to remove dust and grime.
- Paint (Optional): If you want to change the frame’s color, remove the glass and backing. Lightly sand the frame, then apply spray paint in thin, even coats for a smooth finish. Let it dry completely.
2. Choose your art:
Start by choosing and cutting out what you wish to frame; never cut something its exact size. Leave a few millimeters around its perimeter to allow for gluing to the mat.
Place a small piece of tape halfway behind your image and halfway sticking out, with the sticky side up. Do this on only ONE edge of your image (trust me, it’s easier to correct mistakes this way).
3. Add Photo Mat:
Use a pre-cut mat or make your own from cardstock. Mats create a professional border around your image and instantly elevate the look.
Carefully place your mat over the image, centering it to your liking.
Once you’re happy with the placement of your image behind the mat, press down on the side with the tape so it’s fixed in place.
Proceed with taping the remaining three edges in the same manner the image should be taped to the back side of the mat, like this.
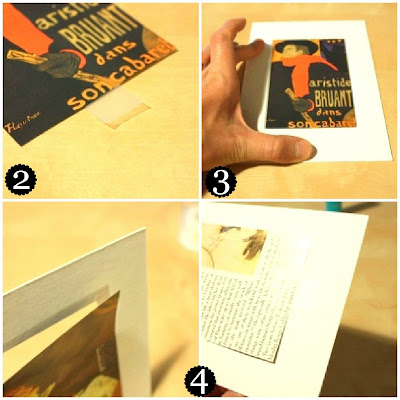
Tip: If you buy a double-layer style mat, use a glue-stick or double-sided tape to adhere the second mat layer to the first. If you bought a single-layer mat, ignore this step!
4. Make The Backing Stand Out
Cut a piece of cardstock slightly larger than your photo or mat opening. Use solid colors, textured paper, or patterns to make your artwork pop.
Use the insert from your picture frame to trace an outline on the back side of your card-stock, and cut it out. By doing this, you’ve cut it the exact size to fit your picture frame.
5. Assemble Your Custom Photo Frames:
Now, layer your components.
- Cardstock Layer: If you want a decorative border behind your mat, cut a piece of cardstock to the same size as your frame backing.
- Attach Image to Mat: Carefully center your image behind the opening of your DIY cardstock mat. Use small pieces of painter’s tape on the back to hold it in place temporarily, or a thin line of acid-free glue stick along the back edges of the image.
- Layering: Place your matted image (or just the image if not using a mat) onto the frame’s backing board. You can use a spray adhesive for a firm bond, ensuring your image stays flat and wrinkle-free.
Chose interesting card-stock, because this is part that really customizes and make DIY custom frames special.

6. Final Assembly
- Clean the Glass: Thoroughly clean both sides of the frame’s glass to avoid trapped dust or smudges.
- Insert Layers: Carefully place the glass back into the frame, followed by your custom-layered backing board (with image and mat).
- Secure: Close the frame’s tabs or fasteners.
7. Add Personal Touches
Decorate the frame edge with washi tape, stencils, or hand-drawn borders for a completely unique look.
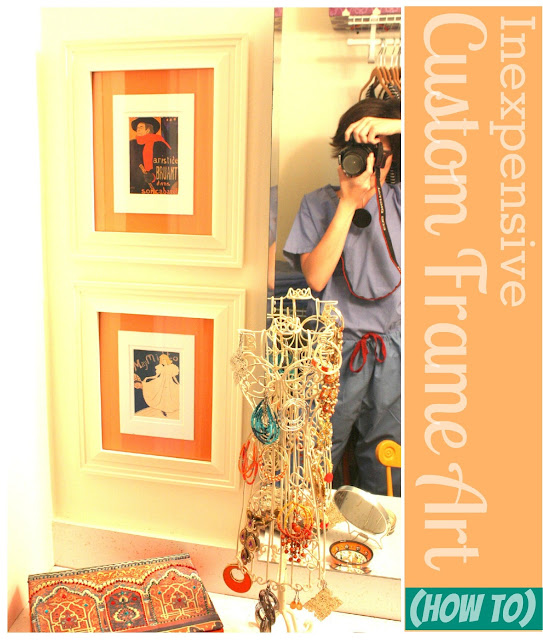
And just like that—you have a DIY custom frame that looks high-end but costs only a few dollars.
Creative Variations to Try
- Gallery Wall Frames – Mix frames with different cardstock colors for a bold wall display.
- Themed Frames – Use magazine cutouts for travel, fashion, or food-themed décor.
- Minimalist Frames – Stick to white mats with black-and-white prints.
- Kids’ Artwork Frames – Showcase children’s drawings with bright cardstock backgrounds.
- Seasonal Frames – Swap cardstock inserts with seasonal colors or patterns (fall leaves, Christmas prints, spring florals).
Safety and Best Practices
- Cutting Safety: Always use a sharp craft knife on a cutting mat. Cut away from your body and keep fingers clear of the blade.
- Adhesive Choice: Use acid-free adhesives, especially for original photos or valuable prints, to prevent discoloration or damage over time.
- Glass Handling: Be careful when removing and cleaning glass to avoid cuts.
- Ventilation: If using spray paint or spray adhesive, work in a well-ventilated area, ideally outdoors or with open windows.
- Start Small: If you’re new to mat cutting, start with practice cuts on scrap cardstock before working on your final piece.
Tips for Success
- Stick to archival-quality paper if you want prints to last longer.
- Use contrasting cardstock colors to highlight your image.
- Keep frames consistent in style for a professional gallery look.
- Try layering mats and cardstock for a designer finish.
Common Questions About DIY Custom Frames
1. How to cut a picture mat at home?
Use a craft knife, ruler, and cutting mat. Measure carefully, and make multiple light passes rather than one deep cut.
2. What glue to use for framing pictures?
Acid-free glue stick, spray adhesive, or archival tape are recommended to prevent damage to your art over time.
3. Can you use regular paper as a mat?
While possible, cardstock is much sturdier and gives a more professional finish. Regular paper can buckle.
4. Where to find cheap photo frames for DIY?
Thrift stores, dollar stores, garage sales, and discount retailers often have great finds.
5. What size mat for an 8×10 photo in an 11×14 frame?
A standard 11×14 mat with an 8×10 opening is ideal.
6. What are DIY picture frame inserts?
Refers to using cardstock, fabric, or even wallpaper scraps to create decorative backgrounds or mats within a frame.
7. How do you make cheap frames look expensive?
Use thick mats, high-quality cardstock, and cohesive colors. Spray-paint old frames in black, gold, or metallic for a polished look.
8. Can you make photo mats at home?
Yes. Cut cardstock with a craft knife, leaving a centered opening for your photo. Double layers of cardstock add depth.
9. What type of cardstock works best for inserts?
Use 65–110 lb cardstock for sturdiness. Matte or textured cardstock works better than glossy for a high-end finish.
10. Do you need glass for DIY frames?
Not always. For magazine art or prints, glass helps protect them. For kids’ artwork or textured crafts, glass is optional.
You don’t need a professional studio to create stunning, personalized framed art. With a few simple materials and this detailed guide, you can craft DIY custom frames that perfectly complement your home decor and showcase your favorite images. Experiment with different colors, textures, and frame finishes to develop a style that is uniquely yours. Happy framing!
You will also like:
How to hang small photo frames collage in alignment?


I love these! =)