Make Cute Paper Butterflies to hang on tree branch
This post may contain affiliate links. Please see our full Disclosure Policy for details.
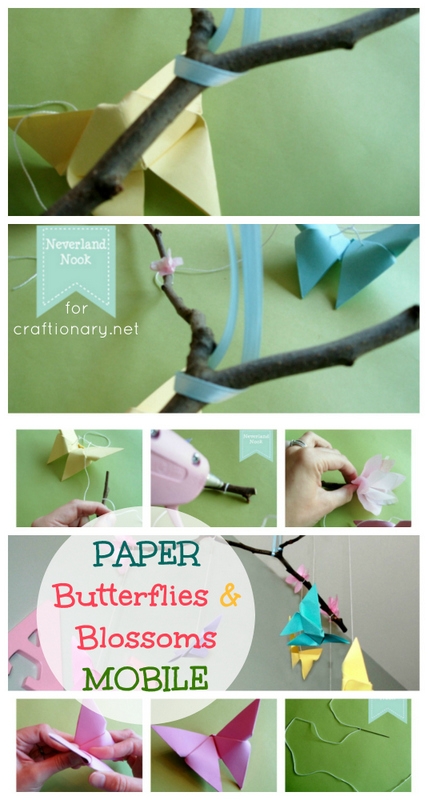
Make DIY Paper butterflies and blossoms mobile with easy pictures and step by step tutorial. This project is great for spring decoration at school and home.
Paper butterflies and blossoms mobile. Today’s guest is going to show us how to make paper butterflies and paper blossoms. Origami or paper projects are such a beautiful art. It’s a fun activity for kids as well.
You can engage with your kids into making cute paper art using different folding techniques. Sabrina has made a very natural baby mobile to go in a baby girl’s nursery using paper butterflies and blossoms.
Paper Butterflies and Blossoms Mobile
Hi! I’m Sabrina, one of two crafty bloggers at Neverland Nook. Our new website is in the works where we would love if you checked in and follow along with our new blog home soon! Leslie and I are also the owners of an etsy shop, where we hand make fun and affordable children’s hair and play accessories.
We met while at ballroom dance class lessons a little over a year ago, and with that meeting came a whirlwind of friendship, business ownership, and crafting. I am so thrilled and appreciative that Hani asked me to share a fun tutorial with you! Today I’ll be showing you how to make a fun butterfly mobile.
Material and instructions to make paper butterflies mobile
pencil,
scissors,
ruler,
hot glue gun,
string,
tissue paper,
double sided paper,
a dead branch,
ribbon and
origami paper
Make Paper Butterflies
First we will make some paper butterflies.
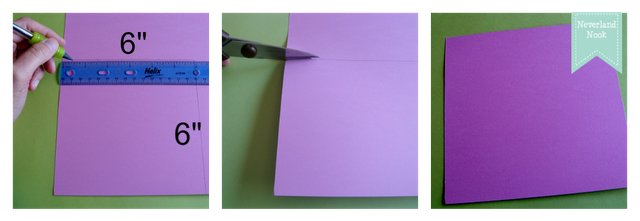
On your double sided color paper (I recommend using thin paper – I learned that the hard way), make 6″x6″ squares and cut them out. You can pick and choose how many butterflies you would like to add according to the size of the mobile you are making.
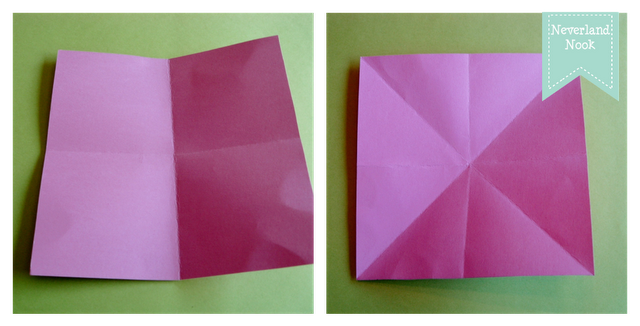
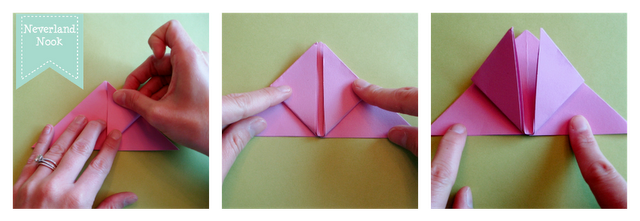
Fold your square in half both ways. Flip the square over (make sure to do this because it will help with the next step) and fold diagonally both ways.
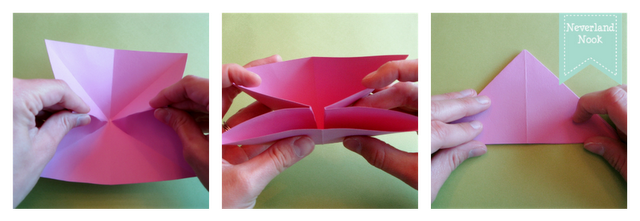
Pinch in the folds on the side into the middle to form a triangle ending with the point facing up.
From the bottom left and right corners, fold the top layer of paper up into a diamond shape.
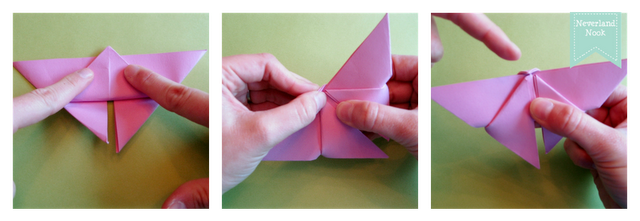
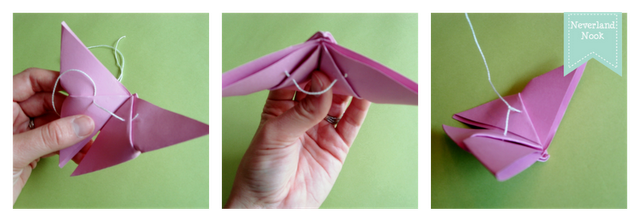
Flip your triangle over so that the point is now at the bottom and you are working with the other side. Fold the bottom part up and fold the tip of the point over the flat top. You’ll want a little more of the tip folded over than I have pictured. It will help stabilize your butterfly better.
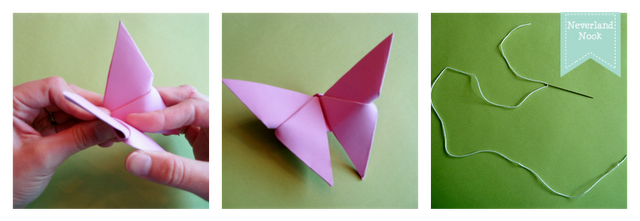
Give the butterfly a good fold in half and Ta Da! Pretty butterfly. Now prepare to hang it by using a needle and string. Knot the string at the end, but let the end going through the needle hang loose.
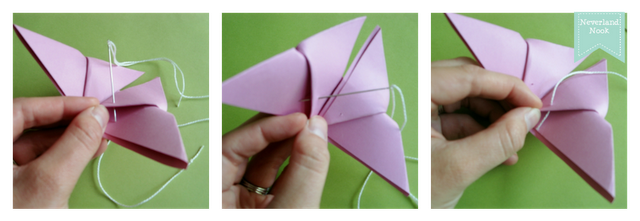
To get the butterfly to hang nicely I poked holes in the top diamond layer in the middle and then pulled the string up from the inside on one side and down through the top on the other side.
Once you knot the other side and cut the excess string off, with another piece of string knot it at the center of the piece going across the butterfly. The lengths of these pieces will depend on how you choose to hang and balance the paper butterflies.
Make crepe paper blossoms
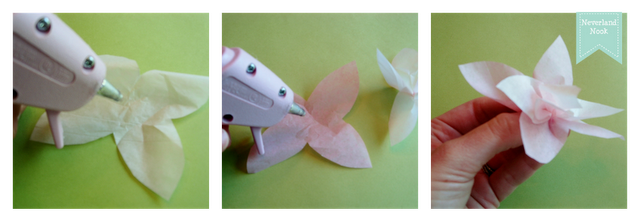
Now we will work on the tissue paper cherry blossoms. I used two different color pink tissue papers. Lying one on top of the other I drew out different flower shapes. They do not need to be perfect (that’s the best part). Cut them all out. You can pick and choose how many you’d like to make.
Attach to branch
Take whichever color you want to be the inside layer and place a dot of hot glue in the middle. Pinch together. Place some hot glue on the middle of the second piece and place the first piece inside of it and pinch together. Easy!
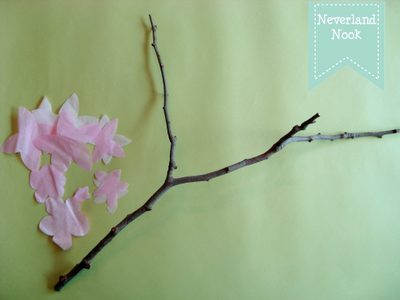
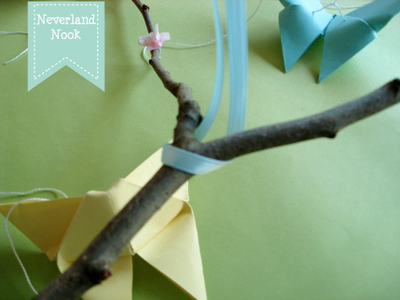
Next you’ll be tying the paper butterflies onto the branch and gluing the blossoms on. I was fortunate enough to have my husband find the perfect branch for me!
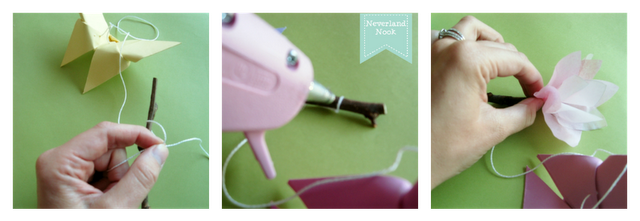
Tie the end of the strings connected to the butterfly to your branch (check the weight and balance as you go for placement). Using my hot glue gun I glued the cherry blossoms over where I tied the string on the branch to hide the string.
Lastly I used a piece of ribbon to hang the mobile.
I was able to loop mine around, but you may have to be a little more creative depending on the shape of your branch.
Ta Da! You have a beautiful Butterfly Mobile!
Thanks for following along!
Thanks for the cute butterflies and blossoms mobile tutorial. This sure is a wonderful addition is a girl’s room.
Oh my goodness! This is gorgeous! I so, so wish I could be this crafty and maybe someday I'll work up the courage. In the meantime, per usual, I will just sit in open-mouth-gaping awe of you awesome crafty ladies 🙂 Great post!
This is so fun! I so want to try to make this. And I am going crazzzzzzzzzzzzzy for that pinwheel wreath! Love, love, love! I am popping in from Teagan's Travels to thank Hani for joining my linky party Destination: Inspiration last week. I would so love if all three of you would join us for the linky party going on now. Blogs and etsy shops are welcome. Hope you all had an amazing Easter weekend!Michelle@Teagan's Travels
That’s really an exciting task. I too perform the job for several times but not 100% succeeded in producing the effect exactly. They used to appear some what sticky. Please produce some attachment links regarding the tips for this creation. Thanks in advance.
I’m so glad you're here. I'm a mom of 2 with a passion for DIY and crafting. I love to share ideas for turning simple materials into beautiful home and garden decor that brings warmth and personality to any space.
Whether you're looking for inspiration or easy tutorials, you're in the right place! Stay a while, explore, and don't forget to follow along for new ideas. Let's create something beautiful together!


Oh my goodness! This is gorgeous! I so, so wish I could be this crafty and maybe someday I'll work up the courage. In the meantime, per usual, I will just sit in open-mouth-gaping awe of you awesome crafty ladies 🙂 Great post!
This is so fun! I so want to try to make this. And I am going crazzzzzzzzzzzzzy for that pinwheel wreath! Love, love, love! I am popping in from Teagan's Travels to thank Hani for joining my linky party Destination: Inspiration last week. I would so love if all three of you would join us for the linky party going on now. Blogs and etsy shops are welcome. Hope you all had an amazing Easter weekend!Michelle@Teagan's Travels
CONGRATS Hani- you WON the Purse Bling Giveaway hosted on COM!
Lovely! I have pinned your picture. New follower.
That’s really an exciting task. I too perform the job for several times but not 100% succeeded in producing the effect exactly. They used to appear some what sticky. Please produce some attachment links regarding the tips for this creation. Thanks in advance.