This post may contain affiliate links. Please see our full Disclosure Policy for details.
Winter is the perfect season to cozy up with yarn, a hook, and a hot drink—and nothing says festive like a beautiful handmade star. Whether you’re decorating your tree, gifting handmade ornaments, or adding a wintry touch to your home, this Crochet Winter Star pattern is a charming project that works up quickly and adds a sprinkle of handmade magic to your decor.
In this post, you’ll find a free crochet pattern, a step-by-step tutorial, and creative ideas for how to use your winter stars!
Why You Will Love This Crochet Winter Star
This winter star is:
- Simple for beginners
- Quick to make under 30 minutes!
- Perfect for scrap yarn projects
- Great for garlands, ornaments, coasters, or gift toppers
- Easily customizable in size and color

Crochet Winter Star Free Pattern
The Free Crochet Pattern: Winter Star
Ready to add a little twinkle to your winter? Let’s get started!
Materials and Supplies:
- Yarn: Worsted weight cotton or acrylic yarn in your chosen colors (we suggest a classic red, lovely wintery white, silver, or even a deep blue!)
- Hook: A crochet hook appropriate for your yarn weight (4mm or H-8)
- Scissors
- Tapestry needle for weaving in ends
- Starch spray (optional): To stiffen the stars
Stitches and Abbreviations:
- ch = chain
- sl st = slip stitch
- sc = single crochet
- dc = double crochet
- tr = treble crochet
Crochet Tutorial with Photos:
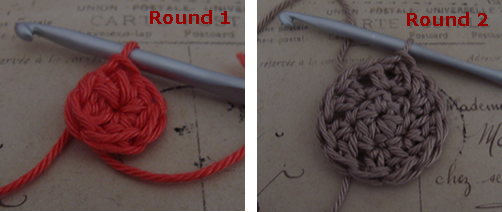
1: Magic Ring
- Make a magic ring (ch 3 and sl st to form a ring)
- Ch 3 (counts as dc). Make 5 dc in the circle.
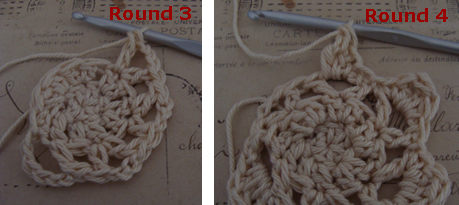
2: Point’s Base
- Ch 3 (counts as dc) and crochet a dc in the same stitch.
- Crochet 2 dc in every next stitch until you’ve finished the round.
- Finish with a sl st in the first dc.
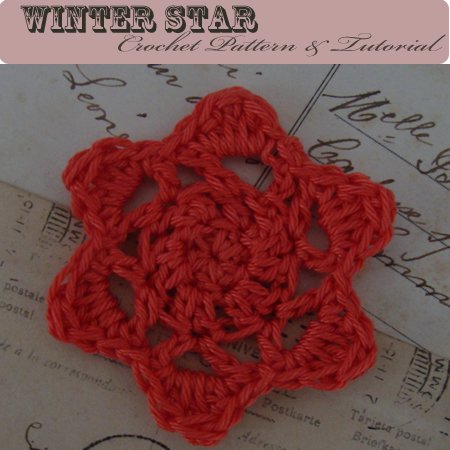
3: Forming Star Points
- Ch 3 (counts as dc), ch 3 and crochet a dc in the same stitch.
- Skip the next stitch and put (1 dc, ch 3 and dc) in the next stitch
- Repeat until you have finished the round. Finish the round with a sl st in the first dc.
4: Adding details and closing
- In every (1 dc, ch 3, 1 dc) group of the last round put a (sc, sc, tr, dc and sc).
- In the spaces between the groups you place a sl st.
- When you finish the round, join with a sl st.
- Weave in the ends.
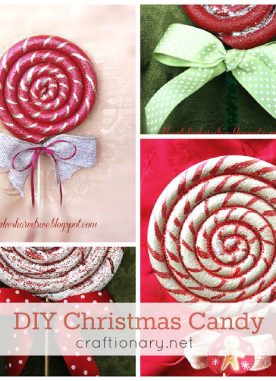
That’s it! You’ve crocheted your first Winter Star!
Optional: Stiffen Your Star
To give your winter star a crisp look, use spray starch or a 50/50 mix of water and white glue. Pin the star flat to a foam board or towel and let dry overnight.
DIY winter star crochet pattern
Ideas to Use Crochet Winter Stars:
- Ornaments: Attach a loop of yarn to hang them on your Christmas tree or around your home.
- Gift Toppers: Tie a star onto your gift wrap for a handmade touch.
- Garland: Crochet several stars and string them together for a festive garland.
- Appliqués: Sew them onto hats, scarves, or blankets for a wintery embellishment.
- Window Decor: Hang them with clear thread for a floating snowflake effect.
- Table Setting: Use larger yarn to create star coasters or table toppers.
This Crochet Winter Star pattern is a quick and satisfying project that brings instant winter charm. Whether you’re new to crochet or a seasoned yarn lover, these stars will warm your heart and your home.

Save and Pin this for personal use only
You will also like:
50 Free Amigurumi Crochet Patterns that are love
What to Make with Crochet Doilies?
50 Amazing Winter Simmer Pots Air Freshener
Follow us on pinterest and discover trending creative craft ideas.


Very pretty! I must have Christmas still on the brain because I think it would be a great ornament or gift decoration. I am a new FB fan visiting from Funky Polka Dot Giraffe. Vicky
One of these days, I'm going to crochet somthing. Thanks for the tutorial.
The pattern is not for the pictured off white star
working on that one too!