This post may contain affiliate links. Please see our full Disclosure Policy for details.
Easy flower paper craft is a cute origami paper folding flower for beginners, starters and even kids to have fun making as an art project. Sometimes crafts like paper flower that involve paper folding techniques like origami are therapeutic and relaxing. This project is also great to start kids on paper folding so they develop skills like focusing, fine motor and neatness.

It requires constructing petals and gluing them together to have your very own colorful flower.
Why This Paper Flower Stands Out
Most paper flowers online use complex origami techniques or multi-layer patterns. This version is ideal because:
- Each petal is made from a single square of paper
- No advanced origami required
- Petals are glued together, not interlocked
- Scalable—you can make mini or giant flowers easily
- Looks like a realistic blossom when layered
Supplies You Need
Basic Materials
- Colored craft paper or origami paper (6×6 inch recommended)
- Glue stick or craft glue
- Scissors
- Pencil (optional)
- Floral wire or pipe cleaners (for stems)
- Circle cardstock piece (for backing)
Paper Recommendations
To get the best results:
- Origami paper folds smoothly and keeps crisp edges
- Cardstock creates more structured petals for larger flowers
- Double-sided colored paper gives a professional finish
- Pastel shades look soft and realistic
- Bright colors look great for party decorations
How to Make Easy Paper Flower Petals (Step-by-Step)
1. Start With a Square Sheet of Paper: 4–6 inch squares are ideal for beginners. I used square paper (9 1/2 cm x 9 1/2 cm).
2. Fold into a Triangle: Keep the pattern-side down and fold the paper diagonally to form a triangle.
3. Fold the Left and Right Corners Up: Bring the two bottom corners up to the top point, creating a diamond shape.

4. Fold the Side Flaps Outward: Open the two flaps and fold them outward to form kite shapes.
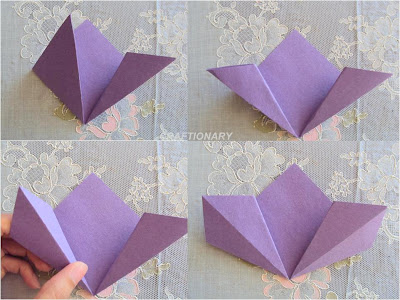
5. Fold the Tips Inward:
- This step gives your petals a curved shape.
- Fold the pointed ends back toward the center line.
6. Fold the Side Flaps Back In: Return the flaps to their original position, now tightened with the curved fold inside.
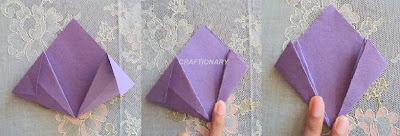
7. Apply Glue and Seal the Petal
- Add glue to one folded flap and bring both sides together.
- Hold for a few seconds until the petal sticks.
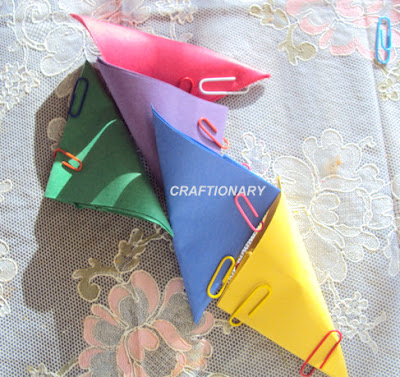
- Tip: Use a paper pin to secure it in place while the glue dries.

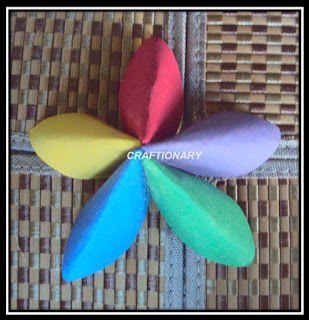
Make 5 petals following the above method.
Finally glue the petals together to complete your flower. See the front and back view of the flower below:
How Many Petals Do You Need?
Here’s what actually works best:
- 5 petals – Classic blossom
- 6 petals – Fuller flower
- 7–8 petals – Dense, realistic look
- 10+ petals – Giant statement flowers
Assembling Your Easy Paper Flower
- Cut a small paper circle (1 inch diameter).
- Arrange your petals around the circle.
- Glue each petal’s base to the circle, slightly overlapping.
- Press firmly until secure.
- Add a center decoration (optional).
Center Ideas
- Rolled paper coil
- Mini pom pom
- Button
- Glittered circle
- Pearls or beads
Optional Layering for More Realistic Flowers
To create a fuller bloom, make two sets of petals:
- Layer 1: 6–8 large petals
- Layer 2: 6 smaller petals
- Glue the smaller petals on top, offset for a natural spiral.
- Add a center embellishment.
This elevates your paper flower from “simple craft” to “decor-worthy”.
Easy Variations
- Two-Tone Paper Flowers: Use double-sided paper or alternate colors for each petal.
- Ombre Flower: Use shades of one color—from light to dark.
- Metallic Edge Flower: Brush edges with metallic paint or ink.
- Patterned Petals: Use scrapbook paper for a modern, textured look.
- Mini Flowers: Use 2×2 paper squares for tiny embellishments (great for cards).
- Giant Wall Flowers: Use 12×12 cardstock and multiple layers.
Common Beginner Mistakes and Fixes:
- Petals won’t stick together? Use stronger craft glue instead of glue stick.
- Flower looks uneven or lopsided? Trace a circle and use it as an anchor to evenly space petals.
- Petals don’t look identical? Use a template to pre-cut consistent squares.
- Flower looks flat? Curl petal edges with a pencil before assembling.
Where to Use Your Easy Paper Flowers
Home Décor
- Wall gallery
- Bedroom or office accents
- Table centerpieces
- Mantel display
Party Décor
- Birthday backdrops
- Wedding bouquets or arches
- Baby showers
- Photo booth backgrounds
Gifts and Cards
- Gift boxes
- Handmade greeting cards
- Scrapbooks
- Teacher appreciation gifts
Educational Use
- Classroom bulletin boards
- School craft projects
- Library displays
FAQs
1. What paper works best for origami flowers?
Origami paper for small flowers; cardstock for large ones.
2. How long do paper flowers last?
Years, if stored away from moisture and sunlight.
3. Can kids make this craft?
Yes! Ages 6+ with help on the gluing steps.
4. Can you make stems for the flowers?
Use floral wire, pipe cleaners, or wooden skewers wrapped in green tape.

Easy paper flowers are one of the most rewarding, low-cost DIY projects. With simple origami folds, thoughtful layering, and a few professional tips, you can create beautiful blossoms for décor, gifts, events, and creative displays.


Hi Hani, thanks so much for taking the time to look and comment on my blog. I love your tutorial. I'm glad you found me so I could see your beautiful blog! I'll be checking back often.Judy K.
Super cute idea! 🙂
Thanks! 🙂
good job………
Love the flower! Thanks for the tutorial:)
Just gorgeous flowers!! I am constantly amazed at the creativity of some people, given just a few items and a bit of encouragement. Thanks for the tutorial 🙂
~~~~~Angie~~~~~