This post may contain affiliate links. Please see our full Disclosure Policy for details.
Make your own origami organizer to store small craft or office supplies. Learn step-by-step folding tips, creative designs, and practical uses for your DIY paper organizer. Perfect for crafters, students, and home offices!
If your desk or craft corner is overflowing with pencils, paper clips, washi tapes, and beads — this project is for you. An origami organizer is a simple, foldable storage solution made entirely from paper. Using basic origami techniques, you can create multi-compartment boxes that hold everything from office supplies to jewelry.
Unlike plastic or wooden organizers, origami versions are:
- Eco-friendly and recyclable
- Budget-friendly (no special tools needed!)
- Customizable — choose any color or paper pattern
- Lightweight yet sturdy when folded properly
Related: functional homework station ideas
Origami Storage Materials:
To make your DIY origami organizer, gather:
- Square origami paper or any sturdy craft paper
- Glue or double-sided tape (optional for reinforcement)
- Ruler and pencil for neat folds
- Decorative paper or stickers for customization


Make Origami Organizer with Compartments
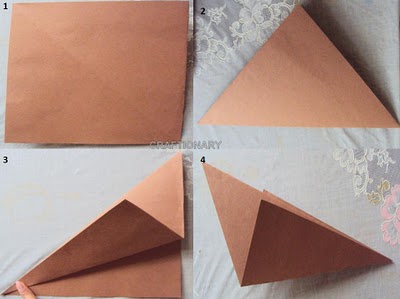
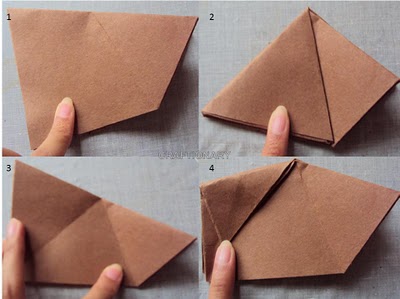
Take a square paper (9″ x 9″) and fold it into a triangle. Fold both the sides of the triangle in halves shaping as shown below. Pattern side down.
Open the paper from the center and fold the flap upward forming the triangle. Now open the side flaps and fold the paper at the center again.
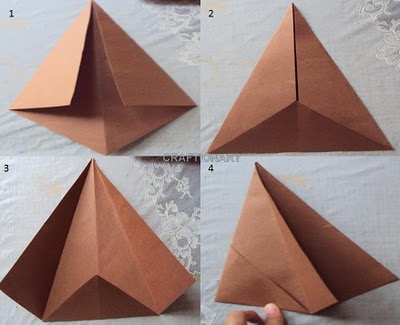
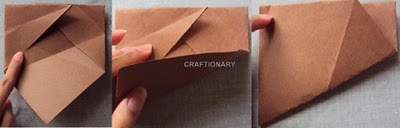
Rotate the above model into the shape shown below. Now fold the top-left corner towards right side and do the same with the other side.

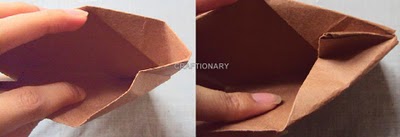
Now fold the left and the right flaps into triangles as shown and unfold them. Unfold the flap facing down followed by folding the left flap over to form an envelope shape. Now finally fold the flap below upward again.
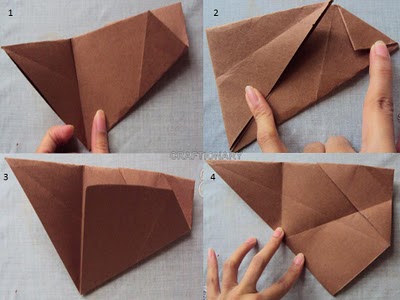
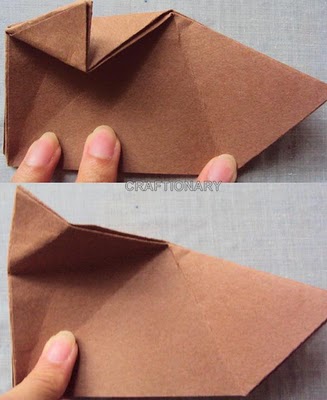
Open the shape at the top and fold in the smaller triangle.
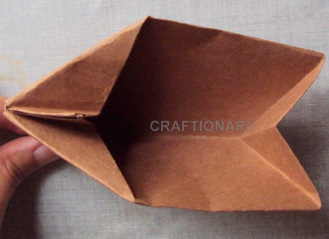
Fold the top left corner and bring it down right, forming a triangle and unfold it. Again fold the top left corner, but this time form a small triangle meeting at the nearest line. Now fold the small triangle upward into a smaller triangle and unfold all.
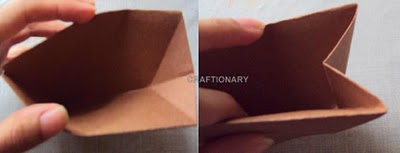
Open the top and fold the above formed folds inside to complete the model.
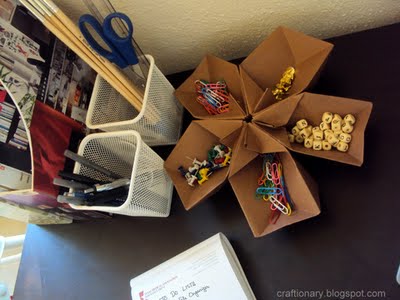
Paper Folding Origami Organizer
Glue them all together at the center only and use paper pins to hold them together till the glue dries. You can also use double-sided tape.

The final shape looks like this. Remove the paper pins
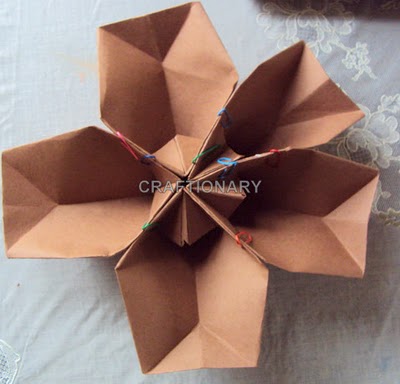

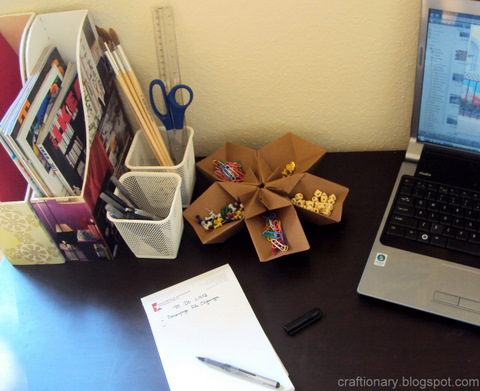
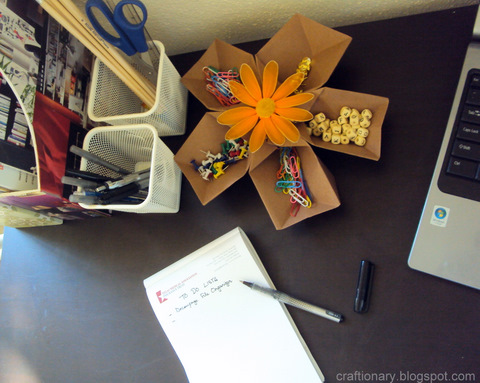
Origami Organizer
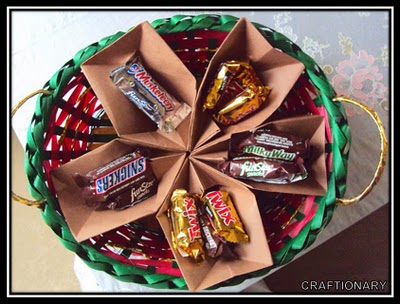
Keep your office supplies handy in this organizer. You can also use it to keep different colored beads, candies and small similar things organized and handy.
Creative Ways to Use an Origami Organizer
This project isn’t just cute — it’s practical. Here are a few ways to use it at home, school, or work:
- Craft Room Organizer: Store buttons, beads, threads, or mini paint tubes.
- Desk Organizer: Perfect for pens, paper clips, and sticky notes.
- Jewelry Holder: Keep earrings, rings, and small accessories.
- Sewing Kit: Store needles, pins, and thread spools neatly.
- Plant Starter Box: Line compartments with plastic wrap to start seedlings.
- Place it in a nice basket or drawers to create compartments to separate different items.
- Use it as a temporary holder for your projects that require use of small things like beads, crystals or buttons.
Related: 20 Essentially Smart Dollar Store Craft Supplies Organizers
Decorating and Customizing Your Origami Organizer
Make your DIY organizer a statement piece by decorating it! Try These Ideas:
- Use patterned origami paper for instant color.
- Add washi tape around the borders for style and strength.
- Label each compartment (e.g., “Pens,” “Clips,” “Pins”).
- Glue decorative gems or stickers for a fun, personalized touch.
- If you’re using your organizer for kids’ desks, you can even add googly eyes and make each box look like a friendly monster or animal face!
How to Make Your Origami Organizer Sturdier
Yes — with a few durability hacks!
- Use double layers: Fold two sheets together for stronger compartments.
- Reinforce the base: Glue a small square of cardboard underneath
- Add clear tape along folds: Prevents wear and tear from daily use.
- Spray seal with Mod Podge or acrylic sealer: Adds shine and water resistance.
Modular Origami Organizer Ideas
Once you master the basic box, you can build bigger organizers by combining smaller ones.
Here are some popular modular designs:
- 3-Box Triangle Organizer – Great for holding pens and brushes.
- 4-Box Square Organizer – Ideal for small items like paper clips or beads.
- Hexagonal Organizer – Combine six boxes for a flower-shaped layout.
- Tiered Paper Drawer – Stack boxes vertically using cardboard spacers.
Common Questions About Origami Organizers
1. What paper size works best for an origami organizer?
8×8 to 12×12 inches works best. Smaller sheets make delicate boxes, while larger ones create sturdy compartments.
2. Can you use printer paper instead of origami paper?
Yes, though it’s best to use slightly thicker paper (like 120–200 gsm). Regular printer paper works for light items. Use construction paper for sturdier projects like this organizer.
3. How do you make an origami organizer waterproof?
Use Mod Podge spray, clear contact paper, or a thin layer of craft varnish.
4. Are origami organizers good for kids?
Absolutely! They’re great for developing fine motor skills, creativity, and responsibility for organizing their workspace.
An origami organizer is more than a paper craft — it’s a smart, sustainable, and creative way to keep your space neat. Whether you use it for craft supplies, stationery, or even snacks, this project brings beauty and order to your desk in just a few folds.
Start with one box, build your way up to a modular masterpiece, and enjoy a clutter-free workspace with your very own DIY origami organizer!
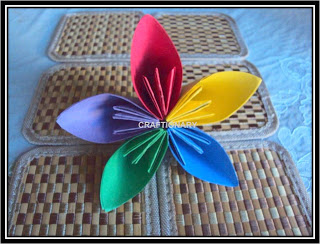
Here’s a little feminine girly touch to the organizer. Just a last minute picture thought.


I like this!
thanks..LoveHani
Super, I like this!!!!!
Cool idea thanks for sharing
thanks friends.. :)origami is really fun to work with but when you are making things just keep the project in mine like if your making flowers make them for a gift or try hanging them up on the bulletin boards.. so it doesn't go waste..
This is fantastic…what a fun way to stash supplies. I am a new follower and thank yo for linking to tickled pink!
This is such an amazing idea! I have been looking for something creative to put on your wedding tables (we're bringing the candy bar to each table) THANK YOU THANK YOU THANK YOU!! Bookmarking and following you now 🙂
What a great idea…just wanted to say I'm a new follower and love your blog and your origami theme in particular!
This is a very good idea to sort those little things on table.
Brilliant Hani
Smile from Belgium
M
this is v cute. I was thinking about using it for separating beads as I work with them.
I wonder if you could leave the last side un-glued and put either a ribbon or hook&loop to attach it into a star. Then it could fold up if you're not using it.
I think I'll go try that now.