This post may contain affiliate links. Please see our full Disclosure Policy for details.
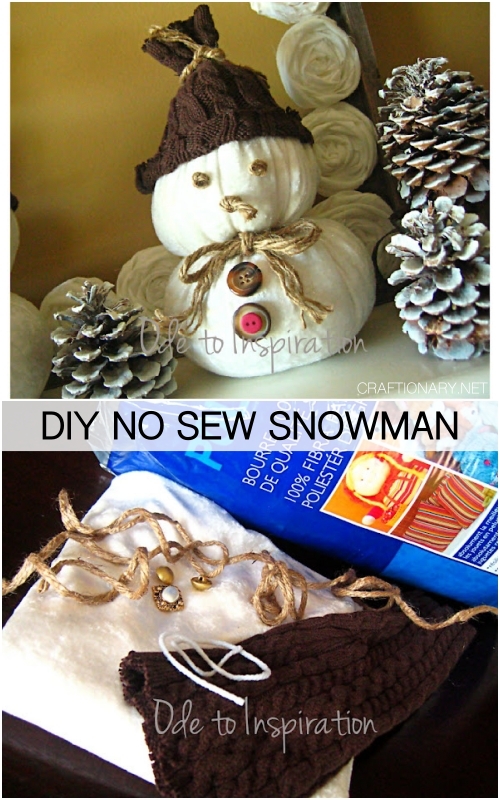
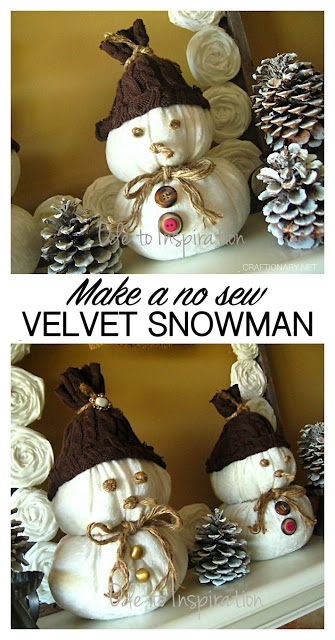
How to make a no sew craft snowman tutorial with fabric and polyester stuffing for home decoration in winter. Cute stuffed snowman instructions. Make your winter funtastic with DIY snowman made with velvet fabric. A fabric snowman tutorial for home decoration.
Making a no-sew snowman is one of the most popular DIY winter crafts because it’s fun, budget-friendly, and requires no sewing skills. Whether you’re crafting with kids, decorating your home, or making handmade holiday gifts, this project is simple and adaptable.
Why Make a No-Sew Snowman?
- No Skills Required: You don’t need any sewing experience. If you can tie a knot and use a glue gun, you’ve got this!
- Budget-Friendly: This craft uses simple, inexpensive materials, many of which can be found at the dollar store or in your own pantry.
- Kid-Friendly: The simple steps and lack of sharp needles make this a safe and fun activity to do with children.
- Personalization: The decorating possibilities are endless. Make each snowman unique with different hats, scarves, and accessories.
- Holiday Charm: Adds a handmade touch to Christmas decorations. It is also great for teachers, friends, or neighbors gift.

No-Sew Easy Snowman Tutorial
Hey, sit in front of your fireplace if you would like. I promise he won’t melt away!
Materials Needed:
- White crushed velvet fabric (37″ inches x 31″ inches)
- A sleeve from an old sweater
- Fiberfill
- Jute (6 ply)
- Piece of yarn
- Buttons
- Hot glue gun
- Scissors
Related: 30 Family Craft Night Ideas with Free Crafts Planner Printable
DIY Snowman Instructions
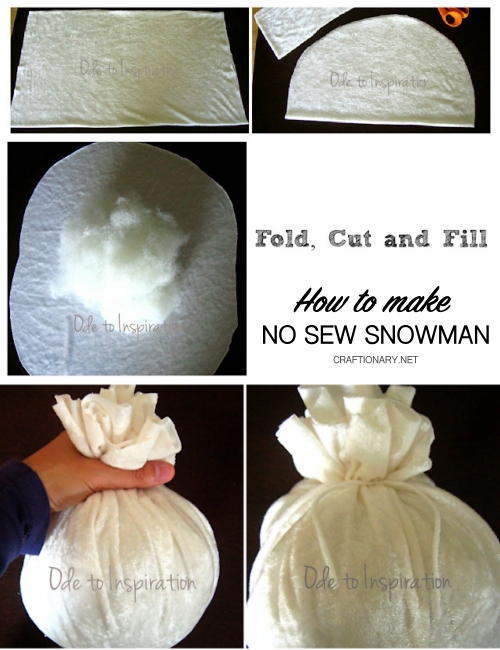
1. Cut Fabric and Add Filling
Fold your fabric with the shorter ends together, and cut out a wide half oval shape. Don’t worry, it doesn’t have to be perfect. Unfold your oval with wrong side of the fabric up, and fill with fiberfill. You can also use rice or beans.
Gather the ends of the oval together. At this point, you can add or subtract the fiberfill if needed. Once satisfied with the amount of fiberfill, tie off the gathered end with a piece of yarn and trim the long ends of the yarn.
2. Shape the Snowman
Use a rubber band or yarn string in the middle to divide the body into head and belly sections. Wrap it at the center of the oval to create two “snowballs” making the top half slightly smaller than the bottom. Tie your jute into a bow and separate the ends into strands.
Adjust stuffing to make it round. Also, at this point, go ahead and trim off the access fabric from the top of your snowman’s head.

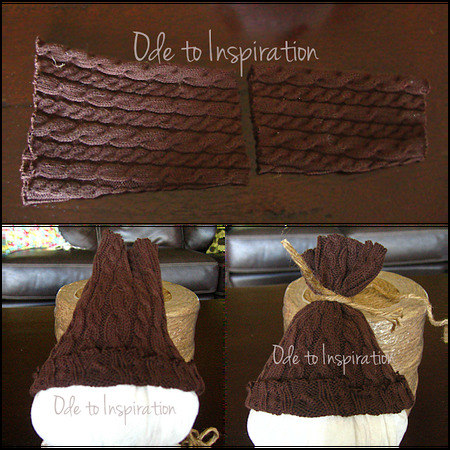
3. Dress the Snowman
The Hat: Take the sweater sleeve and cut it a bit more than half way from the wider end. Place the larger sleeve half on top of the snowman’s head, fold the bottom end of the sleeve up, and tie off the top end with a piece of jute with a double knot.
The Scarf: Use the leftover piece as a scarf. Slip the hat on the head and tie the scarf around the neck.
Optional: With your glue gun, glue the hat to the snowman’s head. All you need is one dot of glue on the front, back, and sides.
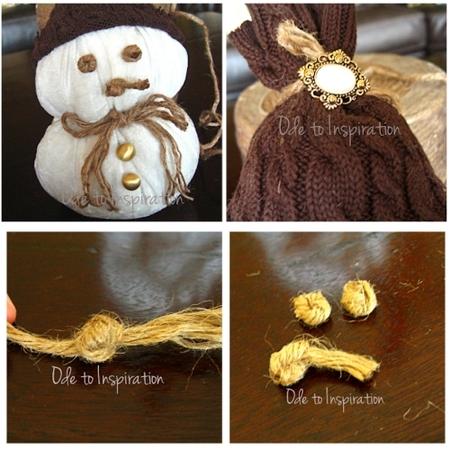
4. Decorate Your Snowman
The Eyes and Nose: Take a smaller piece of jute and tightly double knot it with the second knot directly on top of the first knot. Make three. Then for two of the knots, cut off both ends. These are the eyes. For the the third knot, cut off only one end and trim the other if needed. This is the “carrot” nose.
The Face and Buttons: With your hot glue gun, glue on the eyes, nose and buttons.
You may use beads or small black pom-poms for the eyes and mouth. Add an orange button or felt triangle for the nose. You can also use a permanent marker or fabric marker or glue small black beads to draw on the features like smile if you prefer.
Optional: embellish your snowman’s hat with a button, pendant or jewelry pieces.
And that’s it—your no-sew snowman is ready!
?Creative Variations
- Mini Snowmen: Use baby socks for smaller decorations.
- Glitter Snowmen: Add sparkle by brushing on glue and sprinkling glitter.
- Rustic Look: Use burlap fabric for the scarf and wooden buttons.
- Holiday-Themed: Make red-and-green Christmas snowmen or pastel ones for winter decor.
Common Questions About No-Sew Snowmen
1. What can you use instead of rice?
You can use a variety of fillers! Dry beans, lentils, or even sand or small pebbles work well. For a less firm snowman, you can also use polyester fiberfill or scraps of fabric, but you’ll want to add a small amount of heavier filler at the bottom to give it weight and help it stand up.
2. How do you make the snowman stand up straight?
The key is to use a heavy filler like rice or beans. Fill the bottom of the sock with a good amount of rice first before adding any other stuffing. This will create a stable, weighted base.
3. What if you don’t have a hot glue gun?
While a hot glue gun is recommended for a secure bond, you can use strong craft glue or fabric glue. Be sure to let the glue dry for a full 24 hours to ensure everything is securely attached.
4. Can you use an old t-shirt for this project?
Absolutely! Instead of a sock, you can use a rectangle of white t-shirt or felt. You’ll simply fill the center with rice, gather the fabric at the top, and tie it off with a rubber band or string. Then you can follow the same steps to create the head and decorate it.
5. Can kids make no-sew snowmen?
Yes! It’s a safe kids’ craft with adult supervision for hot glue. For younger children, swap hot glue for fabric glue.
6. How long does it take to make one?
Usually about 15–20 minutes, making it a quick holiday craft.
7. Can you wash a no-sew sock snowman?
No, these are decorative only. Keep them dry to prevent rice or beans from getting damaged.
?Tips for Success
- Pre-wash socks to make them softer and easier to work with.
- Use patterned socks for fun hats and scarves.
- Add cinnamon sticks or scented beads inside for a holiday aroma.
- Display them on mantels, tables, or as part of a Christmas centerpiece.
This no-sew snowman project is a wonderful way to unleash your creativity, share a fun holiday activity with loved ones, and create a charming piece of handmade decor that celebrates the joy of the season.
Aren’t these snowmen the cutest you have ever seen! I love how easy they are to make using most of the things at home or recycle old clothes.


Thank you Hani! So honored to have been able to contribute my little something in your part of town;)