This post may contain affiliate links. Please see our full Disclosure Policy for details.
Bring a touch of modern charm to your jewelry collection with this fun and easy polymer clay craft! These faceted beads look stunning and are surprisingly simple to make — no fancy molds or tools required.
Make polymer clay beads in any shape you like using sharp crafting knife. Complete your jewelry project with the help of needle, thread and a coat of glaze.
Related: The Ultimate Guide to Clay Crafts: Air-Dry Clay vs. Polymer Clay?
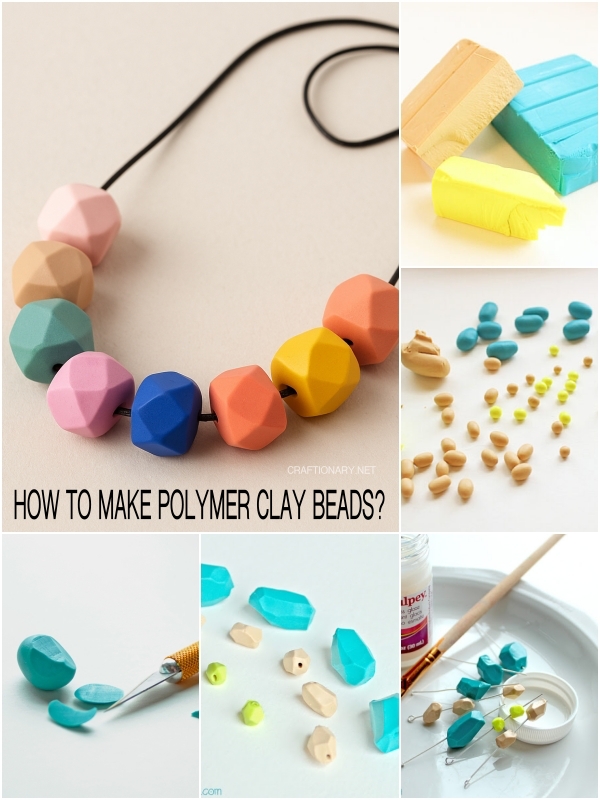
How to make polymer clay beads?
DIY Polymer Clay Beads Necklace
Material
- Oven-hardening clay in whichever colors you like. I used Premo Sculpey in Fluorescent Yellow, Turquoise, and Ecru.
- Very sharp knife. I used a craft scalpel (Craft knife or X-Acto blade)
- Sculpey Gloss Glaze
- Clay roller or smooth glass bottle
- Baking tray and parchment paper to bake in the oven
- A brush to apply the glaze
- Needle or other skinny thing to pierce the beads (Toothpick or skewer)
- Jewelry cord, strong thread, leather string, or chain. I used DMC tatting thread in Ecru.
- Optional: acrylic paint, gold foil, sandpaper
Related: 30 Polymer Clay Jewelry Ideas to Help You Get Started

How to make polymer clay beads?
Instruction on How to make clay beads?
1. Condition Your Clay
- Break off a piece, and start working it in your hands.
- Knead the polymer clay (Bend it, smoosh it, twist it) until soft and pliable.
- The idea is to warm it up so it’s nice and pliable.
If combining colors, swirl or twist clay together for a marbled look.
Related: How to Clean Polymer Clay Pasta Machine?

2. Shape Into Balls
Once it’s soft, Roll small amounts of clay into balls (about 1 to 1.5 cm in diameter). These will become your beads.
I used 3 turquoise, 3 ecru, and 2 fluorescent yellow beads for the finished necklace. Make more than you need.

3. Create Facets
Using your craft knife, carefully slice off small sections around the ball to form a faceted surface. Rotate as you go for an even geometric look — think of cutting a gemstone!
Hint: Once you make the beads, stick them in the fridge for an hour or two. If they’re cold, they’ll be much easier to cut! Carefully start slicing off bits of the beads.
Tip: Don’t worry about symmetry — uneven facets give a more organic, handmade charm.
Related: How Long To Leave Polymer Clay Before Baking?


After you make all the facets, tap the edges down very gently to get rid of any flecks of extra clay.

4. Make a Hole
Use a toothpick or needle to gently poke a hole through each bead from one side to the other. Rotate slightly to prevent cracking.

5. Bake the Beads
Place beads on a parchment-lined baking tray. Bake according to your clay’s instructions (typically 15–30 minutes at 265–275°F / 130°C). Let them cool completely before handling.
Related: How Long to Bake Polymer Clay?

6. Optional: Paint or Finish
Once cool, you can:
- Sand the edges slightly for a smoother look
- Add metallic paint to edges for a gem-like shine
- Apply gloss glaze for a polished finish

I put the beads on the findings to do the glazing, but you don’t really have to. It was just easier to keep the wet edges from smudging. Paint the glaze on fairly thin. Once it’s dry (about 10 minutes for me) paint another coat. Let them sit for a while to dry completely.

7. Assemble Your Necklace
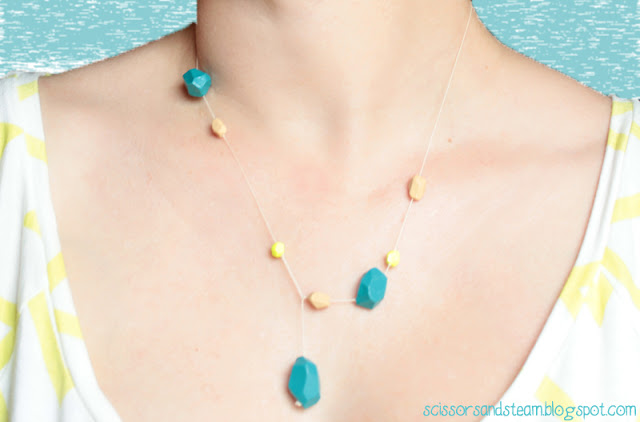
Thread your cooled beads onto your chosen string or cord. Arrange by color or size, knotting between beads if desired for spacing. Tie or clasp the ends to wear!
How to make clay bead necklace?
Now get out your thread. I used DMC tatting thread in ecru. It’s tougher and finer than regular thread. Cut a longish piece, maybe 2 or 3 feet. Better to cut longer than too short! Now tie a heavy knot in one end. I used triple overhand knots for this; that seemed to be enough to keep them from slipping through the beads. Now slide one of your heavier beads onto the thread and make sure it doesn’t slip off. This will be the dangly end, and also the part that holds the necklace on.
Now, for the rest of the beads, it’s up to you where you put them. I wanted mine uneven, so I spaced them somewhat randomly. Put a triple knot (or whatever you need for your beads) wherever you want a bead to rest. You don’t need to put a knot on both sides of the beads.

Since this necklace clasps in the front, you’ll have to do the opposite with the knots and beads for the other side. Just make sure you check the length as you go.

For the clasp, tie a large looped knot. You’ll loop it over the large first bead in order to wear the necklace. It’s so cool; there’s no fumbling with clasps behind your neck!
Design Tips:
- Try ombre shades or mix earthy tones for a trendy statement piece.
- Use gold foil leaf or mica powder before baking for a luxury look.
- Make extra beads for earrings or bracelets to match!
You will also like:
30 Inspiring Polymer Clay Ideas to Start


Gorgeous necklace, love the colour combo.
molto bello grazie mille
ciao Paola
Great tutorial! I had to pin this
Wow !!! Thanks for the tutorial!!!