This post may contain affiliate links. Please see our full Disclosure Policy for details.
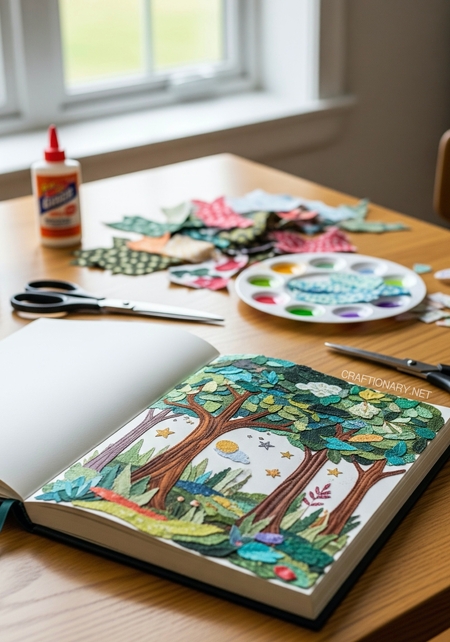
Painted fabric patch frame. I had so many small scraps of fabric left from our DIY projects and I was looking for ways to utilize them into making something useful and crafty. So, I came up with this Painted Fabric Patchwork Frame with no sewing.
Looking for a no-sew patchwork craft that adds charm and personality to your home? This painted fabric patch art project is perfect for beginners, renters, and anyone who wants to create handmade wall art without a sewing machine. In this tutorial, you’ll learn:
- How to turn leftover fabric scraps and fabric paint into beautiful framed decor using just fabric glue.
- Success tips to choose the right fabric and glue
- Common no-sew craft problems and solutions
- FAQs on making patchwork with fabric glue without sewing
- Scrap Fabric Patch Craft Inspirations
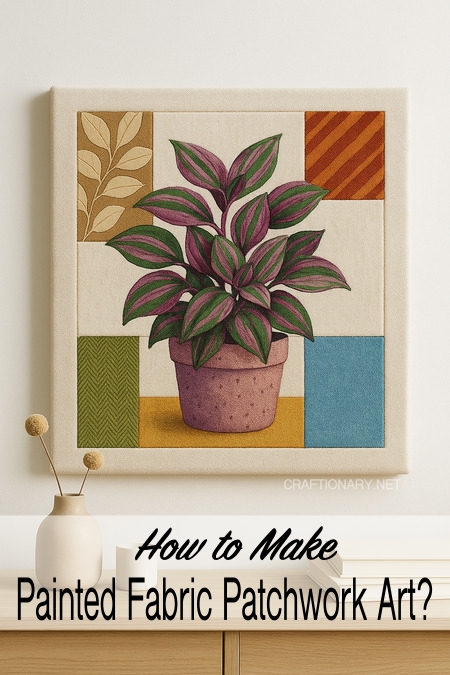
Painted Fabric Patch Art Frame
Why Choose No-Sew Patchwork Art?
No-sew patchwork art is a modern and accessible twist on traditional quilting and textile design. It’s perfect for DIYers, beginners, and upcyclers looking for easy, low-cost ways to create custom wall décor using fabric scraps—no needle or thread required!
- Beginner-friendly – No sewing skills needed
- Time-saving – Faster than stitching or quilting
- Budget-friendly – Use leftover fabrics and simple tools
- Creative freedom – Paint, glue, and collage without constraints
- Safe for kids and classrooms – No sharp tools or machines
Ideal for: renters, small-space crafters, school art projects, and creative home decorators.

Easy Fabric Patchwork Art
Painted Fabric Patchwork Frame
Materials:
- Assorted cotton or canvas fabric scraps
- Fabric paints or acrylic paints (add fabric medium for fabric use)
- Small brushes or stencils (I used size 1 for my small design)
- Double sided tape (works great for small projects) Alternatively, fabric glue (or strong no-sew glue like Fittdyhe fabric glue, Beacon Fabri-Tac or Aleene’s Fabric Fusion) are professional artwork choices.
- Scissors or rotary cutter
- Ruler and pencil
- Stretched canvas, wooden picture frame, or cardboard base
- Optional: Iron (for wrinkle removal)
- Optional: Wax paper or plastic sheet to protect your surface

Instructions:
1. Choose and Prepare Your Fabrics
Start by cutting the scraps slightly larger than your frame’s backing size. I chose to have a 3 column patch-work style.
You can select 5–10 fabric scraps in coordinating colors or prints. Patch them in rows, squares or anything abstract as your heart desires.
Tips:
- Use cotton, linen, or other sturdy fabrics that don’t fray easily. Iron them flat.
- Cotton and linen fabrics hold glue and paint well, and they’re widely recommended by textile artists for DIY textile art projects.
2. Cut Into Patch Shapes
Next I ironed the seams on the sides, to straightened and remove the frayed ends.
Use a ruler to cut your fabrics into geometric shapes – squares, rectangles, or even hexagons. Vary sizes for visual interest, but keep the outer edges clean and flat for easier framing.
3. Arrange the Layout
Lay the fabric patches on a flat surface and arrange them like a collage. Aim for balance in color, size, and texture.
Design Insight: Place more detailed or painted pieces toward the center, and keep lighter patterns near the edges for visual flow.
4. Trace Your Design on Fabric Patches
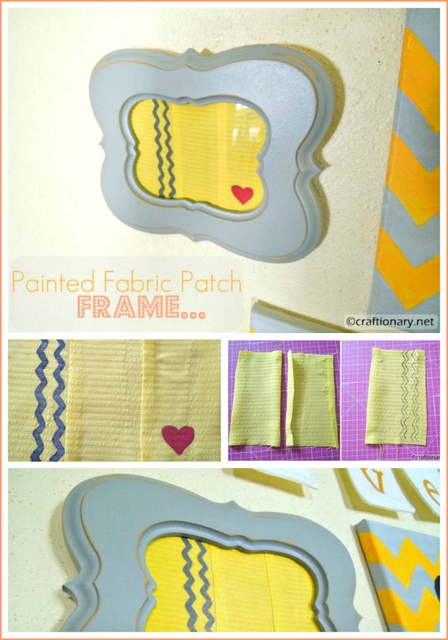
Based on the arrangement and where I want the design, I traced chevron pattern from this template.
Use carbon paper (or free hand draw) to trace your design. Try florals, botanical motifs, or abstract brush strokes. Let dry completely.
![]()
5. Glue in Place
- Double-sided tape: Now you can either sew or stick the patches together. I just wanted an easy fix (and frankly I don’t have a sewing machine) so I used double sided tape to stick the seams of the scraps overlapping each other. The result was pretty neat.
- Fabric Glue: Alternatively, one-by-one, lift each patch, apply a thin layer of fabric glue to the back, and press it onto your base (canvas or cardboard). Smooth out bubbles or wrinkles with your hand or a clean roller.
Let dry according to glue instructions – typically 2–4 hours.
Then I place the frame glass over the fabric front side up to locate where I wanted to draw my heart.

6. Paint Your Fabric Patches
Once I was satisfied with all the design elements, then I painted it.
Use fabric paint or a fabric medium mixed with acrylic paint to hand-paint details on a few of the patches. Try florals, botanical motifs, or abstract brush strokes. Let dry completely.
Tip:
For best results, place cardboard under your fabric while painting. If you’re not confident with freehand designs, try stamping or stenciling.
![]()
7. Frame Your Artwork
Once fully dry and flat, place the finished patchwork into a frame (with or without glass), or stretch over a wooden canvas and secure from behind.
Tip: If you use cardboard as a base, make sure it’s sturdy or double-layered so it doesn’t warp over time.

I traced and painted lines using chevron printable template and a heart. It matches well with the DIY Silhouette Painted Canvas.
Hang your no-sew painted patchwork wall art in the living room, entryway, or craft studio. It makes a great statement piece or gift!

Recommended Glues for No-Sew Patch Art:
Choose the Right Glue for Fabric Patchwork. Not all glues are made equal—especially when working with textiles. For long-lasting results, use glue specifically formulated for fabric or mixed-media crafts.
1. Glues to use for No-Sew Patchwork:
- Fittdyhe Fabric Glue – Easy to use, spreads evenly, most crafters like it.
- Beacon Fabri-Tac – Fast drying, professional hold, strong bond for heavier fabrics.
- Aleene’s Fabric Fusion – Permanent and washable, dries clear, great for framed art.
- Mod Podge Fabric – Dries soft, good for sealing painted fabric (not for thick gluing)
2. Avoid these:
- School glue / Elmer’s – Yellows over time, warps fabric, not durable
- Hot glue – Stiffens fabric and can leave bumps or burns
Pro Tip: Always apply a thin layer and press flat. Avoid over-gluing to prevent fabric puckering.
3. Common No-Sew Craft Problems (and Fixes)
| PROBLEM | CAUSE | FIX |
| Fraying edges | Loose weave or cutting fabric on grain | Use pinking shears or apply Fray Check |
| Glue soaking through fabric | Using too much glue or thin material | Apply glue sparingly, back fabric with interfacing |
| Paint cracking | Thick paint or improper drying | Use fabric medium, allow 24 hours drying |
| Edges lifting | Not enough glue or uneven pressure | Press with a book while drying |
| Wrinkles or bubbles | Uneven surface or damp glue | Smooth with hands or roller before drying |
Fabric Choices for Clean Results:
Choosing the right fabric is essential for a smooth glue-and-paint process. The goal is to use materials that don’t fray easily, hold paint well, and adhere cleanly without bulk.
1. Fabrics to Use:
- Cotton or Muslin – Soft, easy to cut, holds glue and paint well
- Canvas – Durable, textured, ideal for bold paint and strong hold
- Linen – Natural look, slightly textured, easy to work with
- Denim (lightweight) – Adds structure, great for modern or rustic looks
- Duck Cloth – Tightly woven, paint-friendly, doesn’t wrinkle easily
2. Fabrics to Avoid:
- Silk or Chiffon – Too slippery and hard to glue
- Polyester or stretchy fabrics – May not hold glue or paint evenly
- Tulle, netting, or lace – Fragile and hard to mount or paint
Tip: For painting, always pre-wash fabric to remove sizing chemicals.
FAQs for Fabric Patchwork Crafts:
- Can I wash the final product? No – this is a decorative wall piece, not meant to be washed.
- Can I use hot glue? Not recommended – hot glue stiffens fabric and can cause puckering. Use fabric-specific glue for best results.
- How long does it last? With proper framing and indoor display, your art should last for years!
How to Paint Fabric Without Bleeding or Cracking?
Painted patches can elevate your no-sew artwork, but the wrong technique leads to cracking, smudging, or bleeding.
Best Practices for painting on fabric:
- Use fabric paint or mix acrylic paint with fabric medium (2:1 ratio).
- Place a cardboard sheet underneath to prevent bleed-through.
- Avoid over-saturating your brush. Use light, even strokes.
- Let paint dry 24 hours before gluing or framing.
- For crisp edges, use stencils, tape, or stamps.
- Optional: Heat-set your painted fabric with an iron (no steam, 30 seconds) to make designs more durable.
Scrap Fabric Patches Creative Craft Project Inspirations:
Scrap fabric patches are incredibly versatile and can be transformed into a wide range of beautiful and functional crafts. Here’s a list of creative ideas:
1. Wall Art and Home Decor
- Patchwork Wall Hangings: Stitch scraps into geometric or freeform patterns.
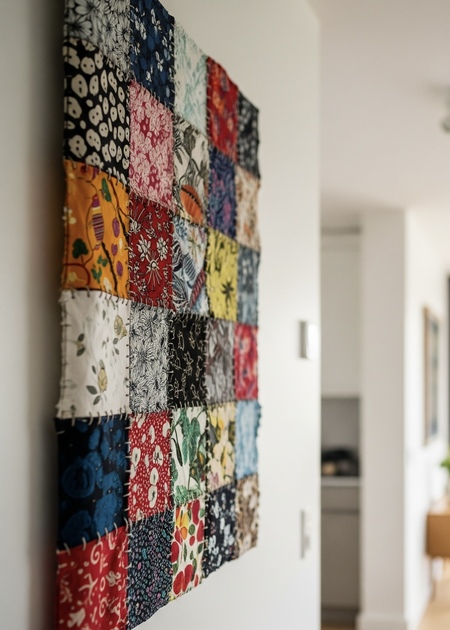
Patchwork wall hanging
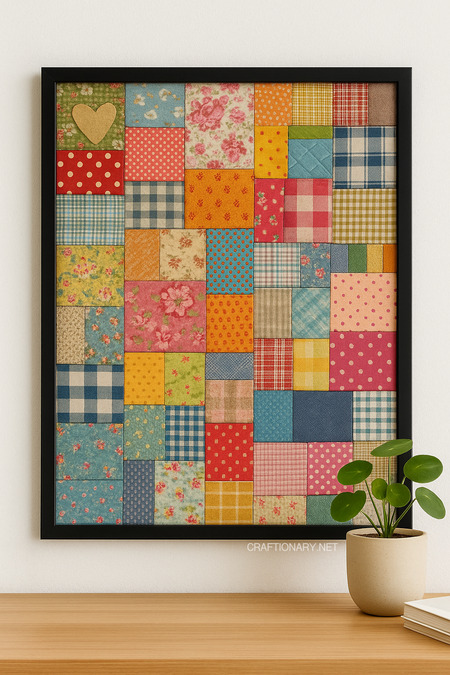
- Textured fabric display frame: Simply glue square cutouts on the frame backing.
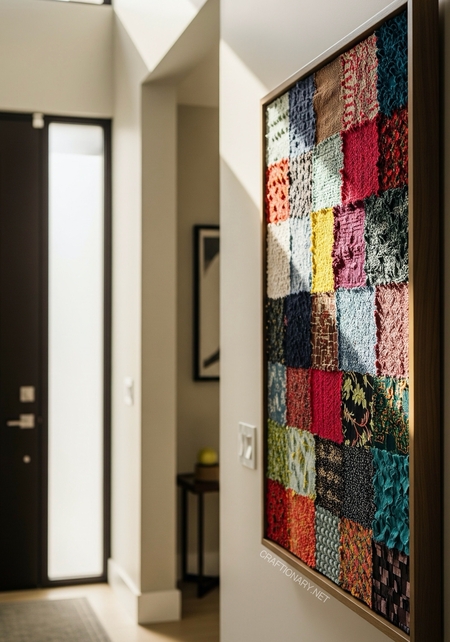
Textured fabric squares glued on frame patch work
- Framed Mini Quilts: Create small quilt pieces and frame them like artwork.
Framed Mini Quilt Patches
- Fabric Banners or Garlands: Cut into flags or shapes and string together.
- Scrappy Fabric Wreaths: Tie or glue fabric pieces to a wreath form.
2. Quilting Projects
- Mini Quilts or Lap Quilts: Great way to use coordinating scrap sizes.
- Mug Rugs or Coasters: Perfect for showcasing small pretty prints.
- Pot Holders or Oven Mitts: Add batting for function and thickness.
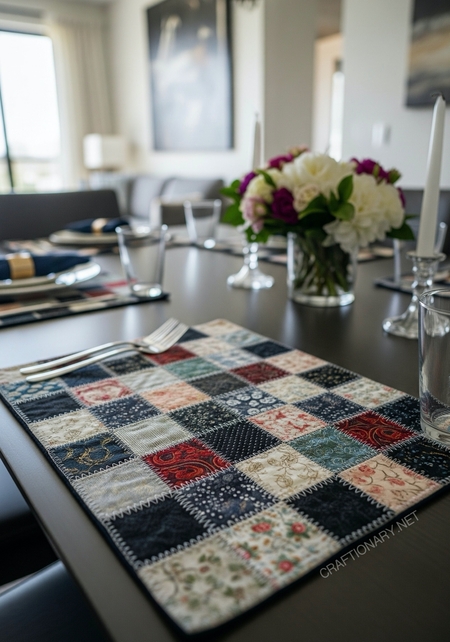
Patchwork placemat
3. Accessories and Clothing
- Scrunchies or Hair Bows: Quick and cute.
- Patchwork Tote Bags or Pouches: Use interfacing for structure.
- Fabric Bracelets or Brooches: Add beads, buttons, or embroidery.
- Appliqué on Shirts or Jackets: Cut and sew patches for custom designs.
4. Stationery and Organization
- Fabric-Covered Notebooks: Glue patches onto covers for texture.
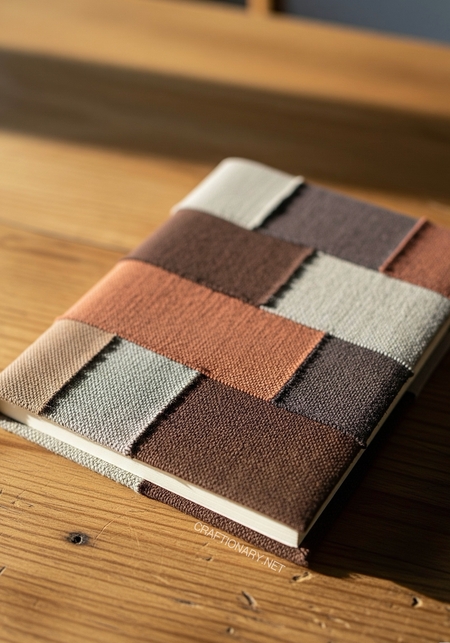
Patchwork notebook cover
- Fabric Bookmarks: Add ribbon or stitching detail.
- Patchwork Pencil Cases: Sew small rectangles together before constructing.
5. Eco-Friendly Crafts
- Reusable Fabric Gift Wraps or Bags: Sew scraps into furoshiki-style wraps.
- Fabric Produce Bags: Use lightweight cotton or mesh.
- Patchwork Grocery Totes: Reinforce with lining or interfacing.
6. Kids’ Crafts and Toys
- Soft Toys or Dolls’ Clothes: Perfect for small-scale sewing.
- Quiet Books or Fabric Puzzles: Combine colors and textures for interactive fun.
- Fabric Crowns or Capes: Great for pretend play using bold fabric designs.
7. Embellishments and Mixed Media
- Journaling or Scrapbooking Add-ons: Glue or stitch fabric into pages.
Patchwork scrapbook page
- Fabric Flowers or Yo-Yos: Use as brooches or decorative accents.
- Canvas Art with Fabric Shapes: Mix with painting, embroidery, or typography.
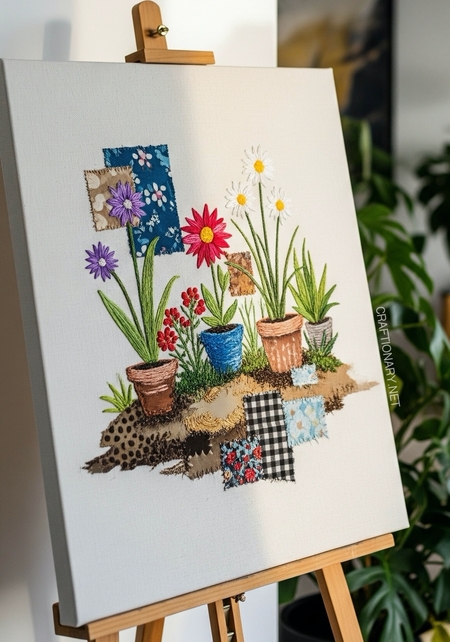
Patchwork canvas art
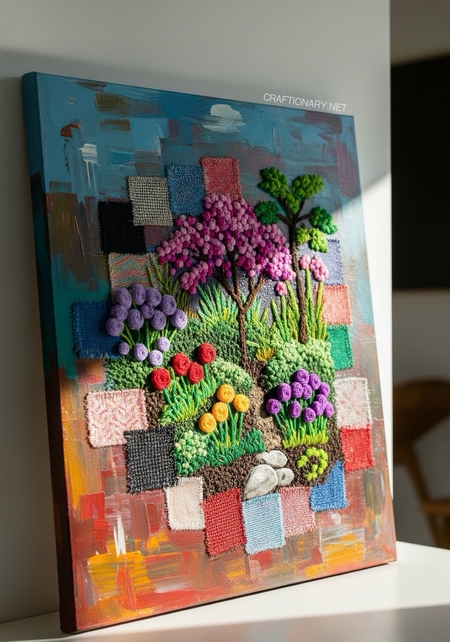
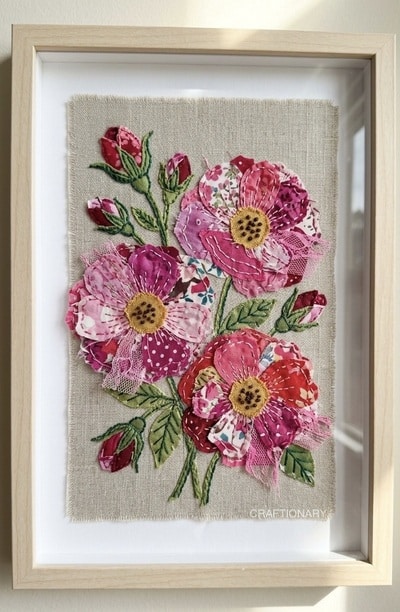
Mixed media painted fabric patch embroidery art
Related: 30 Most Popular Floral Hand Embroidered Garden Ideas
You will also like:
How to make custom frames for less
DIY Finger Knitted Embroidery Hoop
Simple Gallery Wall Craft Projects
You will also like DIY wall art and DIY projects Boards on our pinterest.


Wow this is very cute. I love those frames, I need to purchase some 🙂
This is to stinking cute. What a great job. I would love it if you showed it off at my new linky party @ Kampenlane.com.
I can't wait to see what else you create.
~Taylor
Such a simple and cute idea! I also did something with a frame this week that I submitted to the Ginney Sack. Come and visit me too!!
Admirable! The choice of fabric and color is perfect as well!
It looks nice there with your silhouette canvases!
Very Very pretty and very very creative!! Oh and it would look very very pretty at my place… just in case… 🙂
Thanks for sharing at The DIY Dreamer.. From Dream To Reality!! xoxo
That is a super cute frame – and it DOES look great with the chevron and next to the other chevron canvases!! Great job!
I'm so glad you linked this up to Romance on a Dime. Thanks for sharing!!
This is absolutely adorable!! Hope you can link it up at my turquoise lovin' party!! (All projects welcome)
What a fabulous idea for making matching decor! It goes together perfectly. Thank you for sharing on
That is really cute! Love the Chevron and the color! New sew….my kind of project!
Love the yellow and gray chevron:) It's so cheerful.
This is such a cute idea! I never would have thought of it. Thanks for sharing at Terrific Tuesdays.
Rachel
adventuresofadiymom.blogspot.com
This is very cute. This would make a great space filler for a gallery wall or in a stand up frame on a mantle. Thanks for sharing at Handmade Tuesdays.
I love the colors! Super cute!! I would love you to link it up to Fantabulous Friday going on now!
So pretty! What bright and happy decor. Thanks for linking up to my party!! Have a great weekend 🙂
I LOVE this cute frame! Thanks for sharing at oopsey daisy!
Cute!! I would never have thought to frame fabric like that! LOVE the chevron silhouettes too! Too fun! I'm so glad you shared at Shine on Fridays.
Your whole display is really cute. I've got to get me some of those frames. I'm seeing them all around and they're so cute.
This is such a wonderful idea! I love the fabric frame, but the entire wall is beautiful! Thanks for sharing with us this week!
Take care,
Trish
Such a cute idea.. LOVE these.. Would LOVE if you could please link up to my Mother's day gifts, idea's and fun tips linky if you have a moment please :)) Thanks SO much.. Wishing you a lovely start to your week.. xoxox.. M,
What cute little projects! I love the color and the cute little frame. I would love for you to share this at my link party
It all looks so cute! What a fun idea for your wall. We loved having you link up to our “Strut Your Stuff Saturday.” Hope you'll be back soon! -The Sisters
Thank you for linking up this fabulous project!!!This week’s Linky Party is up!!!! I hope you will stop by an link up another lovely project..Claire x