This post may contain affiliate links. Please see our full Disclosure Policy for details.
If you love combining crochet and decoupage, a DIY Mod Podge crochet tray is the perfect weekend craft. This project blends the softness of crochet with the durability of Mod Podge, resulting in a sturdy, waterproof, and decorative tray you can use for organizing, serving, or as a stylish home accent.
In this tutorial, I’ll walk you through how to make a Mod Podge crochet tray, sharing practical tips, the best materials to use, and ways to customize your design. Whether you’re a beginner at decoupage or an experienced crocheter looking for a new twist, this guide will help you create a piece that’s both functional and beautiful.
Why Make a Mod Podge Crochet Tray?
Crochet trays lined and sealed with Mod Podge have a unique charm—they’re soft to the touch but sturdy enough to hold keys, jewelry, or lightweight decor.
Benefits of making one:
- Customizable – choose yarn colors, crochet patterns, and printed designs.
- Durable – Mod Podge adds a protective coating, making it easy to clean.
- Budget-friendly – uses inexpensive materials you might already have.
- Gift-worthy – perfect for birthdays, housewarmings, or holiday presents.
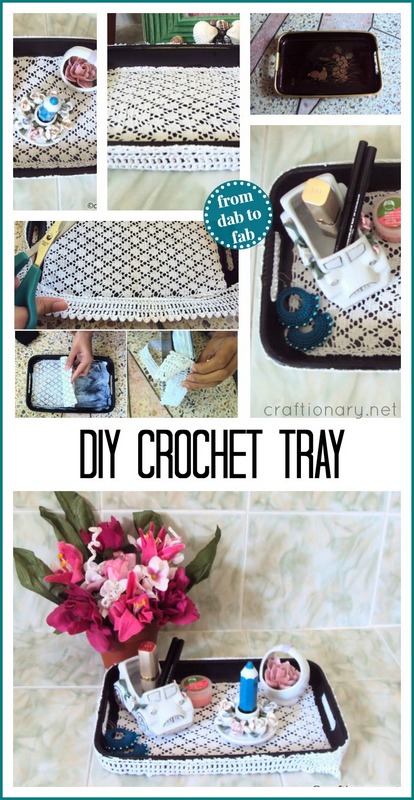
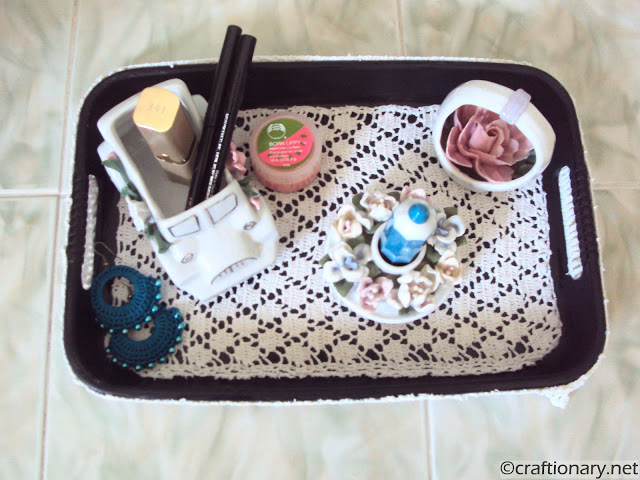
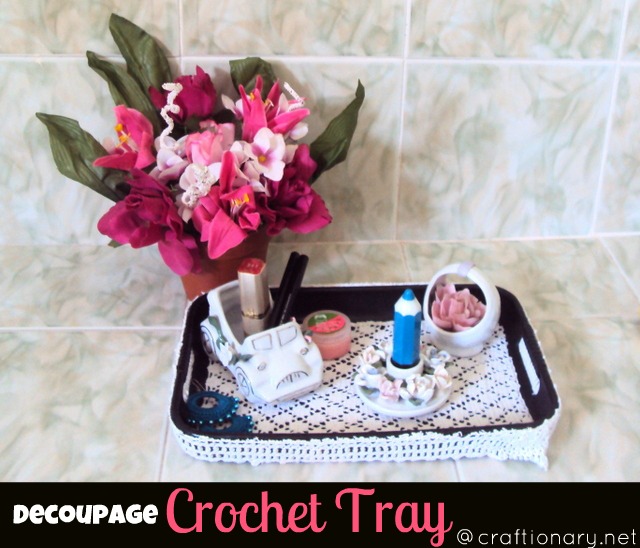
Turn an old vintage tray into look beautiful and decorative display with old crochet doilies.
Related: What to Make with Crochet Doilies?
Materials
Before starting, gather all your supplies:
- Crochet mat – from thrift store, dollar store or old stash
- Scissors – for trimming yarn
- Mod Podge (Matte or Gloss) – for sealing and strengthening
- Foam brush or soft bristle brush – for even application
- Plastic sheet or wax paper – to protect your work surface
- Tray base (optional) – wood or plastic tray to line with crochet piece
- Decorative paper, fabric scraps, or napkins – for extra design elements
How to Make a DIY Mod Podge Crochet Tray?
Method 1
Step 1: Crochet the Base
You can either crochet the base to the size of your desired tray or utilize your stash.
Pro Tip: Use tight stitches so the yarn holds its shape and doesn’t sag after Mod Podge application if crocheting.
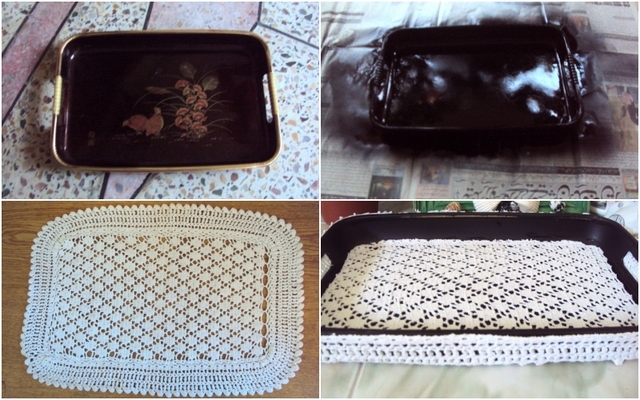
Step 2: Prepare the Tray
Spray paint an old tray to your desired color and let it dry. Cut the crochet mat to the tray’s base dimensions.
This crochet mat fit perfectly into the tray. I separated the border from the center.
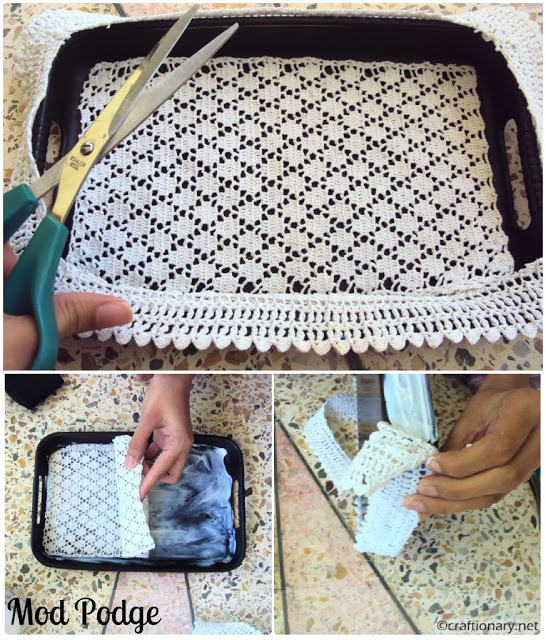
Step 3: Apply Mod Podge
- Using your foam brush, apply an even layer of Mod Podge over the base of the tray and place the crochet piece over it.
- With the cutout border use Mod Podge on the side of the tray and stick the crochet border.
- Now let it dry.
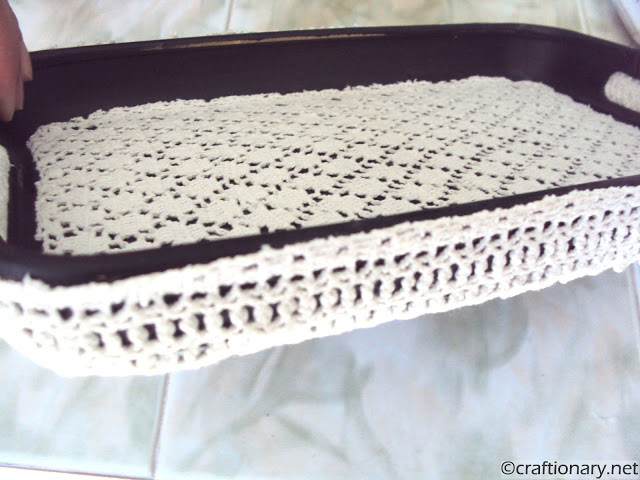
Step 4: Seal with Mod Podge
Now use the mod podge to cover the top of the crochet mat and the sides to seal it. Let it dry for 4 hours before using.
I love how neat and organized the tray looks with a hint of handmade love!
Method 2:
Step 1: Prepare the Surface and apply Mod Podge
- You can also make a crochet tray without any base.
- Place your finished crochet piece on a flat surface covered with plastic or wax paper to prevent sticking.
- Using your foam brush, apply an even layer of Mod Podge over the entire crochet piece. Make sure to press the Mod Podge into the stitches so it fully saturates the fibers.
- Flip over and coat the underside as well.
Note: If adding decorative paper or fabric, position it on the crochet piece before sealing with Mod Podge.
Step 2: Shape and Dry
While still wet, shape your crochet piece into the tray form—you can use a real tray or bowl as a mold.
Let it dry for at least 24 hours.
Apply a second coat of Mod Podge for extra durability, then let it dry again.
Step 3: Final Touches
Once dry, your crochet tray should be firm and ready to use. You can:
- Add handles for carrying.
- Decorate edges with lace or ribbon.
- Line the base with felt for a softer finish.
Mod Podge Crochet Tray – Design Ideas
- Rustic farmhouse look: Use jute twine instead of yarn and matte Mod Podge.
- Floral vintage tray: Crochet in cream yarn and decoupage with floral napkins.
- Bold and modern: Use bright yarn and seal with glossy Mod Podge for a lacquered effect.
Expert Tips for Best Results
- Use cotton yarn for better stiffness and Mod Podge absorption.
- Thin layers of Mod Podge prevent clumping and speed up drying time.
- Mold while wet to ensure the tray keeps its shape.
- Avoid water exposure even after sealing—wipe clean with a dry cloth.
FAQs
1. Can you wash your Mod Podge crochet tray?
Yes, with waterproof Mod Podge you can wash it.
2. How long does it take to dry?
Usually 24 hours for one coat, but 48 hours is better for complete curing.
3. Can you make this without a base tray?
Yes! You can freeform the crochet and mold it with a bowl or box while drying.
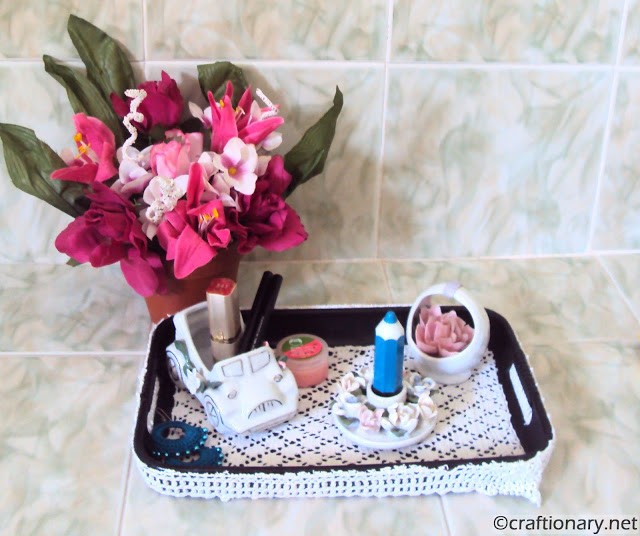
My mom loves the transformation and she used it to display her vintage collection and to-go makeup supplies in the washroom.
A DIY Mod Podge crochet tray is a simple yet impressive project that blends two crafts—crochet and decoupage—into one functional decor piece. With a few materials, some patience, and a touch of creativity, you can create a tray that looks store-bought but has the charm of handmade craftsmanship.
Whether you make it for yourself or as a heartfelt gift, this project proves that combining fiber art with sealing techniques like Mod Podge opens up endless possibilities.
You will also like:
DIY Backsplash tile tray that looks expensive
How to Stencil a Decorative Tray: DIY Painted Tray
How to Make a Resin Tray DIY that Looks Classy
DIY Large Leaf Resin Tray With Hot Glue Gun
You will also enjoy the DIY Crochet and DIY Trays & Vases Boards that are updated regularly.


Pretty idea, Hani!
Turned out beautiful! You and your Mom do beautiful work Hani. I wish I had learned to crochet when I was younger. Thanks for sharing at Creative Thursday this week. Have a wonderful weekend.
Michelle
Hello.
Visiting from Serenity Saturday blog hop.
My wife used to crochet a lot, but doesn't have the time now. I have no such talent (LOL). This is pretty special though and a wonderful keepsake too. Nice presentation. Thanks for sharing.
Trembling With Desire
Very creative:)
What a beautiful transformation!
Love the lace! Looks so feminine now. Thanks for linking up at Take it on Tuesday!!
Betsy @ Romance on a dime.com
I am totally pinning this lovely project, Hanni! thanks for sharing this with us at the Crafty Saturday Party. I can't wait to see what you have for us this week.
Hugs,
[email protected]
Very pretty!! Thank you for sharing at Sharing Saturday!!
LOVE IT!!! What a great idea to decorate the tray!
Thanks so much for sharing this at The DIY Dreamer.. From Dream To Reality!