This post may contain affiliate links. Please see our full Disclosure Policy for details.
Empty Altoids tins are endlessly useful: their compact, sturdy metal design makes for a fantastic base for DIY projects, travel kits, and quirky storage solutions. Instead of tossing them in the recycling bin, you can turn them into durable, personalized items that are both functional and fun.
From Trash to Treasure: The Enduring Charm of Altoids Container
Related: Ways to decorate altoid tin crafts
That satisfying click of an empty Altoids tin isn’t just a sound—it’s an invitation to create. The humble metal box, perfectly sized for a pocket or bag, has become a staple for crafters, survivalists, and artists alike. It’s the ultimate canvas for upcycling, turning a mint container into a highly functional or beautifully decorative piece.
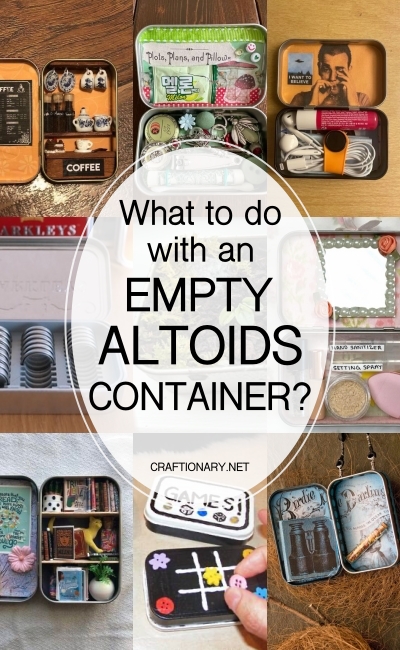
Empty altoids container
Artistic Techniques to Elevate Your Altoids Container
1. Decoupage
- Use thin scrapbook paper or napkins.
- Seal with 2–3 coats of Mod Podge.
- Prevent bubbles by smoothing oil from the center outward.
2. Mini Diorama Building
- Use layered cardstock or foam to create depth.
- Add polymer clay figures or 3D items.
- Backgrounds can be watercolor paper or tiny prints.
3. Aging, Distressing and Metallic Finishes
- Dry brushing gives texture.
- Metallic wax gives a vintage look.
- Alcohol inks add marbled, vibrant effects.
4. Lining the Interior
- Use felt, velvet, or cork for a soft, clean finish.
- Double-sided tape helps avoid bulky glue lumps.
5. Resin Art
- Create a glossy, waterproof lid design.
- Perfect for mini terrariums or faux ocean art.
Altoid Tin Crafting 101: The Beginner’s Primer
Before you start gluing, painting, or wiring, you need a clean, prepped tin. Skipping these steps is the fastest way to a frustrating project!
- Tin Prep: Cleaning and Removing the Label
- Remove Residue: Wipe down the inside with rubbing alcohol to eliminate sticky mint residue.
- The Label: The paper label on the bottom can be stubborn. Soak the tin in warm, soapy water for 5–10 minutes, then peel it off. Use Goo Gone or a tiny dab of cooking oil on a rag to remove any remaining adhesive.
Step-by-Step Tutorial: Easy Decoupage Altoids Container
Materials
- Tin
- Scrapbook paper
- Mod Podge
- Pencil
- Scissors
- Paint (optional)
Preparations
Before you start, here are some essential steps to make sure your tin is ready for crafting:
- Clean the Tin: Wash with soap, dry thoroughly, and wipe with isopropyl alcohol to remove residue.
- Sand Edges: Use fine-grit sandpaper to smooth any sharp metal to avoid cuts.
- Prime (Optional): Apply a metal primer if you plan to paint—it helps your design last longer.
- Line the Interior: Use felt, foam, or cork sheets to pad the inside (especially useful for storage or delicate items).
- Gather Supplies: Depending on your project, you might need glue, resin, paint, dividers, small containers, magnets, or miniature items.
Step-by-Step Instructions
- Trace the tin lid onto paper and cut out your shape.
- Paint the edges if you want a solid border.
- Apply Mod Podge to the lid and press paper smoothly.
- Seal with 2–3 thin coats.
- Line the interior with felt or cork.
- Add embellishments: ribbon, vinyl labels, stickers, charms.
Success Tip: Let each coat dry fully to prevent tackiness—another detail most competitors fail to mention.
Tips to Personalize Your Altoid Container Crafts
- Use Cricut vinyl labels for names, quotes, or icons.
- Add magnets to turn tins into fridge organizers.
- Use fabric scraps to wrap tins for boho-style containers.
- Add mini hinges and create flip-open boxes.
- Use spray enamel for a premium glossy finish.
The Embossing Problem (Pro Tip!)
The “Altoids” lettering embossed on the lid and sides can show through thin paper or paint.
- Option 1 (Paint): Prime the entire tin with a layer of white acrylic paint or gesso. This covers the lettering and gives your paint or washi tape a bright, consistent base.
- Option 2 (Paper): For altered art or decoupage, trace the lid onto thick cardstock or thin foam core, cut to fit, and glue this layer over the embossing before adhering your decorative paper. This creates a perfectly flat surface.
The Clasp Conundrum: Making Sure the Lid Closes
This is the most common beginner frustration. If your tin won’t close, your lining or embellishments are too thick.
- Rule of Thumb: Any material placed on the inside lid must be extremely thin (thin paper, foil, felt). Anything thick, like craft foam or multiple layers of cardstock, should be reserved for the inside bottom of the tin only.
- Thin the Edges: When lining the sides, trim the paper or fabric just slightly lower than the metal lip. The metal-on-metal contact is what allows the tin to “click” shut.
The Functional Side: EDC and Utility Kits
The Altoids tin is the original Everyday Carry (EDC) container. These projects prioritize organization, compactness, and utility.
1. The Essential Altoid Tin Survival Kit
This is a classic project—a micro kit designed for short-term emergencies. Every item should serve multiple purposes.
| CATEGORY | ESSENTIAL ITEMS | RATIONALE |
| Fire Mini Bic Lighter
|
Ferrocerium Rod (secured to tin exterior), Cotton Balls soaked in Vaseline (best tinder), Waterproof Matches.
|
Fire is paramount for survival.
|
| Water Water Purification Tablets (stored in a small sealed bag)
|
Aluminum Foil (can be used to boil water over a fire)
|
Includes purification, not just collection.
|
| First Aid 3-4 Band-Aids
|
Triple Antibiotic Ointment Packet, 1-2 Pain Relievers (Acetaminophen/Ibuprofen)
|
Practicality for minor, common injuries.
|
| Utility Mini Multi-tool (or Razor Blade/Scalpel Blade—handle with care!)
|
10 ft of 8-10lb Fishing Line and 2-3 Hooks, Small Safety Pin.
|
Focuses on core utility (cutting, catching, repair).
|
2. Practical and Organizational Kits
| PROJECT IDEA | CORE COMPONENTS AND USE |
| Mini Sewing Kit Needles (stored in a cork piece)
|
Thread wrapped around a small piece of card, 2-3 Safety Pins, Mini Scissors.
|
| Watercolor Travel Palette
|
Fill the bottom with white polymer clay (Sculpey) or hot glue to form small wells, or use half-pans secured with magnets.
|
| Pocket Tackle Box
|
Assorted fishing hooks, sinkers/weights, 20ft of monofilament line.
|
| Urban EDC/Wallet
|
Secure credit cards/cash with a small elastic band. Use a light-colored foam lining to keep contents secure and quiet.
|
The Artistic Side: Altered Tins and Mixed Media
Altered Art is the craft of transforming an ordinary object into a highly detailed, personalized artistic piece.
1. Altered Art Tins and Dioramas
This technique involves decoupage, layering, and embellishments to create a miniature 3D scene.
| TECHNIQUE | KEY TOOLS/MATERIALS | VALUE |
| Paper Adhesion
|
Mod Podge (for paper), Foam Brush, Ink Pad (Distress Ink).
|
Inking the edges of paper before gluing it down camouflages any slight misalignment.
|
| Embellishment
|
Small Charms, Miniature Figures, Dresden Trim, Beads.
|
E6000 or a high-quality, quick-dry adhesive (like Scotch Quick Dry) is necessary for securely bonding metal/plastic to the tin.
|
| Diorama Depth
|
Thin Foam Core or Corrugated Cardboard.
|
Use multiple layers of foam to create distance and a 3D effect inside the tin’s base.
|
2. Polymer Clay and Resin Tins
Polymer Clay (Sculpey): The clay adheres best to bare, clean metal. You can sculpt directly onto the tin, and the entire piece (tin + clay) can be baked according to the clay manufacturer’s directions.
Resin Tins: Safety First! Use epoxy resin to create a glossy, embedded scene. Always work in a well-ventilated area with gloves. Fill the hinge holes with a dab of hot glue first to prevent seepage, then pour thin, level layers of resin.
Essential Tools and Expert Glues
Using the right materials is the key to a professional-looking and durable craft.
1. Gluing to Metal: The Expert Guide
| APPLICATION | RECOMMENDED ADHESIVE | RATIONALE |
| Paper/Fabric to Tin
|
Mod Podge, Permanent Spray Adhesive
|
Specifically formulated for decoupage and large surface area coverage.
|
| Metal/Heavy Embellishments
|
E6000 Industrial Strength Glue
|
High strength, flexibility, and permanence needed to bond heavy materials to the slick metal surface.
|
| Foam/Inserts
|
Hot Glue (Low Temp), Tacky Glue
|
Best for structural integrity; hot glue sets quickly for foam linings.
|
2. Specialized Tools (Niche vs. Budget)
While pros use specialized equipment, there are budget-friendly alternatives:
| PRO TOOL (Expertise) | BUDGET ALTERNATIVE (Experience) |
| Crop-A-Dile/Corner Chomper
|
Sharp Scissors and a Dime or Coin (use as a tracing template to perfectly round the corners of paper).
|
| Brayer
|
Clean Rolling Pin or edge of a Credit Card (to smooth paper and press out air bubbles).
|
| Distress Ink Pad
|
Dark Brown or Black Eye Shadow/Makeup Brush (for aging paper edges).
|
Frequently Asked Questions
1. Are Altoids tins safe for food storage?
They originally held food, but for food reuse, thoroughly clean and line them with food-safe paper or insert plastic containers. Otherwise, they’re best used for non-edible crafts.
2. How do you remove the Altoids logo from the lid?
Sand lightly, use primer, and then paint or add scrapbook paper or vinyl.
3. Can you solder or drill Altoid tins?
Yes, but proper tools and safety gear (gloves, goggles) are required. For most crafts, glue and paint work just fine.
4. Where can you buy lots of Altoid tins for crafting?
Some crafters buy mint in bulk or ask friends/family to save their tins. You can also find used tins on craft resale groups.
Your Next Tiny Project
The Altoid tin remains a perfect upcycling vessel because it forces you to think small, be efficient, and maximize every millimeter of space.
Before tossing that empty Altoids container into the recycling, take a moment to imagine its potential. With a little creativity, you can transform it into a travel kit, a miniature artwork, or a practical storage solution—and give it a new life that’s functional, beautiful, and earth-friendly.
Whether you need a functional mini survival kit to fit in your backpack or a gorgeous piece of altered art to gift, the satisfying snap of the lid means your tiny treasure is ready to go.