This post may contain affiliate links. Please see our full Disclosure Policy for details.
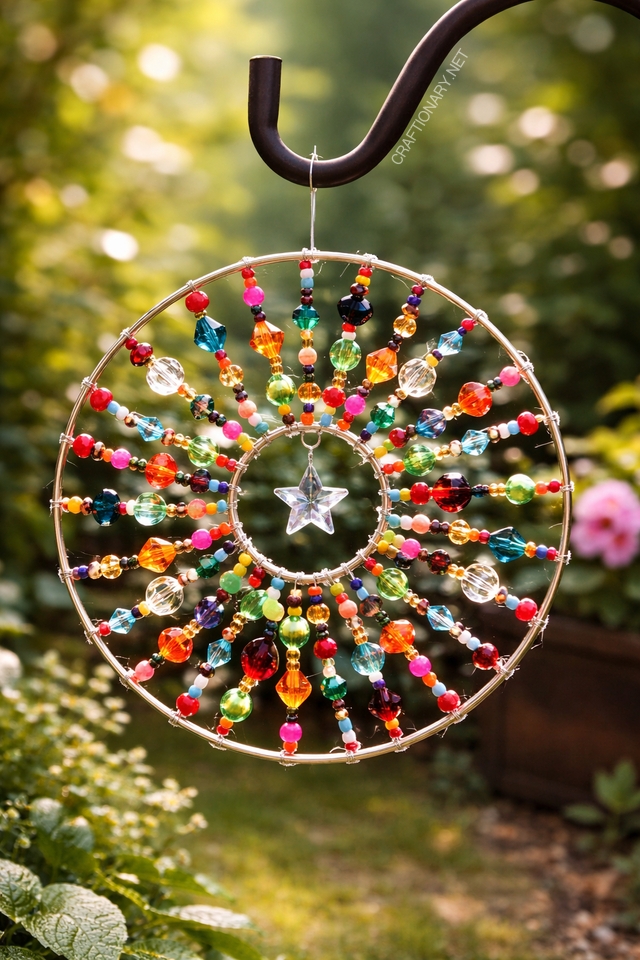
That is a stunning beaded suncatcher! The way the light hits those faceted beads is really something. The design uses a spoke technique, connecting a smaller inner ring to a larger outer ring to create a sunburst effect.
Beaded suncatchers are more than just garden ornaments; they are jewelry for your home. Whether hung in a sun-drenched window or from a shepherd’s hook in the garden, these crystal creations capture and refract light, scattering rainbows across your space.
We will walk you through creating a professional-grade, double-ring beaded suncatcher—the exact style seen in high-end craft boutiques.
Project Overview
- Difficulty: Intermediate (Requires patience with tension)
- Time: 2–3 hours
- Cost: $15–$30 (depending on bead quality)
Essential Materials and Tools
To ensure your suncatcher lasts through seasons of wind and sun, quality materials are key.
- Metal Rings: You will need two sturdy metal hoops (copper or brass are excellent for weather resistance). A 3-inch inner ring and an 8-inch outer ring create the perfect sunburst ratio.
- Beading Wire: While fishing line is common, clear monofilament (10lb–15lb test) or nylon-coated jewelry wire is preferred for durability against UV rays.
- Assorted Beads: (Large spoke beads 8mm-10mm, small spoke beads 4mm-6mm)
- Faceted Glass/Crystal: These are essential for the prism effect.
- Seed Beads: Used as spacers to protect larger beads from grinding against the metal.
- Acrylic Beads: Great for lightweight bulk and color.
- Centerpiece: A large crystal star, heart, or teardrop prism.
- Tools: Needle-nose pliers, rust proof spray paint, wire cutters, and clear waterproof glue (like E6000 or clear nail polish).
Step-by-Step Instructions
Optional spray paint your rings before starting the project.
1: Prep the Centerpiece
Attach your star prism to the top of the inner ring. Use a small jump ring or a tight loop of wire so the star hangs exactly in the center of the 3-inch circle.
2. Create the Anchor Spokes
- The secret to a perfectly symmetrical suncatcher is establishing your tension early.
- Cut four pieces of wire, each 10 inches long.
- Tie the first wire to the 12 o’clock position on the inner ring.
- Thread your beads onto the wire until the bead column reaches the edge of the outer ring.
- Secure the wire to the outer ring using a surgeon’s knot (fishing wire) or twist it over with plier (wire).
- Repeat this at the 3, 6, and 9 o’clock positions. Your inner ring should now be suspended and centered.
3. Filling the Sunburst
Now, fill in the gaps between your anchors.
- The Pattern: For a professional look, follow a consistent pattern for each spoke (e.g., Seed Bead > Small Round > Large Faceted > Small Round > Seed Bead).
- Spacing: Aim for a spoke every 0.5 to 0.75 inches along the outer ring.
- Tension: Keep the wires taut but not so tight that the rings begin to taco or bend.
- The Technique: (optional) Instead of cutting a new string for every spoke, you can “travel” along the ring. Tie to the inner ring, string up to the outer ring, tie a knot, then thread the line along the outer ring a half-inch and start the next spoke going back down.
4. Securing the Knots
Once all spokes are finished, apply a tiny drop of clear glue to every knot on both the inner and outer rings. This prevents the wire from sliding or loosening over time due to temperature changes.
5. Finishing the Hanger
Attach a sturdy loop of wire or a decorative chain to the top of the outer ring. Ensure the attachment point is centered so the suncatcher hangs perfectly level.
Important Tips for Success
- Hidden Knots: (If using fish wire) When tying off a spoke, try to thread the tail of the fishing line back through the last two beads before clipping it. This hides the sharp end of the wire.
- Weight Matters: (If using fish wire) If you use very heavy glass beads, the fishing line may stretch over time. Using a slightly thicker line (12lb test) helps maintain the drum-tight look of the spokes.
- Uniformity: To keep the inner ring perfectly circular, count your beads! Ensure every spoke has the exact same count and length of beads so the tension is even all the way around.
- Friction Check: Copper rings can sometimes have slightly sharp joins. Check your rings for any burrs that might snap the fishing line and sand them down if necessary.
Pro Tips for Longevity
- UV Protection: If hanging outdoors, use glass rather than plastic beads. Plastic can fade and become brittle in direct sunlight over 1–2 years.
- Weight Balance: If your suncatcher leans forward, your centerpiece might be too heavy. Ensure the beads on the spokes provide enough counter-tension.
- Cleaning: Use a soft microfiber cloth and a bit of glass cleaner to keep the facets sparkling.
Commonly Asked Questions
What is the best wire for suncatchers?
For indoor use, 0.5mm nylon cord is fine. For outdoor use, stainless steel jewelry wire or high-test fishing line is best as it won’t rot or rust.
How do you make my suncatcher make more rainbows?
The rainbow effect comes from refraction. Look for beads labeled AB Coated (Aurora Borealis) or Faceted Lead Crystal. Smooth round beads will glow, but they won’t throw rainbows.
Can you use hot glue?
Avoid hot glue for suncatchers. If hung in a window, the sun’s heat can re-melt the glue, causing your project to fall apart. Use a permanent, cold-set adhesive.
These suncatchers make incredible gifts for housewarmings, Mother’s Day, or even as a meditative craft for your own patio. Once you master the double-ring technique, the design possibilities are endless!
You will also like:
The Ultimate Guide: Make Chicken Wire Beaded Suncatchers
Make Beaded Succulent Plants: A Forever Blend of Craft and Nature
Aesthetic Perler Bead Ideas and Patterns for Elevating Your Space