This post may contain affiliate links. Please see our full Disclosure Policy for details.
Creating a lasting floral arrangement like the one in the image is a perfect way to bring everlasting spring into your home. This DIY crochet hydrangea bouquet project is a favorite among fiber artists because it combines simple repetitive stitches with a stunning, high-impact result.
Unlike real hydrangeas that wilt in days, these hand-stitched blooms provide a permanent touch of slow decor for your living space.
1. Crochet Hydrangea Flowers Free Pattern:
Crocheting a full bouquet may look intimidating, but it is actually one of the best ways to practice foundational skills. Because hydrangeas are made up of many small florets, you can perfect your technique on one tiny flower before moving on to the next. It’s a low-pressure, portable project that allows you to see progress quickly.
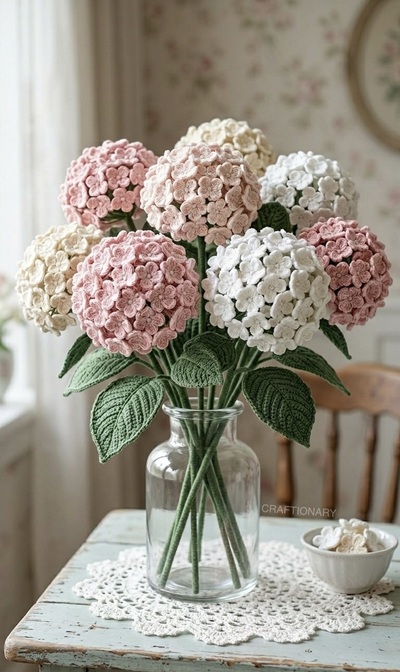
A hydrangea head is just dozens of tiny four-petal flowers packed onto a ball, and you can crochet a single floret in a few minutes while watching TV. Make fifty of them and you have a bloom that looks far harder than it is.
This is the pattern for the dusty pink, cream and white bouquet in the photo above. You’ll make the florets, build the head, wire the stem and add veined leaves. It’s beginner-friendly if you can make a magic ring and a double crochet.
Time: about 4–5 hours per bloom, mostly florets.
Skill level: confident beginner.
Materials Needed:
To achieve the soft, realistic textures seen in the image, you will need:
- Yarn: Yarn (DK or light worsted cotton): Cotton holds its shape, shows petal definition and doesn’t pill. Plan on roughly one 50 g ball (about 100–125 m) per bloom.
- Flower: Antique rose or dusty pink, blush, ivory, white.
- Leaves: Sage or leaf green for stems and leaves, plus a darker green for leaf veins.
- Crochet Hook: 2.25mm or 2.75mm (go down to 2.25 mm if your florets look floppy). Using a slightly smaller hook than the yarn label recommends ensures the petals are stiff and hold their shape.
- Stems: 18-gauge floral wire or wooden skewers. One 30 cm (12 in) length per stem, plus a little extra for leaves
- Assembly: A hot glue gun or floral tape, wire cutter, and 6 cm (2.5 in) foam or polystyrene ball to act as the base for the bloom.
- Tapestry needle and scissors.
- Glass vase for displaying the flowers.
Substitutions: A chenille stem works if you don’t have floral wire, but it bends under the weight of a full head. Use wire for any bloom you want to stand upright in a vase.
Abbreviations (US Terms)
- ch: chain
- sl st: slip stitch
- sc: single crochet
- hdc: half double crochet
- dc: double crochet
- MR: magic ring
Step-by-Step Instructions
1. The Individual Hydrangea Floret
The secret to a lush hydrangea is volume. Each bloom is a cluster of tiny four-petal or five-petal flowers. You need about 50–60 florets per 6 cm bloom. Each finishes around 3 cm (1.25 in) wide.
- Round 1: Create a Magic Ring.
- Round 2: Into the ring: ch 2, 4 dc, ch 2, sl st into the ring. That’s one petal. Repeat 3 more times for 4 petals.
- Finish: Pull the tail to close the ring tightly. Fasten off, leaving a 15 cm tail.
- Center (optional): Add a tiny French knot or a seed bead in a slightly contrasting shade. Real hydrangea florets have a small pale center, and it makes the whole head look more natural.
Make them in batches: Do 10 at a time and weave in nothing yet. The tails get glued down later, which saves a lot of finishing time.
2. Building the Flower Head
- Dab glue on the ball and press the first floret at the top, tail tucked underneath.
- Work outward in rings, overlapping each floret slightly over the last so no foam shows. Real hydrangea heads are dense, so overlap more than feels necessary.
- Alternate petal angles so the four-petal shapes don’t line up in rows.
- Leave a bare patch about 1 cm wide at the bottom where the stem goes in.
- Let the glue set fully before moving on.
Make it look real: Hydrangeas aren’t one flat color. Mix two neighboring shades in each head, for example mostly dusty pink with a handful of blush florets scattered in. This is what makes the bouquet lifelike instead of crafty.
Substitute method: You can use the cluster technique instead of foam ball. Start by passing a wire through the bud of each flower and twist the wires together to form a cluster of tiny flowers to resemble a hydrangea head.
3. Finishing the Wire Stems
- Bend a small loop or hook at one end of the 30 cm wire.
- Add glue to the bare patch on the ball and push the hooked end in, so the bend anchors inside the foam.
- Starting at the flower head, wrap the stem tightly with green yarn, dabbing glue every few centimetres. Or cover it with floral tape first, then wrap the yarn over it for a textured stem.
- Finish at the bottom, glue the tail and trim.
2. The Realistic Sage Leaf
- Base: Chain 15.
- Row 1: Single Crochet (SC) in 2nd chain from hook, Half Double Crochet (HDC) in next, DC in next 8, HDC, SC. (3 SC in the tip to turn).
- Back Side: Work back down the opposite side of the chain following the same pattern (SC, HDC, 8 DC, HDC, SC).
- Detail: Slip stitch around the entire edge to create a firm border. For a more realistic look, you can crochet over a thin piece of wire during this final round.
3. The Realistic Sage Leaf
Make 4–6 leaves per stem cluster.
- Base: Ch 15.
- Side 1: Starting in the 2nd ch from the hook: sl st, sc, hdc in next 2, dc in next 5, hdc in next 2, sc in next 2, 3 sc in the last ch (the tip).
- Side 2: Rotate to work along the other side of the foundation chain: sc in next 2, hdc in next 2, dc in next 5, hdc in next 2, sc in next, sl st in the last chain. Fasten off and leave a tail.
- Veins: With darker green yarn, backstitch a line down the center. Then add short diagonal stitches from the center line toward the edge on both sides. This gives the ribbed look in the photo.
- Posable leaves: Lay a 15 cm wire along the foundation chain before you start, and crochet around it. Leaves will then hold a curve.
Assembling the Bouquet
- Wrap 3–4 leaves around the stem just below each head with floral tape or green yarn.
- Make blooms in different sizes if you like. A 5 cm ball for a smaller bloom looks great beside the 6 cm ones.
- Stagger stem lengths by 2–3 cm so heads sit at different heights.
- Add a few loose leaves low on the stems to fill the vase.
Vase styling: A clear glass vase shows the stems, which are half the charm. Pebbles or a little crumpled paper in the base hold the stems in place.
Here’s another idea you can make by tweaking the above directions a little.
2. Hydrangea pitcher arrangement:
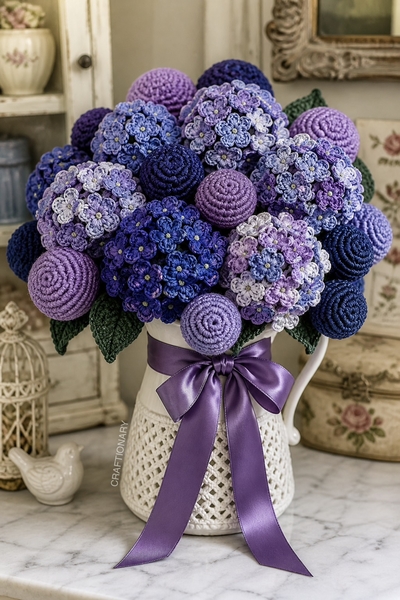
Materials Needed:
To achieve the deep purples and varied textures seen in the image, you will need:
- Yarn: Light-weight (Level 3) or Sport weight cotton yarn in various shades: deep violet, periwinkle, lavender, and royal blue. Use dark forest green for the leaves.
- Crochet Hook: 2.5mm or 3.0mm. A smaller hook is better to ensure the stitches are tight and the flowers hold their shape.
- Stems: 18-gauge floral wire.
- Assembly: A hot glue gun, floral tape, and small Styrofoam balls (1.5 to 2 inches) to act as the base for the blooming heads.
- Extras: A white ceramic pitcher and a purple satin ribbon to finish the look.
Step-by-Step Instructions
1. The Individual Floret (The Petals)
Each large hydrangea head is a cluster of tiny four-petal flowers. Follow the same instructions as above.2.
2. The Decorative Buds (The Spheres)
The image features solid, textured balls interspersed with the flowers. These are made using amigurumi techniques.
- Round 1: 6 Single Crochet (SC) in a Magic Ring.
- Round 2: 2 SC in each stitch (12).
- Round 3: 1 SC, 2 SC in next (18).
- Round 4-6: SC around.
- Round 7: 1 SC, Decrease (12). Stuff with fiberfill.
- Round 8: Decrease around and close.
3. The Sage Green Leaf
Same instructions as above. For the textured look seen in the photo, work a final round of Reverse Single Crochet (Crab Stitch) around the edges.
4. Assembling the Bouquet
- The Head: Apply hot glue to a Styrofoam ball and press your florets onto it until the surface is completely covered.
- The Stem: Wrap floral wire in green yarn or green floral tape. Insert the wire into the base of the Styrofoam ball with a bit of glue.
- The Leaves: Glue the leaves to the stem about 3 inches below the flower head.
Key Techniques to Consider for Success
- Magic Ring: This is essential for flower centers; it allows you to pull the middle tight so there is no visible hole.
- Stitch Definition: This refers to how clearly you can see the individual loops of yarn. High stitch definition makes the flowers look more professional.
- Slow Stitching: The practice of mindful, intentional crafting—perfect for projects like this that require repetitive, calming movements.
Color Ideas
- Antique rose and ivory: the soft vintage look from the photo
- Blue and periwinkle: the classic garden hydrangea
- Sage green and white: a modern, calm look for a neutral room
- Lavender and lilac: a spring bouquet
- Ombré: shade each bloom from pale to deep within one head
Troubleshooting
- Florets curl or look floppy: Go down a hook size, or crochet a bit tighter on the dc stitches.
- Foam shows through: Add more florets, or stick extra ones in the gaps, especially near the stem.
- Heads feel heavy and tilt: Use thicker wire or double up two lengths twisted together.
- Colors look flat: Mix two shades per bloom, and add a bead or French knot center.
- Leaves curl in: Block lightly by steaming without touching, or spritz with a 1:1 mix of white glue and water and let dry flat.
Common Questions
1. How do you make the flowers look more vintage or realistic?
In the image, the colors are muted. Look for heathered or dusty yarn tones rather than bright primaries. You can also use a light touch of pink eyeshadow or fabric marker on the edges of white petals to give them a natural sun-kissed gradient.
2. How do you clean your crochet bouquet?
Dust is the main enemy of fiber art. Use a hairdryer on a cool and low setting to blow away dust, or use a soft-bristled makeup brush to gently clean the petals.
3. What is the best way to display them?
As shown in the image, a simple clear glass apothecary jar or a vintage milk bottle complements the textures of the yarn perfectly. Placing a doily underneath adds to the shabby chic aesthetic.
4. Can you make them without foam?
Yes. Stuff a crochet ball tightly with fiberfill and sew or glue florets on. Foam gives the firmest, rounder result, though.
Why This Pattern Works
Most free hydrangea patterns tell you to just attach lots of small flowers. What actually makes them look real is the density, the overlap, the two-shade mix and the wired, veined leaves. These details take the project from a craft-fair item to something people think you bought.
You aren’t just making a craft; you’re creating a piece of art that brings a sense of calm and beauty to any room. I hope you found these instructions useful. Share your finished projects with us on Facebook and get featured.
You will also like:
50 Free Amigurumi Crochet Patterns that are love
Beginner Crochet Plant Free Pattern for First-time Crocheters






Correct me if I’m wrong, but the pattern does not make the flowers shown in the images… for one thing they should only have five petals and nothing acting as the middle in a different colour? Is there any videos available which explain this (and the leaves?)
You can make these with a combination of 4-petal and 5-petal flower clusters. Only a knot joins the petals at the center to form a flower. To bundle them you can also use floral wire and floral tape (from the center of flower) to secure them together. I hope this helps. In some instances: The middle different color is a thread loop to cover wire.
I will confirm the pattern and update if there is something we are missing. Thank you!