This post may contain affiliate links. Please see our full Disclosure Policy for details.
Bring a touch of rustic charm to your home or handmade gifts with these easy fabric and burlap flowers! These no-sew blooms are perfect for beginners and a great way to upcycle fabric scraps and burlap ribbon.

These decorative flowers make cute toppers for gifts, decorating craft projects like wreaths, bowl fillers, hair clip attachments and even decorating old sweaters or clothes as some examples.

Material for Making Fabric and Burlap Flowers
To make flowers you will need:
- Burlap ribbon or burlap fabric
- Sewing machine or sewing tape
- Cotton fabric scraps (floral, pastel, or patterned work well)
- Hot glue gun and glue sticks
- Scissors (sharp fabric scissors recommended)
- Floral wire or pipe cleaners (optional, for stems)
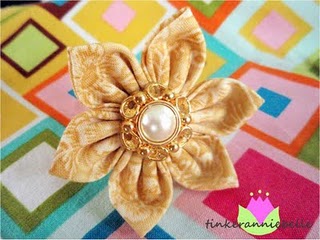
- Felt circles or buttons (optional, for flower centers)

Instructions for Looped Burlap Flowers
1. Cut Loops
Simply start by cutting several strips of burlap or fabric (around 5” wide). Depending upon the size of the flower you want cut an approximate length. These flowers vary from 12 to 30 cm in length.
Now fold about 2″ wide strips into half and press with iron if required. With the help of a sewing machine stitch and over-lock to prevent fraying.
Cut the strip using scissors at every 1/2″ interval vertically. This will give the petals look of the final flower. (photo 2-3). You may also give it a round or almond-shape look for enhanced results.
2. Assemble the Flower
Make a small bud (by rolling a small piece of burlap) and use glue to secure it. Now start rolling the strip on the bud to form flower. Glue at the start, as you go, and at the end. (photo 4-6)

Keep folding around the bud and glue to seal the end.

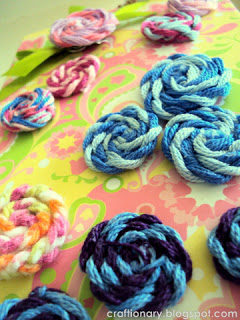
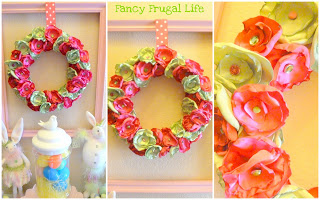
When You are done. You will get burlap flowers that look like this:


Consider making colorful and trendy flowers using pattern fabrics or solid colors.

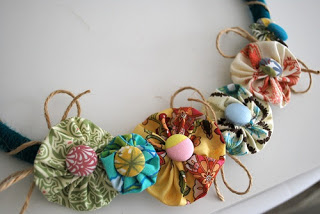
You may combine Burlap and Fabric flowers together for a creative project.


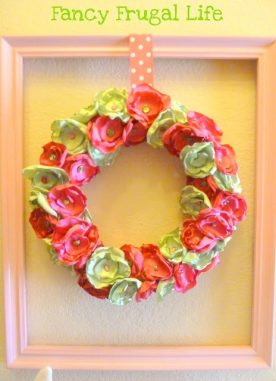
I simply adore different colored handmade flowers put together. They look so spring-like.

These flowers can easily be made using left over fabric scraps as well.


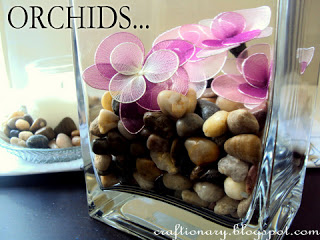
You can find the Spring Wall Art using these flowers.
Optional: Add Stems
If you want to use these flowers in a bouquet or centerpiece simply glue the flower to a floral wire stem. Wrap the stem with floral tape, twine, or green fabric for a polished finish.
Tips for Beautiful Results:
- Fray Control: Lightly singe fabric edges with a lighter or apply fray check for a neater finish.
- Color Combos: Mix textures—pair neutral burlap with soft florals or lace for added charm.
- Theme Ideas: Try seasonal colors—pastels for spring, burnt orange for fall.
Other Handmade Flowers
Looking for more flower ideas, check out these:


Looking for more great ideas? Check out tutorials in the category FLOWERS.
Are you on pinterest? You will also enjoy the Handmade flowers and DIY wall art Boards. These are updated regularly whenever I find unique ideas.


Thanks Denise. You can make a bud by rolling a piece of burlap and gluing it at the start and the end.. I hope that helps! I have a tutorial for that in the coming weeks..
Thanks for visiting.. I hope you will keep visiting in the future.. 🙂
Have a nice day!
deliziosi, grazie per il tutorial
These are great. They look wonderful and seem to be easy as well. But,
What does “Make a small bud” mean? Can you be more specific – or have you posted what that means elsewhere? This is my first visit to your blog.
Thanks.
Wow….I love what you did and then all the other ideas!!! I'm ready to go make some fabric flowers!
I've come to have a small addiction with Burlap, love the flowers. Found you on Made in a Day.
Cute burlap flowers.
These are so awesome, Hani! 🙂
The burlap flower is just beautiful!!!
These are so cute! and I just Love creating with Burlap!!
Nancy
Great idea! Thanks for the tutorial..I can't wait to try this out.
Megan
Love this! Just posted our Kitchen Fun and Crafty Friday link party…would LOVE for you to share this!
This is so creative! I must try this out for my little girls. I just love your blog so much I dad to follow. It would make my day if you came by my blog
Your flowers are so cute and that's a really nice way of doing them!! 🙂
These flowers are so fun! I love them. I need to try these out. Thanks for linking up to Blissful and Domestic
I am loving these flowers. They look so adorable. So many possibilities with these. Thanks for sharing.
Ruth
I LOVE this…going to try this as soon as I get home on sunday!
I love a fabric flower – so cute and colorful!
I love these! I want to try and make them with my girls. I am a new followers. I am truly inspired to try some on these! What a great way to start the week with great positive ideas. Please come by and visit me
Super cute! I'd love it of you linked up to Crafty Cousins!
Fantastic tutorial! These flowers are all the rage right now! Hope you'll stop by and link up
over from the blog hop. they look fab and you make it look so easy but I bet if I tried with all the fabric books I have… well, goodness knows what they will look like!
Love these,thanks for joining us at Creative Mondays 🙂
oops…it was late- you already linked up. 🙂 silly me!
The flowers are oh so cute!Thanks for the tutorial:)
These flowers are great! We'd love for you to link them up to our party!
These are great. I have an obsession with fabric flowers and now I have yours pinned along with my others. Can't wait to try them. Thanks for taking the time to make a tutorial for us.
Thanks so much for the tutorial! I love these! Stopping by from What I Whipped Up Wednesday.
They look great–what a neat idea!
Pinning thanks!
Your beautiful project is being featured tomorrow at Dwell on Friday!
These are SO bright and colorful! They make me so happy! Thanks for sharing at oopsey daisy!
These look so cute and easy to make!! I wish I had more fabric on hand. Thanks for sharing this on the Take it on Tuesday blog hop. I'm pinning this!
Love the texture from the burlap! thanks for sharing at Made for You Monday on Clip with Purpose!
Thank you for linking up your project !!This week’s linky party is up!!! i hope you will stop by and link up another fabulous project…
these are so cute Hani!!
thanks for sharing on Serenity Saturday!
Can't wait to see what you link up later today!
Natasha xxx
Your in the SSTS ON COM today. YAY! winks, jen
OMG love love love this so much! I saw something like this at a boutique and they wanted almost $100 bucks for it!?!?! I am so glad you posted this…I for sure will be making it! You are so crafty!
come check out my blog all about COLOR! I think you'd really enjoy it!
xoxo
Aarean
colorissue.blogspot.com
These are so cute and thanks for the great tutorial! Thanks so much for sharing with the Crafty Blog Stalker!
Very cute flowers! And I love your really easy-to-follow tutorial. Thanks for sharing at I Made It! Monday. Can't wait to see what you have this next week.
Thank you for sharing at The Crafty Blog Stalker. You have been featured! Please stop by and grab a featured button and wear it proudly!
FEATURED!
Gave you a shout out!
I love the burlap flowers! They all look great. Thank you for entering in my Craftastic Competition! Good luck!
i really love diy.. thank for sharing this cute flower ideas.. i’ll try soon 🙂
this is so crafty.I am sure the fabric exchange has so many fabric for this kind of project.