This post may contain affiliate links. Please see our full Disclosure Policy for details.
Penny art is more than a fun upcycling project—it’s a way to turn forgotten coins into meaningful décor while reconnecting with a small piece of history. Every penny tells a story through its shifting designs and materials, especially the change from solid copper before 1982 to a zinc core with a thin copper coat afterward.
These differences actually matter when crafting, as they affect how each coin cleans, ages, and reacts in projects such as mosaic tabletops, wall panels, monograms, trays, and picture frames. When used thoughtfully, pennies act like tiny metal tiles, transforming spare change into something with texture, warmth, and a sense of cultural memory.
Before you start, it’s important to understand these material differences. The guide below walks you through choosing, preparing, and aging pennies the right way, and later you’ll find 30 creative, practical penny art and craft ideas to help you repurpose old coins into durable, long-lasting pieces.
Penny Art Concise Guide
Materials You’ll Need
- Pennies (cleaned or aged)
- Base surface: wooden board, wooden tray, or canvas panel
- Strong adhesive (E6000 or tacky glue)
- Clear sealant or resin topcoat
- Ruler/scale for alignment
- Soft cloth for cleaning
- Optional: Patina solution for aging pennies
Step-by-Step Instructions For Making Art with Pennies:
1: Foundation and Design
- Design: Start with a clean, intentional pattern (e.g., monogram, geometric shape).
- Substrate: Use a solid wood panel or cradled hardboard for stability.
- Prep Surface: Paint the background now if desired. Let it cure completely.
- Prepare Pennies: Clean with mild soap, dry thoroughly, and sort by shine vs. patina for controlled contrast.
2: Adhesion and Assembly
- Adhesive: Use a flexible, industrial-strength bond (E6000 is recommended).
- Application: Work in 4″x4″ sections. Apply adhesive to the substrate or penny back.
- Placement: Use tweezers for precise alignment. Press each penny firmly.
- Cure: Allow 48 hours of undisturbed curing on a flat surface.
3: Finishing and Preservation
- Grouting (Optional): Use sandless grout for mosaic finish. Apply, wait 15 minutes, then haze pennies with a damp sponge.
- Sealing (Essential): Apply 2-3 light coats of UV-resistant acrylic sealant.
- Final Cure: Wait 72 hours before hanging or handling.
Key Principle: Penny art works best when built in slow, solid layers, letting each step set fully. Rushing weakens the piece; patience makes it last.
FAQs
1. Is it legal to use pennies for art?
Yes. In the United States, using coins for crafts or decor is legal as long as you don’t melt them down to resell as metal or alter them to commit fraud. Simply arranging, gluing, or sealing pennies in a mosaic or art piece is fully allowed. Similar rules apply in most countries—pennies in art are considered decorative, not a form of currency misuse. Some suggest that once used as art it cannot be used as currency.
2. What can you do with old pennies?
Old or spare pennies can be used for a wide range of practical and decorative projects. Some popular options include:
- Mosaic tabletops, mirrors, trays, or coasters
- Framed wall art, initials, or monograms
- Decorative letters, numbers, or clocks
- Mixed-media projects combining wood, glass, or resin
- Small keepsakes or DIY jewelry
Essentially, any project where the copper color, texture, and uniform size enhance visual appeal.
3. What is the symbolism of a penny?
Beyond its monetary value, a penny symbolizes luck, prosperity, and mindfulness of small things. In art, it represents transformation—turning something ordinary into something meaningful. Each coin also carries historical value, reflecting the mint year, national symbols, and the evolution of materials from solid copper to copper-plated zinc after 1982.
4. How to age pennies for art?
Aged pennies add depth, contrast, and antique charm to your art. There are two reliable approaches:
1. Natural Patina:
- Expose pennies to air, moisture, and handling over weeks or months.
- They slowly darken, developing brown, green, or blue tones, creating a subtle, authentic look.
2. Artificial Aging:
- Use vinegar, salt, lemon juice, or ammonia to accelerate the oxidation process.
- Specialized patina solutions can create rich antique effects quickly.
- Always rinse and dry pennies thoroughly before gluing or sealing to ensure adhesion and durability.
With the basics covered, the ideas below demonstrate how pennies can be utilized across various crafts, art, and sculptural projects—ranging from practical pieces to purely creative endeavors.
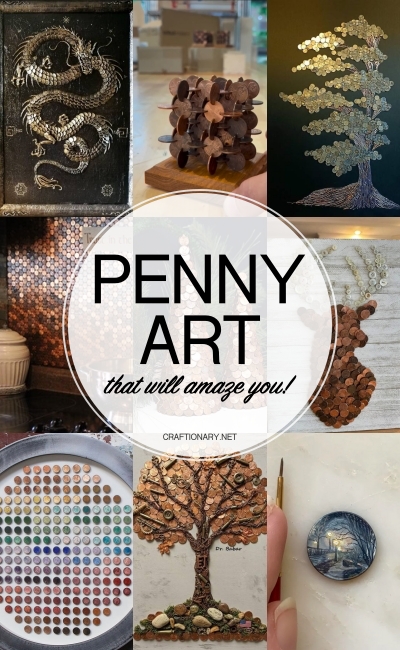
Penny Art Ideas
Creative and Fine Pennies Projects
1. Ombrè Penny Art
Sort pennies by shade and age to create a natural gradient. This technique works well for wall panels and framed art.

Doodle Craft Blog
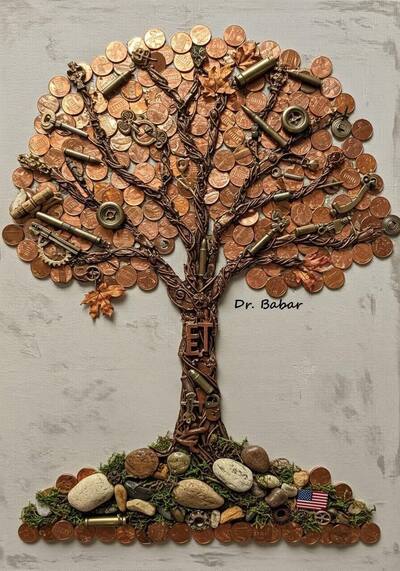
2. Tree of Life Penny Wall Art
Arrange pennies into a Tree of Life design on a wood or canvas base. Varying penny tones help define branches and roots while keeping the piece symbolic and balanced.
3. Penny Tree Art with Wires
Twist and shape wire to form the trunk and branches, then attach pennies as leaves. This style relies only on wire and coins, keeping the design clean and lightweight.

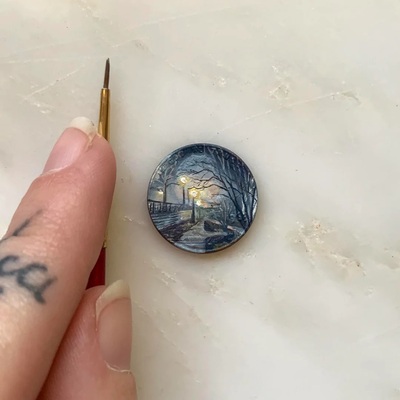
4. Penny Painting Art
Paint directly onto penny surfaces using fine brushes. Sealing locks in detail and prevents chipping.
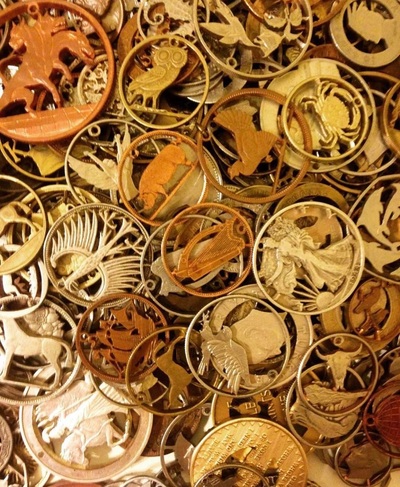
5. Penny Carving/Cutting
Cut or carve pennies into shapes or designs for advanced art pieces. Best suited for display rather than functional use.
6. Penny Milestone Timeline Frame
Mount one penny for each important life date inside a frame. Each coin represents a moment, making this a meaningful keepsake for weddings, anniversaries, or family history displays.
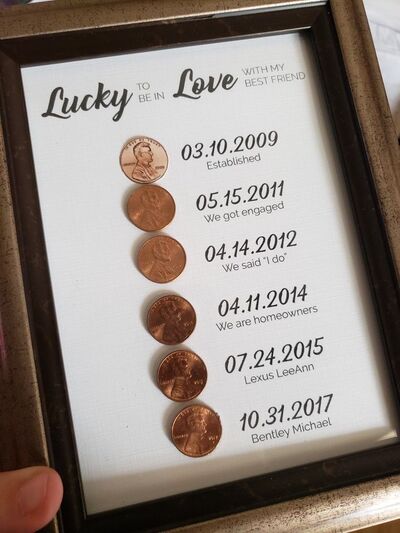
Rabecca Bock
7. Penny Name Sign
Spell out names or words using pennies on a wood base. Planning spacing first keeps letters clean and readable.
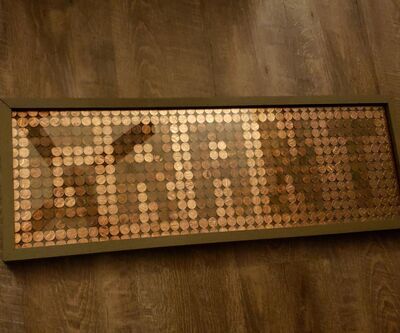
Instructables
8. Glass Fused Copper Pennies
Fuse colored glass onto penny surfaces to create a grid-style mosaic. The glass adds color while the copper base keeps the piece grounded and durable. Best used as framed wall art.

Sculptural and Conceptual Penny Art
9. DIY Penny Cube
Build a cube using layered pennies to explore repetition and form. This works well as modern desk or gallery art

10. 3D Penny Structural Art
Push pennies beyond flat surfaces into architectural forms. These pieces rely on patience and precise alignment.
Megilli Cutti
11. Penny Dragon Relief Art
Layer and slightly overlap pennies to build a raised dragon design. This method adds depth and movement, making it ideal for symbolic or statement wall art.

I Shapes Arts
12. Penny Tap Flow Shadow Box
Fix a real or replica tap inside a shadow box and arrange pennies so they look like they’re pouring out. This type of art often works as wall décor for offices or study spaces.
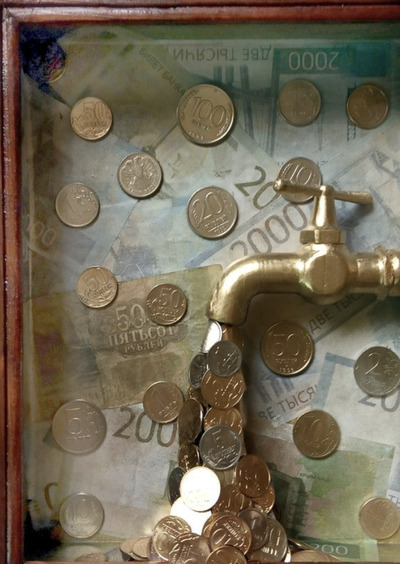
Related: Shadow Box Ideas – Practically Smart Ways to Display
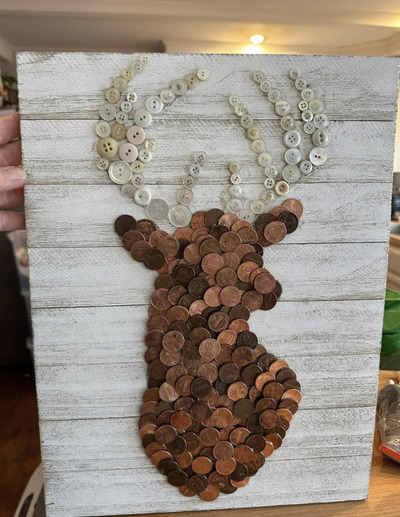
13. Penny Deer Wall Art
Form a deer shape by closely placing pennies on a flat surface. Using different coin shades helps define the outline, making it a strong choice for rustic or nature-themed walls.
14. Penny Grape Cluster Art
Arrange pennies tightly to create the look of a grape bunch and spray paint everything gold. Repetition gives the piece its shape, while added silk leaves, twigs, or a textured background make the design stand out.
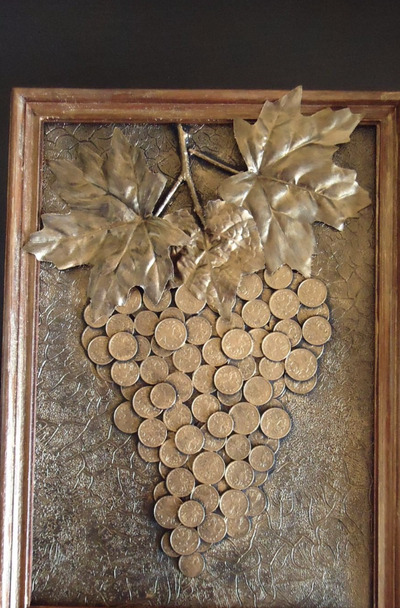
Jocelyn Slynder
Penny Craft Ideas
Wearable and Personal Accessories
15. Classic Penny Buttons
Turn pennies into decorative buttons by drilling and sealing them, then sewing them onto jackets, bags, or craft garments. They add texture and character, but work best on items that aren’t washed often.
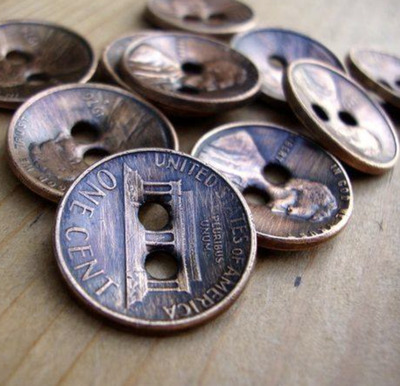
Mark Montano
16. DIY Pressed Penny Bracelets
Flatten pennies and link them together to create bold, rustic bracelets. Smooth the edges and seal them so they’re comfortable for everyday wear..
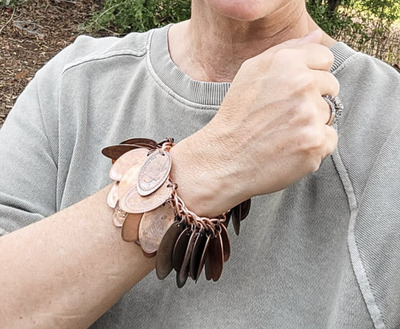
Kim Pepper Blog
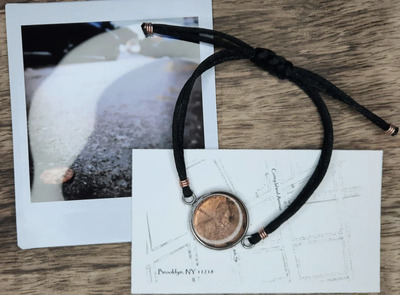
17. Lucky Penny Necklace
Transform a single penny into a pendant by drilling or wire-wrapping it. Choosing a meaningful year makes this piece feel personal rather than decorative.
18. Elegant Penny Earrings
Use pressed pennies as statement earrings that feel lightweight but eye-catching. A good seal keeps them shiny and skin-safe.
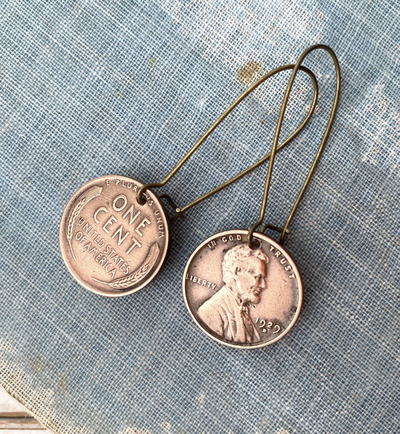
Shop: Red Truck Designs
19. Custom Penny Key Chains
Stamp or paint pennies with names or dates, then attach them to key rings. These make practical keepsakes that get used every day.
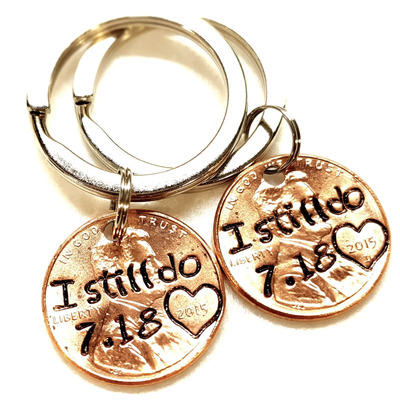
Shop: Rustic Midwest Charm
Home Decor and Functional Crafts
20. Copper Penny Large Wall Clock
Build a clock face using pennies as a full surface layer. The copper tones add depth while keeping the piece fully functional.
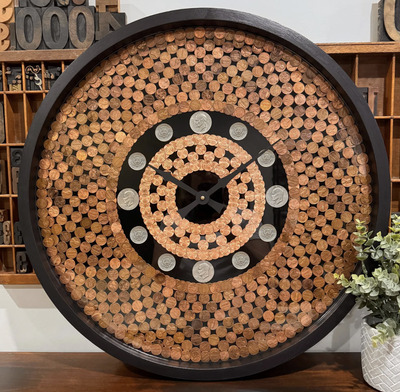
Shop: Fun Cool Wall Clocks
21. Pressed Pennies Wind Chime
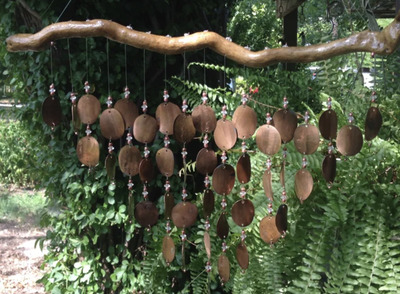
Instructables
Related: Make Wind Chimes (20 Outstanding Ideas)
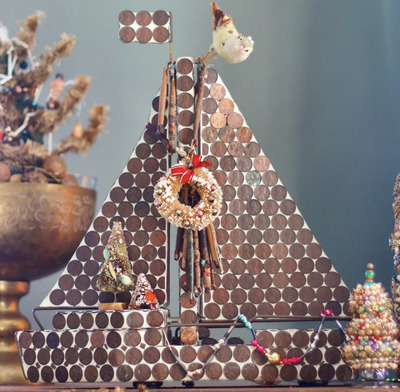
22. DIY Penny Tree Sculpture
Layer pennies onto a cone base to create a tree form. Starting from the bottom keeps it stable, while mixed patina adds depth.

23. Penny Wall Display Frame
Arrange pennies by year, tone, or pattern inside a frame. This works especially well for commemorative or travel-collected coins.
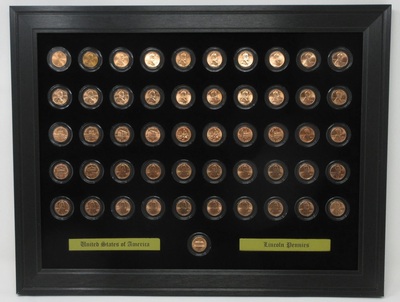
Shop: Games and Frames LLC
24. Penny Backsplash
Tile pennies onto a backsplash area using grout and sealant. The result is water-resistant and adds warmth without patterned tiles.
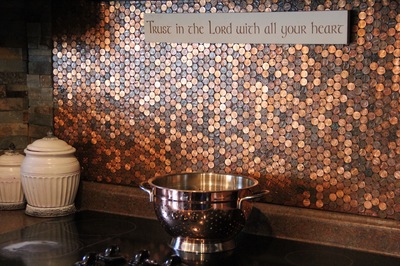
Forget Him Knot
Small Crafts and Keepsakes
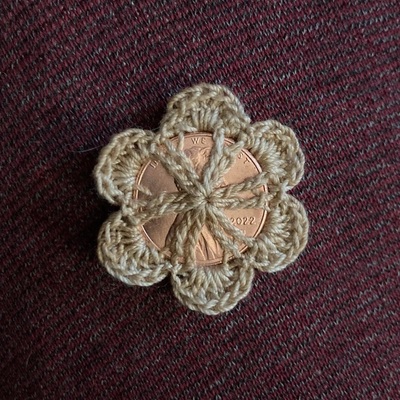
25. Crocheted Penny Brooch
Stitch pennies into crochet work to add weight and contrast. This works best for statement pieces rather than delicate wear.
26. DIY Penny Ornaments
Use a single penny per piece for quick crafts like tags, charms, or gift toppers. They’re easy to personalize with paint or stamping.

Penny art invites you to slow down and look closer. Each coin adds texture, history, and intention to whatever you’re making, whether it’s a functional piece or a work of art. Pick an idea that speaks to you, gather your spare change, and start building something meaningful—one penny at a time.
Written by: Hani Shabbir
Drafted by: Sabah Waqas
You will also like:
25 Crafty Jewelry Art Ideas using Broken or Old Family Items
30 Creative Ways to Decorate Altoid Tin Crafts
100 Things You Can Paint On – Creative Surfaces for Art Lovers